Popular Woodworking 2005-06 № 148, страница 75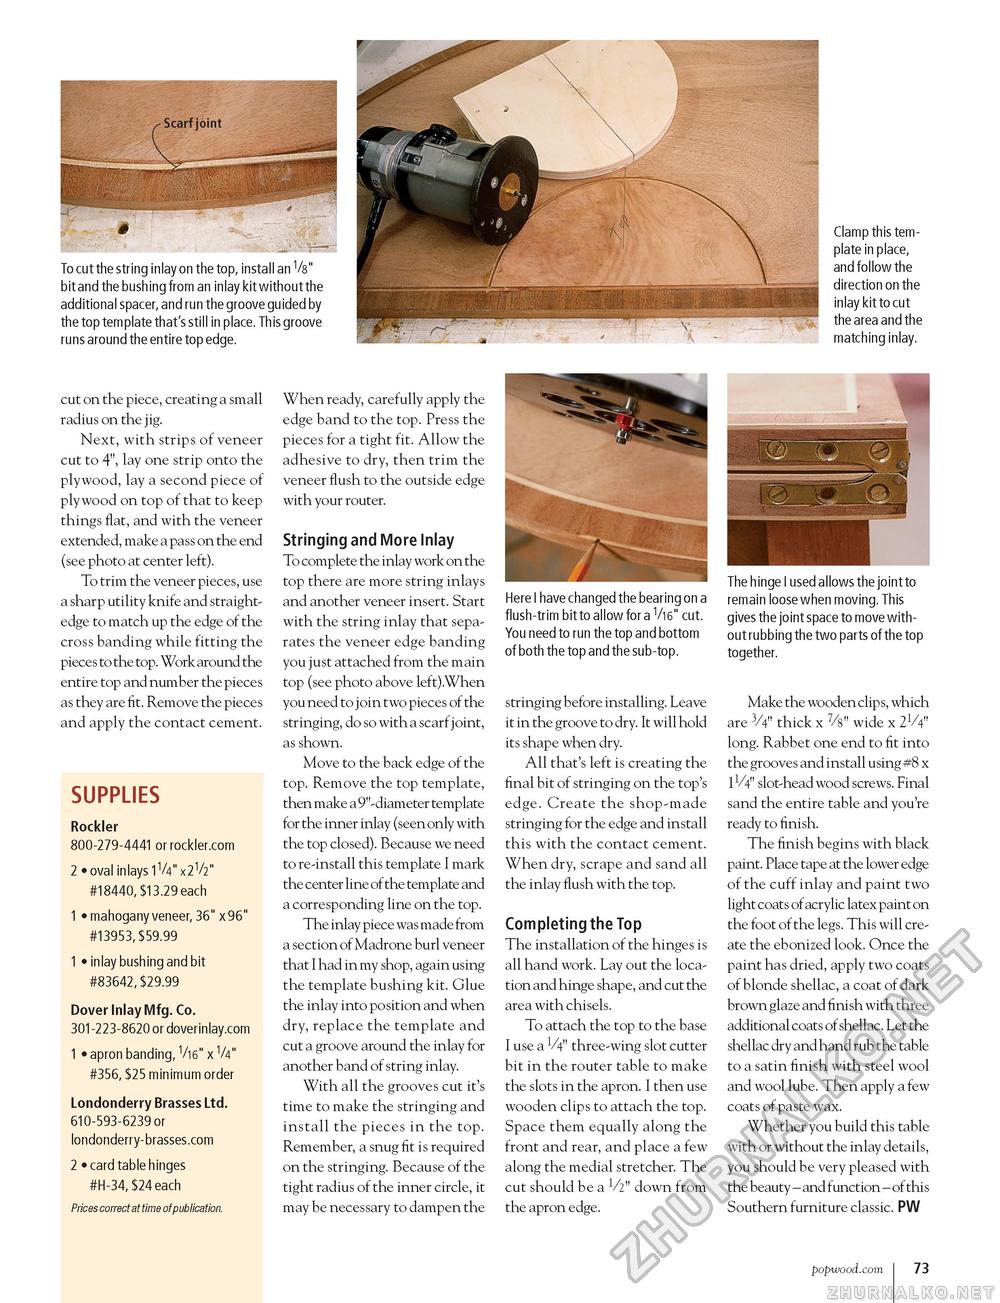
cut on the piece, creating a small radius on the jig. Next, with strips of veneer cut to 4", lay one strip onto the plywood, lay a second piece of plywood on top of that to keep things flat, and with the veneer extended, make a pass on the end (see photo at center left). To trim the veneer pieces, use a sharp utility knife and straightedge to match up the edge of the cross banding while fitting the pieces to the top. Work around the entire top and number the pieces as they are fit. Remove the pieces and apply the contact cement. SUPPLIES Rockler 800-279-4441 or rockler.com 2 • oval inlays 1V4" x 2V2" #18440, $13.29 each 1 • mahogany veneer, 36" x 96" #13953, $59.99 1 • inlay bushing and bit #83642, $29.99 Dover Inlay Mfg. Co. 301 -223-8620 or doverinlay.com 1 • apron banding, Vi6" x V4" #356, $25 minimum order Londonderry Brasses Ltd. 610-593-6239 or londonderry-brasses.com 2 • card table hinges #H-34, $24 each Prices correct at time of publication. When ready, carefully apply the edge band to the top. Press the pieces for a tight fit. Allow the adhesive to dry, then trim the veneer flush to the outside edge with your router. Stringing and More Inlay To complete the inlay work on the top there are more string inlays and another veneer insert. Start with the string inlay that separates the veneer edge banding you just attached from the main top (see photo above left).When you need to join two pieces of the stringing, do so with a scarf joint, as shown. Move to the back edge of the top. Remove the top template, then make a 9"-diameter template for the inner inlay (seen only with the top closed). Because we need to re-install this template I mark the center line of the template and a corresponding line on the top. The inlay piece was made from a section of Madrone burl veneer that I had in my shop, again using the template bushing kit. Glue the inlay into position and when dry, replace the template and cut a groove around the inlay for another band of string inlay. With all the grooves cut it's time to make the stringing and install the pieces in the top. Remember, a snug fit is required on the stringing. Because of the tight radius of the inner circle, it may be necessary to dampen the Here I have changed the bearing on a flush-trim bit to allow for a V16" cut. You need to run the top and bottom of both the top and the sub-top. stringing before installing. Leave it in the groove to dry. It will hold its shape when dry. All that's left is creating the final bit of stringing on the top's edge. Create the shop-made stringing for the edge and install this with the contact cement. When dry, scrape and sand all the inlay flush with the top. Completing the Top The installation of the hinges is all hand work. Lay out the location and hinge shape, and cut the area with chisels. To attach the top to the base I use a V4" three-wing slot cutter bit in the router table to make the slots in the apron. I then use wooden clips to attach the top. Space them equally along the front and rear, and place a few along the medial stretcher. The cut should be a 1/2" down from the apron edge. Clamp this template in place, and follow the direction on the inlay kit to cut the area and the matching inlay. The hinge I used allows the joint to remain loose when moving. This gives the joint space to move without rubbing the two parts of the top together. Make the wooden clips, which are 3/4" thick x 7/8" wide x 21/4" long. Rabbet one end to fit into the grooves and install using #8 x IV4" slot-head wood screws. Final sand the entire table and you're ready to finish. The finish begins with black paint. Place tape at the lower edge of the cuff inlay and paint two light coats of acrylic latex paint on the foot of the legs. This will create the ebonized look. Once the paint has dried, apply two coats of blonde shellac, a coat of dark brown glaze and finish with three additional coats of shellac. Let the shellac dry and hand rub the table to a satin finish with steel wool and wool lube. Then apply a few coats of paste wax. Whether you build this table with or without the inlay details, you should be very pleased with the beauty - and function - of this Southern furniture classic. PW popwood.com 73 |


