Popular Woodworking 2005-08 № 149, страница 52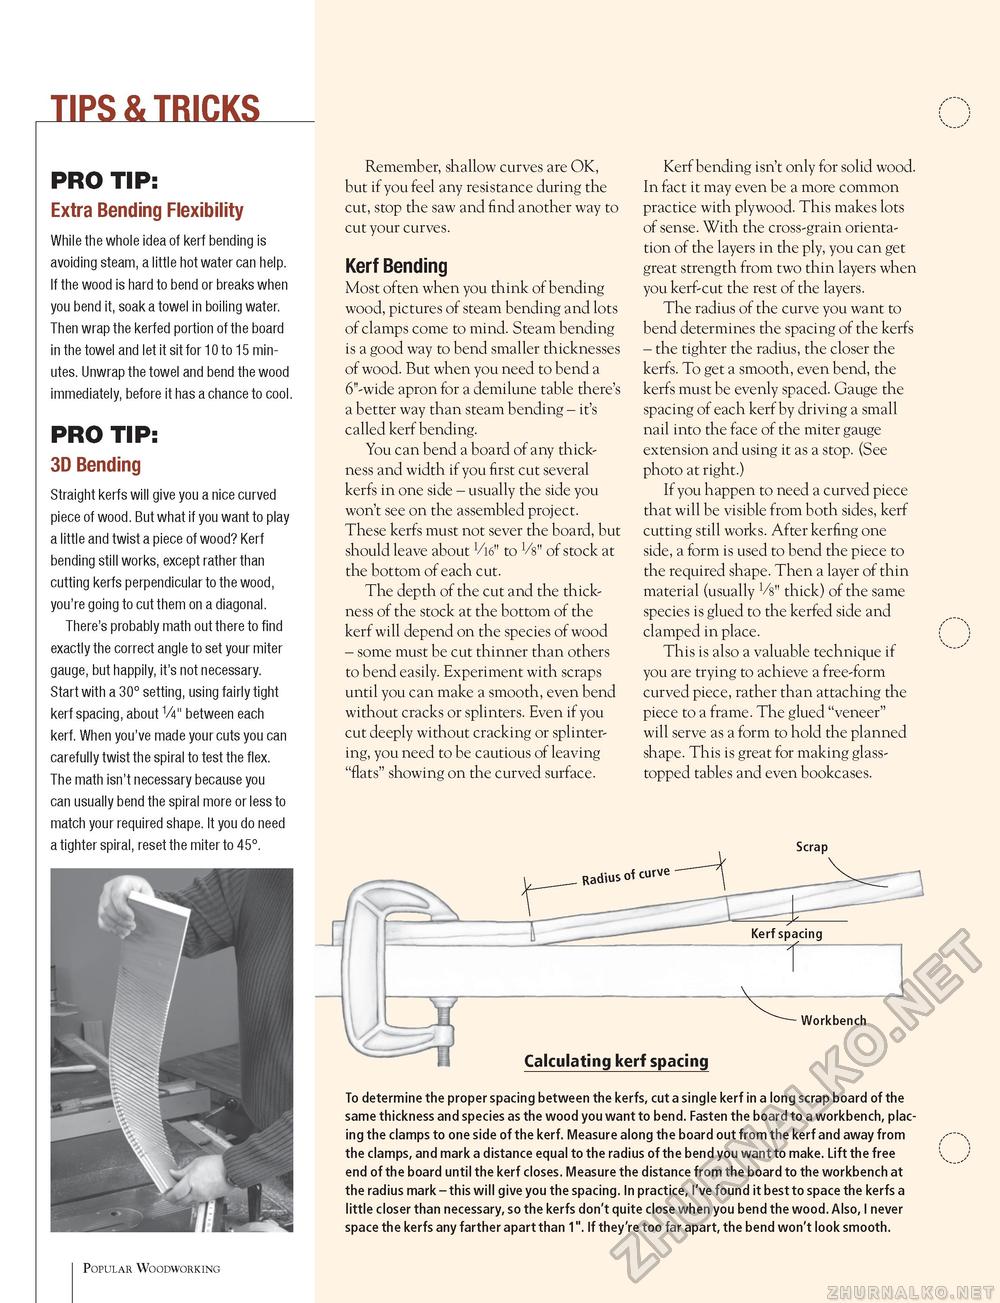
TIPS & TRICKSPRO TIP: Extra Bending Flexibility While the whole idea of kerf bending is avoiding steam, a little hot water can help. If the wood is hard to bend or breaks when you bend it, soak a towel in boiling water. Then wrap the kerfed portion of the board in the towel and let it sit for 10 to 15 minutes. Unwrap the towel and bend the wood immediately, before it has a chance to cool. PRO TIP: 3D Bending Straight kerfs will give you a nice curved piece of wood. But what if you want to play a little and twist a piece of wood? Kerf bending still works, except rather than cutting kerfs perpendicular to the wood, you're going to cut them on a diagonal. There's probably math out there to find exactly the correct angle to set your miter gauge, but happily, it's not necessary. Start with a 30° setting, using fairly tight kerf spacing, about 1/4" between each kerf. When you've made your cuts you can carefully twist the spiral to test the flex. The math isn't necessary because you can usually bend the spiral more or less to match your required shape. It you do need a tighter spiral, reset the miter to 45°. Remember, shallow curves are OK, but if you feel any resistance during the cut, stop the saw and find another way to cut your curves. Kerf Bending Most often when you think of bending wood, pictures of steam bending and lots of clamps come to mind. Steam bending is a good way to bend smaller thicknesses of wood. But when you need to bend a 6"-wide apron for a demilune table there's a better way than steam bending - it's called kerf bending. You can bend a board of any thickness and width if you first cut several kerfs in one side - usually the side you won't see on the assembled project. These kerfs must not sever the board, but should leave about 16" to Vs" of stock at the bottom of each cut. The depth of the cut and the thickness of the stock at the bottom of the kerf will depend on the species of wood - some must be cut thinner than others to bend easily. Experiment with scraps until you can make a smooth, even bend without cracks or splinters. Even if you cut deeply without cracking or splintering, you need to be cautious of leaving "flats" showing on the curved surface. Kerf bending isn't only for solid wood. In fact it may even be a more common practice with plywood. This makes lots of sense. With the cross-grain orientation of the layers in the ply, you can get great strength from two thin layers when you kerf-cut the rest of the layers. The radius of the curve you want to bend determines the spacing of the kerfs - the tighter the radius, the closer the kerfs. To get a smooth, even bend, the kerfs must be evenly spaced. Gauge the spacing of each kerf by driving a small nail into the face of the miter gauge extension and using it as a stop. (See photo at right.) If you happen to need a curved piece that will be visible from both sides, kerf cutting still works. After kerfing one side, a form is used to bend the piece to the required shape. Then a layer of thin material (usually Ms" thick) of the same species is glued to the kerfed side and clamped in place. This is also a valuable technique if you are trying to achieve a free-form curved piece, rather than attaching the piece to a frame. The glued "veneer" will serve as a form to hold the planned shape. This is great for making glass-topped tables and even bookcases. To determine the proper spacing between the kerfs, cut a single kerf in a long scrap board of the same thickness and species as the wood you want to bend. Fasten the board to a workbench, placing the clamps to one side of the kerf. Measure along the board out from the kerf and away from the clamps, and mark a distance equal to the radius of the bend you want to make. Lift the free end of the board until the kerf closes. Measure the distance from the board to the workbench at the radius mark - this will give you the spacing. In practice, I've found it best to space the kerfs a little closer than necessary, so the kerfs don't quite close when you bend the wood. Also, I never space the kerfs any farther apart than 1". If they're too far apart, the bend won't look smooth. Popular Woodworking |


