Popular Woodworking 2005-08 № 149, страница 51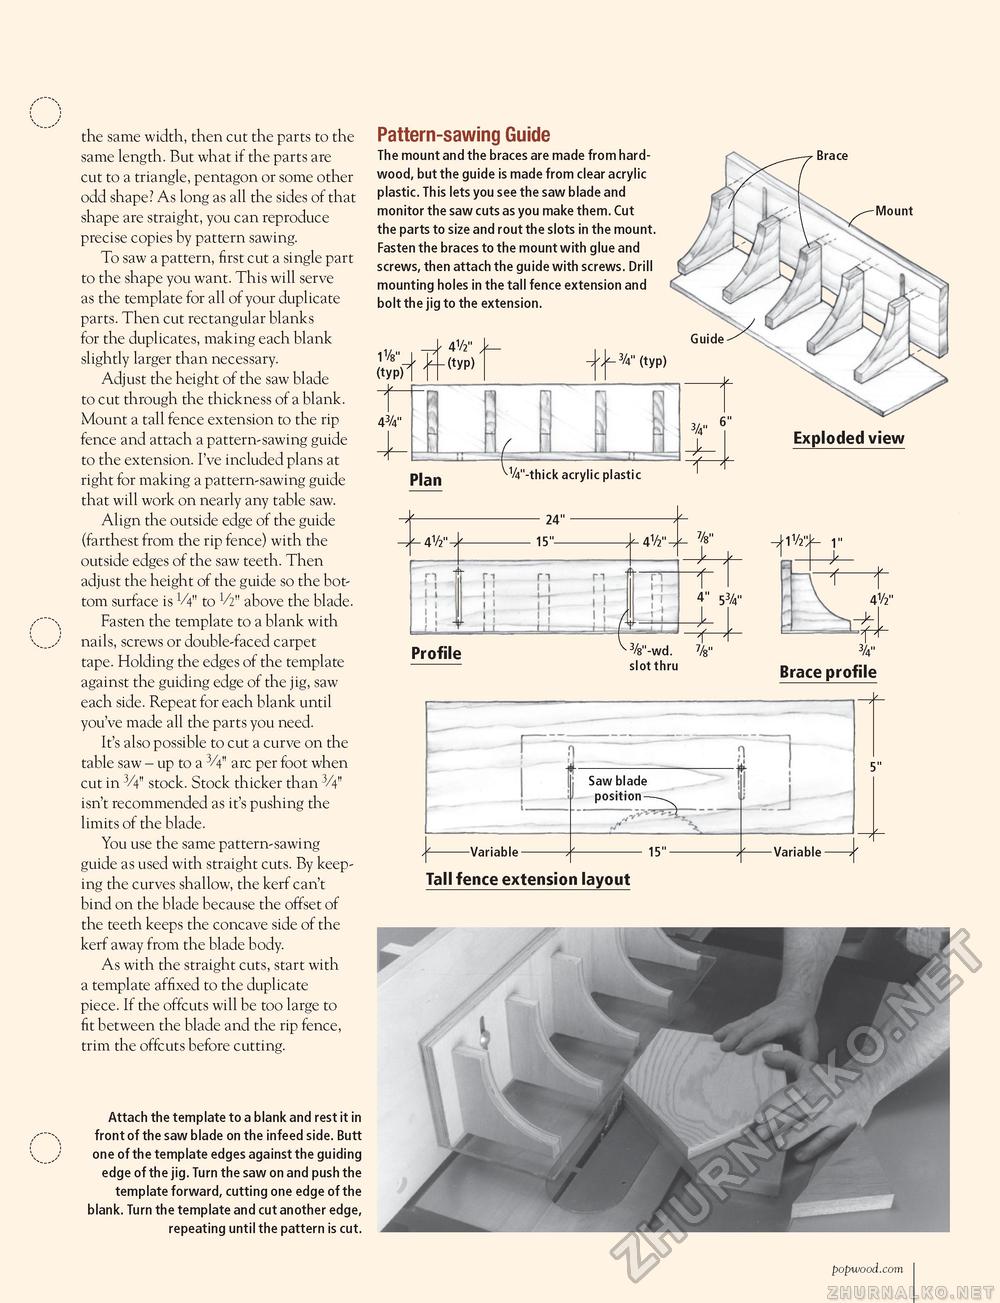
the same width, then cut the parts to the same length. But what if the parts are cut to a triangle, pentagon or some other odd shape? As long as all the sides of that shape are straight, you can reproduce precise copies by pattern sawing. To saw a pattern, first cut a single part to the shape you want. This will serve as the template for all of your duplicate parts. Then cut rectangular blanks for the duplicates, making each blank slightly larger than necessary. Adjust the height of the saw blade to cut through the thickness of a blank. Mount a tall fence extension to the rip fence and attach a pattern-sawing guide to the extension. I've included plans at right for making a pattern-sawing guide that will work on nearly any table saw. Align the outside edge of the guide (farthest from the rip fence) with the outside edges of the saw teeth. Then adjust the height of the guide so the bottom surface is to V2" above the blade. Fasten the template to a blank with nails, screws or double-faced carpet tape. Holding the edges of the template against the guiding edge of the jig, saw each side. Repeat for each blank until you've made all the parts you need. It's also possible to cut a curve on the table saw - up to a 3/4" arc per foot when cut in 3/4" stock. Stock thicker than 3/4" isn't recommended as it's pushing the limits of the blade. You use the same pattern-sawing guide as used with straight cuts. By keeping the curves shallow, the kerf can't bind on the blade because the offset of the teeth keeps the concave side of the kerf away from the blade body. As with the straight cuts, start with a template affixed to the duplicate piece. If the offcuts will be too large to fit between the blade and the rip fence, trim the offcuts before cutting. Attach the template to a blank and rest it in front of the saw blade on the infeed side. Butt one of the template edges against the guiding edge of the jig. Turn the saw on and push the template forward, cutting one edge of the blank. Turn the template and cut another edge, repeating until the pattern is cut. Pattern-sawing Guide The mount and the braces are made from hardwood, but the guide is made from clear acrylic plastic. This lets you see the saw blade and monitor the saw cuts as you make them. Cut the parts to size and rout the slots in the mount. Fasten the braces to the mount with glue and screws, then attach the guide with screws. Drill mounting holes in the tall fence extension and bolt the jig to the extension. Brace Mount 11/s" (typ) r 43/4" I' 4V2" (typ) Plan V4"-thick acrylic plastic Exploded view 24" -4V2" 15" - 4V2" i 1 1 f ! 1 n 1 1 1 1 1 i 1 _Lk ci 1 1 II 11 rr L-Z^ 7/b" 4" 53/4" Profile *3/8"-wd. 7/b" slot thru Brace profile Tall fence extension layout popwood.com I 51 |


