Popular Woodworking 2005-08 № 149, страница 48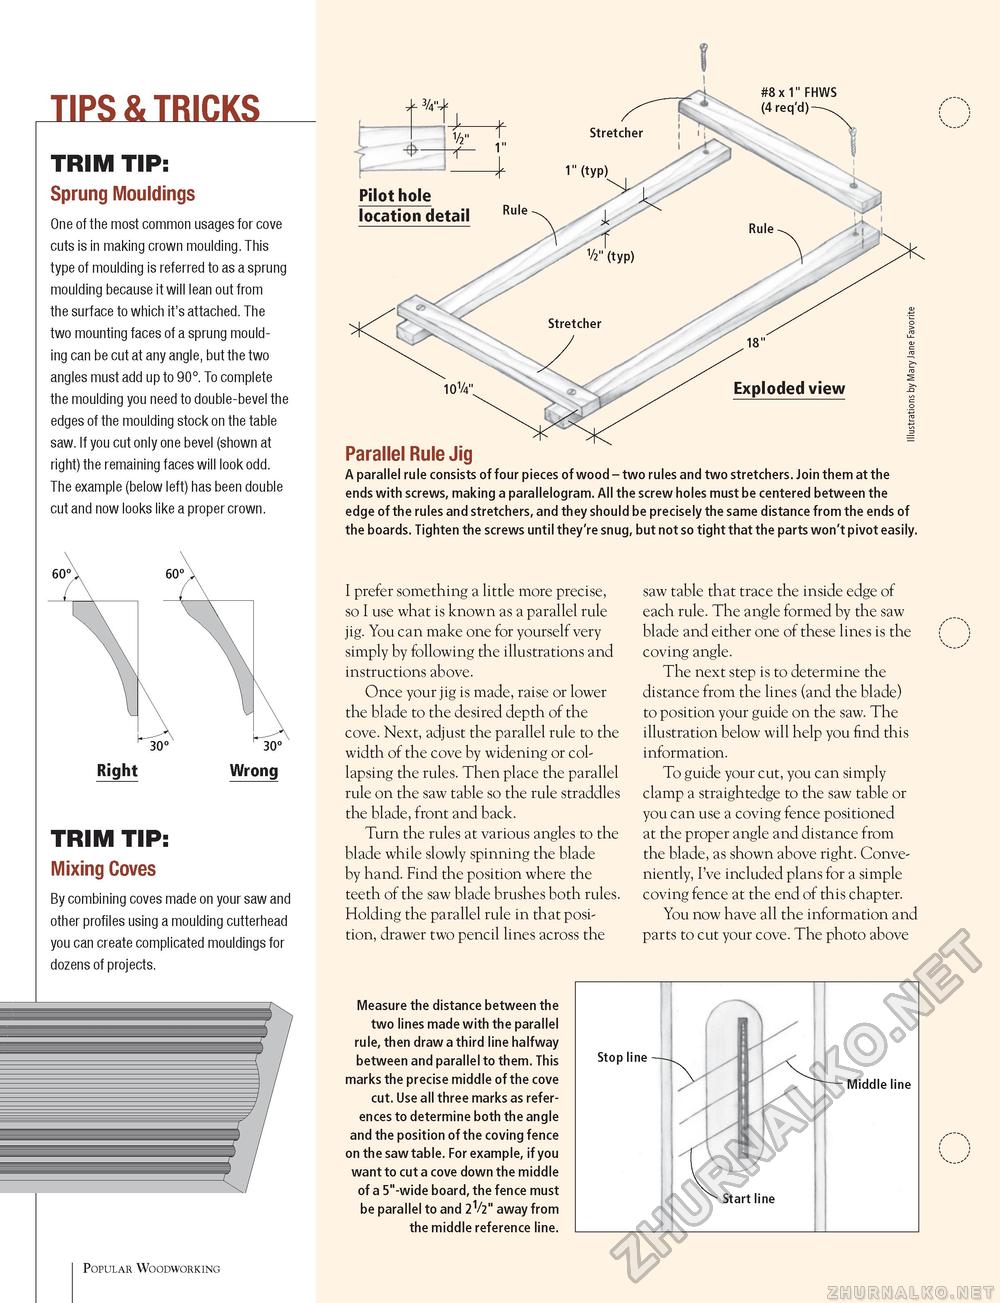
TIPS & TRICKSTRIM TIP: Sprung Mouldings One of the most common usages for cove cuts is in making crown moulding. This type of moulding is referred to as a sprung moulding because it will lean out from the surface to which it's attached. The two mounting faces of a sprung moulding can be cut at any angle, but the two angles must add up to 90°. To complete the moulding you need to double-bevel the edges of the moulding stock on the table saw. If you cut only one bevel (shown at right) the remaining faces will look odd. The example (below left) has been double cut and now looks like a proper crown. Right Wrong TRIM TIP: Mixing Coves By combining coves made on your saw and other profiles using a moulding cutterhead you can create complicated mouldings for dozens of projects. t i Parallel Rule Jig A parallel rule consists of four pieces of wood - two rules and two stretchers. Join them at the ends with screws, making a parallelogram. All the screw holes must be centered between the edge of the rules and stretchers, and they should be precisely the same distance from the ends of the boards. Tighten the screws until they're snug, but not so tight that the parts won't pivot easily. I prefer something a little more precise, so I use what is known as a parallel rule jig. You can make one for yourself very simply by following the illustrations and instructions above. Once your jig is made, raise or lower the blade to the desired depth of the cove. Next, adjust the parallel rule to the width of the cove by widening or collapsing the rules. Then place the parallel rule on the saw table so the rule straddles the blade, front and back. Turn the rules at various angles to the blade while slowly spinning the blade by hand. Find the position where the teeth of the saw blade brushes both rules. Holding the parallel rule in that position, drawer two pencil lines across the saw table that trace the inside edge of each rule. The angle formed by the saw blade and either one of these lines is the coving angle. The next step is to determine the distance from the lines (and the blade) to position your guide on the saw. The illustration below will help you find this information. To guide your cut, you can simply clamp a straightedge to the saw table or you can use a coving fence positioned at the proper angle and distance from the blade, as shown above right. Conveniently, I've included plans for a simple coving fence at the end of this chapter. You now have all the information and parts to cut your cove. The photo above Measure the distance between the two lines made with the parallel rule, then draw a third line halfway between and parallel to them. This marks the precise middle of the cove cut. Use all three marks as references to determine both the angle and the position of the coving fence on the saw table. For example, if you want to cut a cove down the middle of a 5"-wide board, the fence must be parallel to and 21/2" away from the middle reference line. Popular Woodworking |


