Popular Woodworking 2005-08 № 149, страница 82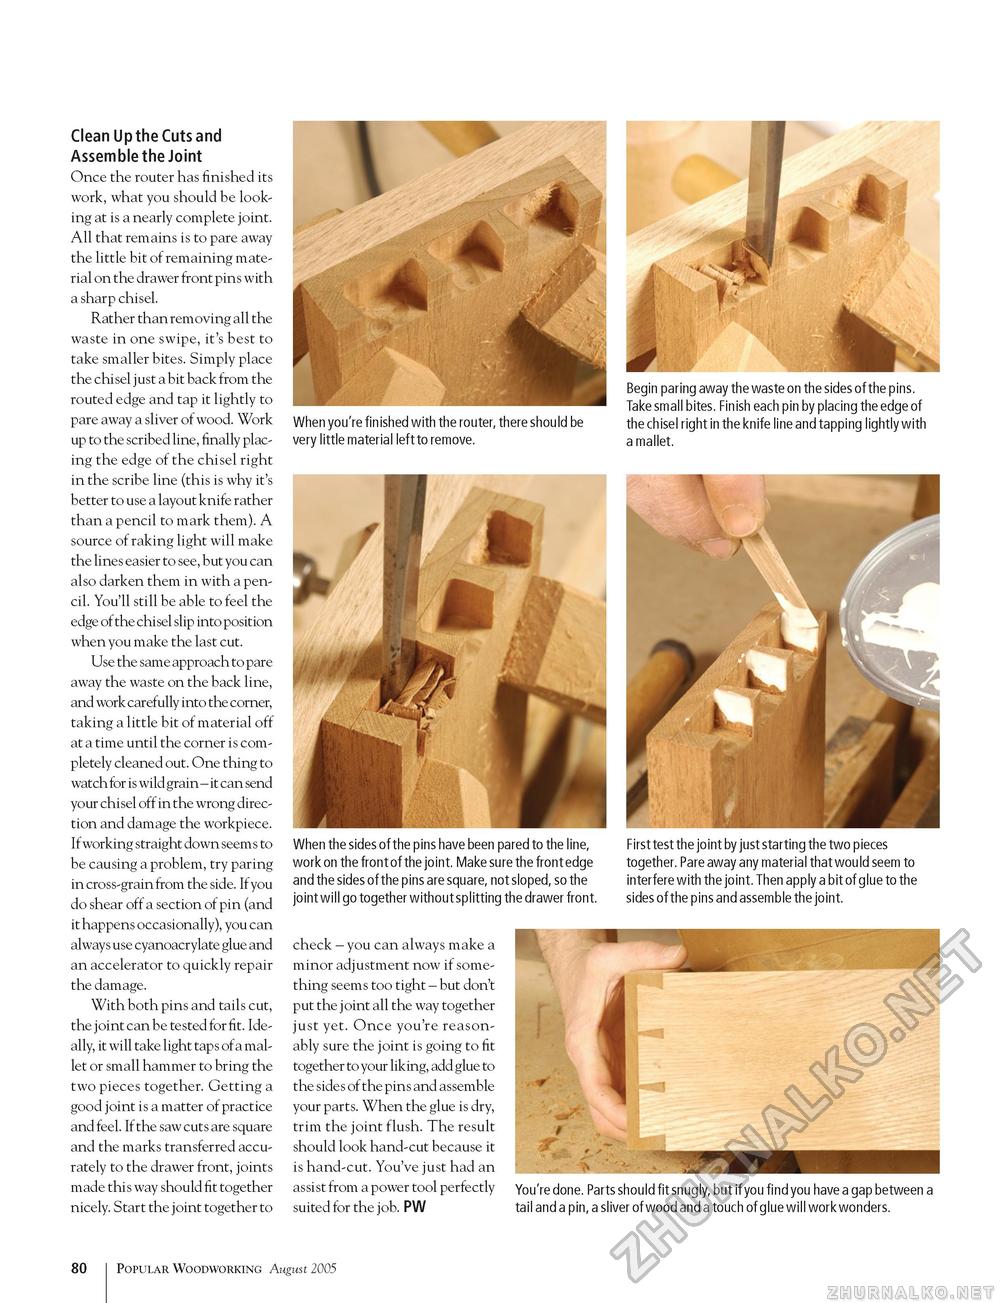
Clean Up the Cuts and Assemble the Joint Once the router has finished its work, what you should be looking at is a nearly complete joint. All that remains is to pare away the little bit of remaining material on the drawer front pins with a sharp chisel. Rather than removing all the waste in one swipe, it's best to take smaller bites. Simply place the chisel just a bit back from the routed edge and tap it lightly to pare away a sliver of wood. Work up to the scribed line, finally placing the edge of the chisel right in the scribe line (this is why it's better to use a layout knife rather than a pencil to mark them). A source of raking light will make the lines easier to see, but you can also darken them in with a pencil. You'll still be able to feel the edge of the chisel slip into position when you make the last cut. Use the same approach to pare away the waste on the back line, and work carefully into the corner, taking a little bit of material off at a time until the corner is completely cleaned out. One thing to watch for is wild grain - it can send your chisel off in the wrong direction and damage the workpiece. If working straight down seems to be causing a problem, try paring in cross-grain from the side. If you do shear off a section of pin (and it happens occasionally), you can always use cyanoacrylate glue and an accelerator to quickly repair the damage. With both pins and tails cut, the joint can be tested for fit. Ideally, it will take light taps ofa mallet or small hammer to bring the two pieces together. Getting a good joint is a matter of practice and feel. If the saw cuts are square and the marks transferred accurately to the drawer front, joints made this way should fit together nicely. Start the joint together to When you're finished with the router, there should be very little material left to remove. Begin paring away the waste on the sides of the pins. Take small bites. Finish each pin by placing the edge of the chisel right in the knife line and tapping lightly with a mallet. When the sides of the pins have been pared to the line, work on the front of the joint. Make sure the front edge and the sides of the pins are square, not sloped, so the joint will go together without splitting the drawer front. check - you can always make a minor adjustment now if something seems too tight - but don't put the joint all the way together just yet. Once you're reasonably sure the joint is going to fit together to your liking, add glue to the sides of the pins and assemble your parts. When the glue is dry, trim the joint flush. The result should look hand-cut because it is hand-cut. You've just had an assist from a power tool perfectly suited for the job. PW First test the joint by just starting the two pieces together. Pare away any material that wou ld seem to interfere with the joint. Then apply a bit of glue to the sides of the pins and assemble the joint. You're done. Parts should fit snugly, but if you find you have a gap between a tail and a pin, a sliver of wood and a touch of glue will work wonders. 80 Popular Woodworking August 2005 |


