Popular Woodworking 2006-02 № 153, страница 70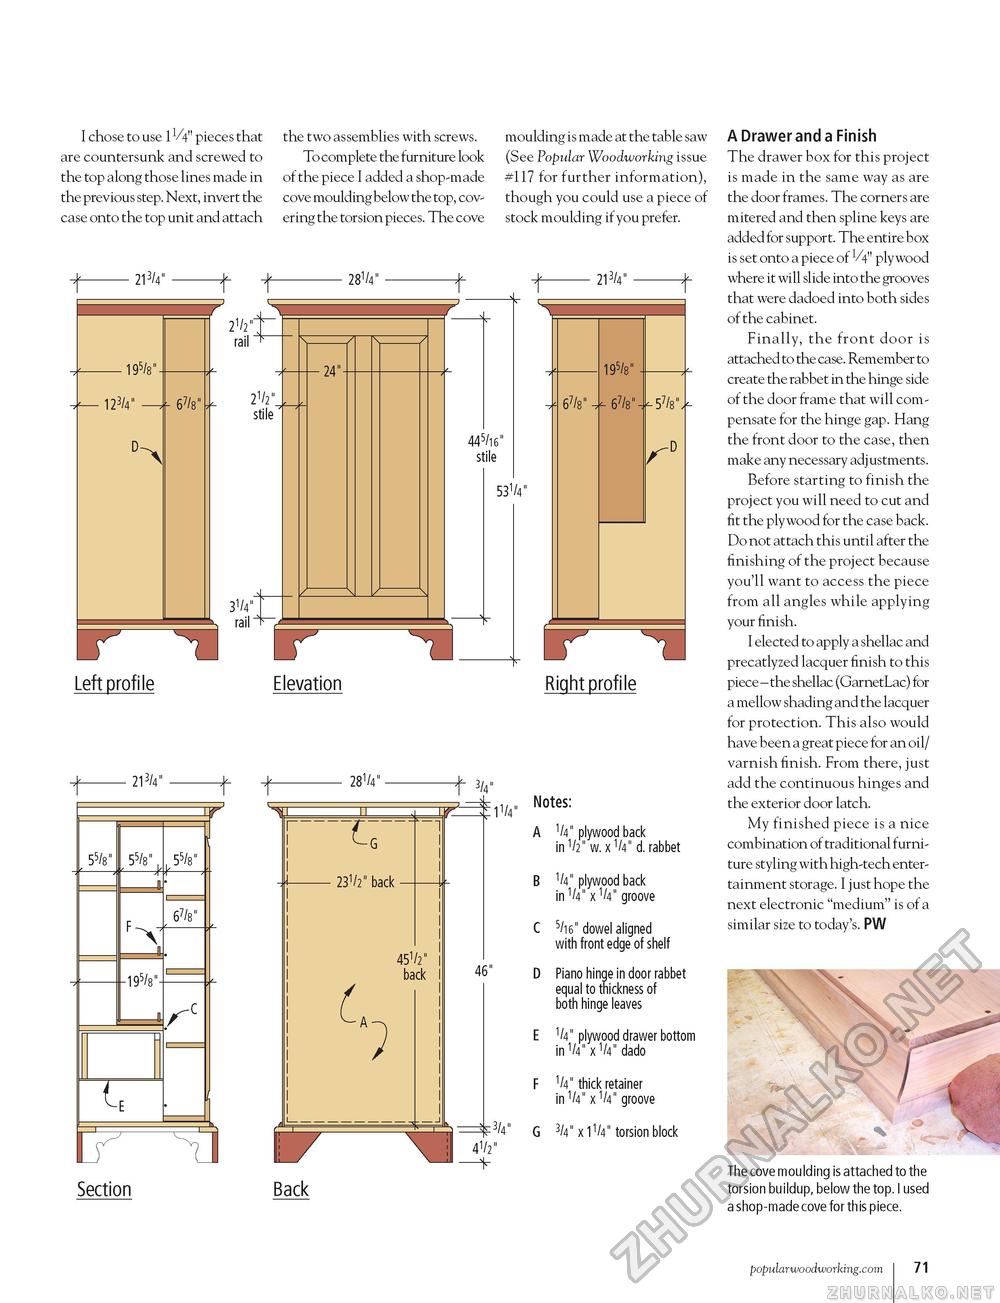
moulding is made at the table saw (See Popular Woodworking issue I chose to use 11/4" pieces that the two assemblies with screws. are countersunk and screwed to To complete the furniture look the top along those lines made in of the piece I added a shop-made #117 for further information), the previous step. Next, invert the cove moulding below the top, cov- though you could use a piece of case onto the top unit and attach ering the torsion pieces. The cove 213/4" f t 281/4" stock moulding if you prefer. 213/4" ■195/8" 123/4" 67/8M 2V rail 2V2 stile" 3V4 rail ^ 24" M_VL 445/i6" stile 53V 195/8" ■57/8" Left profile 213/4" Elevation Right profile 28V 55/8" 55/8" -^ ■195/8" L 55/8" 6?/8" r- T, -G 23 V back L 451/2" back 13/4" 5^=|l1/4" Notes: A V' plywood back in V w.xV d. rabbet 46" f3/4" 41/2" B 1/4m plywood back in V x V groove C 5/i6" dowel aligned with front edge of shelf D Piano hinge in door rabbet equal to thickness of both hinge leaves E Vplywooddrawerbottom inV xV dado F 1/4" thick retainer inV x1/4" groove G 3/4M x 11/4" torsion block Section Back A Drawer and a Finish The drawer box for this project is made in the same way as are the door frames. The corners are mitered and then spline keys are added for support. The entire box is set onto a piece of 1/4" plywood where it will slide into the grooves that were dadoed into both sides of the cabinet. Finally, the front door is attached to the case. Remember to create the rabbet in the hinge side of the door frame that will compensate for the hinge gap. Hang the front door to the case, then make any necessary adjustments. Before starting to finish the project you will need to cut and fit the plywood for the case back. Do not attach this until after the finishing of the project because you'll want to access the piece from all angles while applying your finish. I elected to apply a shellac and precatlyzed lacquer finish to this piece - the shellac (GarnetLac) for a mellow shading and the lacquer for protection. This also would have been a great piece for an oil/ varnish finish. From there, just add the continuous hinges and the exterior door latch. My finished piece is a nice combination of traditional furniture styling with high-tech entertainment storage. I just hope the next electronic "medium" is of a similar size to today's. PW The cove moulding is attached to the torsion buildup, below the top. I used a shop-made cove for th is piece. popularwoodworking.com I 103 |


