Popular Woodworking 2006-04 № 154, страница 81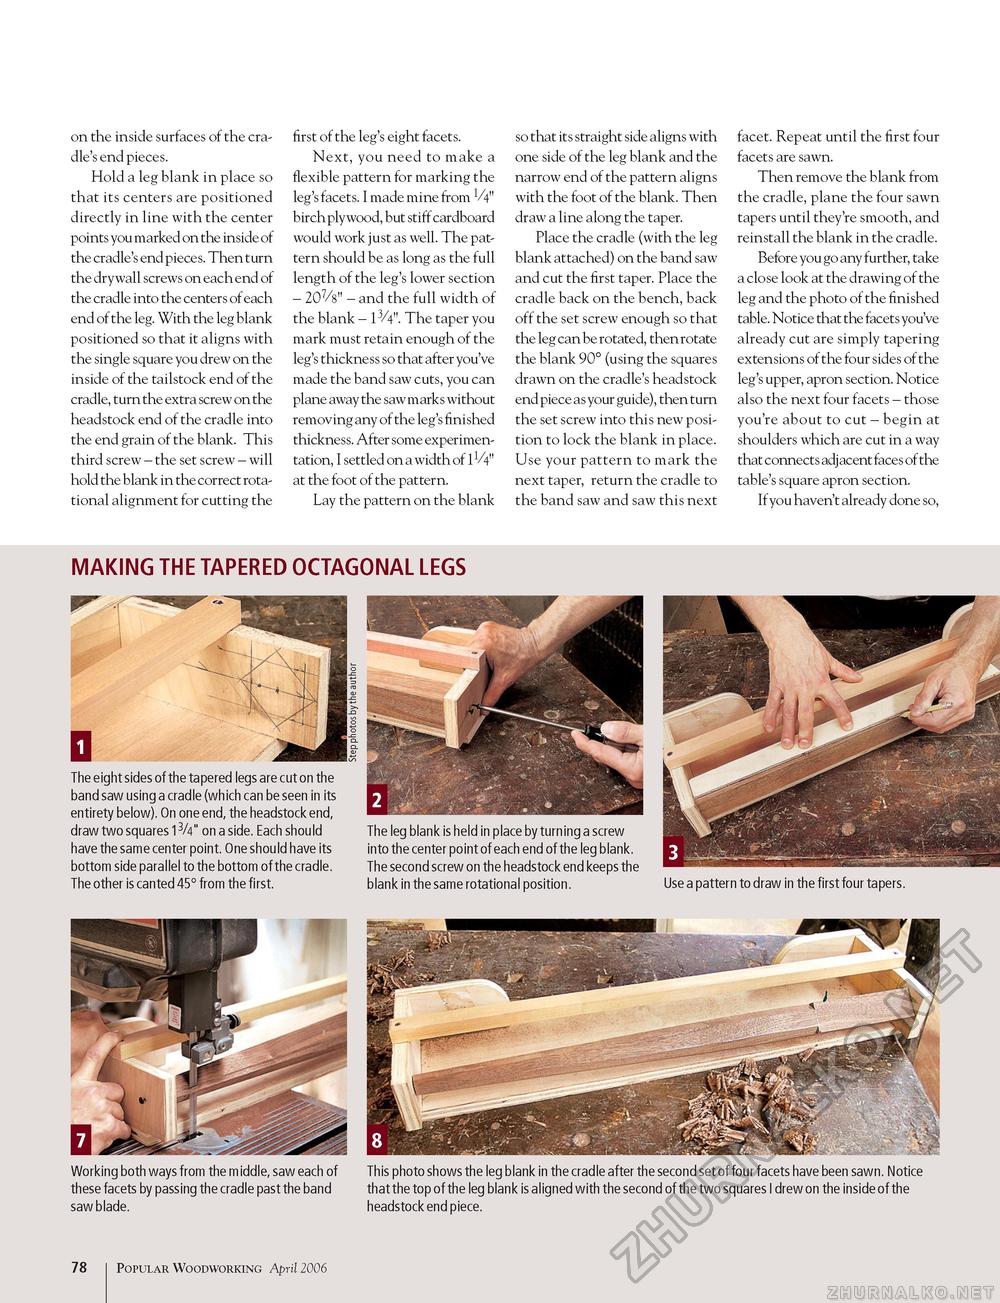
on the inside surfaces of the cradle's end pieces. Hold a leg blank in place so that its centers are positioned directly in line with the center points you marked on the inside of the cradle's end pieces. Then turn the dry wall screws on each end of the cradle into the centers of each end of the leg. With the leg blank positioned so that it aligns with the single square you drew on the inside of the tailstock end of the cradle, turn the extra screw on the headstock end of the cradle into the end grain of the blank. This third screw - the set screw - will hold the blank in the correct rotational alignment for cutting the first of the leg's eight facets. Next, you need to make a flexible pattern for marking the leg's facets. I made mine from 1/4" birch plywood, but stiff cardboard would work just as well. The pattern should be as long as the full length of the leg's lower section - 207/8" - and the full width of the blank - 13/4". The taper you mark must retain enough of the leg's thickness so that after you've made the band saw cuts, you can plane away the saw marks without removing any of the leg's finished thickness. After some experimentation, I settled on a width of IV4" at the foot of the pattern. Lay the pattern on the blank so that its straight side aligns with one side of the leg blank and the narrow end of the pattern aligns with the foot of the blank. Then draw a line along the taper. Place the cradle (with the leg blank attached) on the band saw and cut the first taper. Place the cradle back on the bench, back off the set screw enough so that the leg can be rotated, then rotate the blank 90° (using the squares drawn on the cradle's headstock end piece as your guide), then turn the set screw into this new position to lock the blank in place. Use your pattern to mark the next taper, return the cradle to the band saw and saw this next facet. Repeat until the first four facets are sawn. Then remove the blank from the cradle, plane the four sawn tapers until they're smooth, and reinstall the blank in the cradle. Before you go any further, take a close look at the drawing of the leg and the photo of the finished table. Notice that the facets you've already cut are simply tapering extensions of the four sides of the leg's upper, apron section. Notice also the next four facets - those you're about to cut - begin at shoulders which are cut in a way that connects adj acent faces of the table's square apron section. If you haven't already done so, MAKING THE TAPERED OCTAGONAL LEGS The eight sides of the tapered legs are cut on the band saw using a cradle (which can be seen in its entirety below). On one end, the headstock end, draw two squares 13/4" on a side. Each should have the same center point. One should have its bottom side parallel to the bottom of the cradle. The other is canted 45° from the first. The leg blank is held in place by turning a screw into the center point of each end of the leg blank. The second screw on the headstock end keeps the blank in the same rotational position. Use a pattern to draw in the first four tapers. Working both ways from the middle, saw each of these facets by passing the cradle past the band saw blade. This photo shows the leg blank in the cradle after the second set of four facets have been sawn. Notice that the top of the leg blank is aligned with the second of the two squares I drew on the inside of the headstock end piece. 78 Popular Woodworking April 2006 |


