Popular Woodworking 2006-04 № 154, страница 82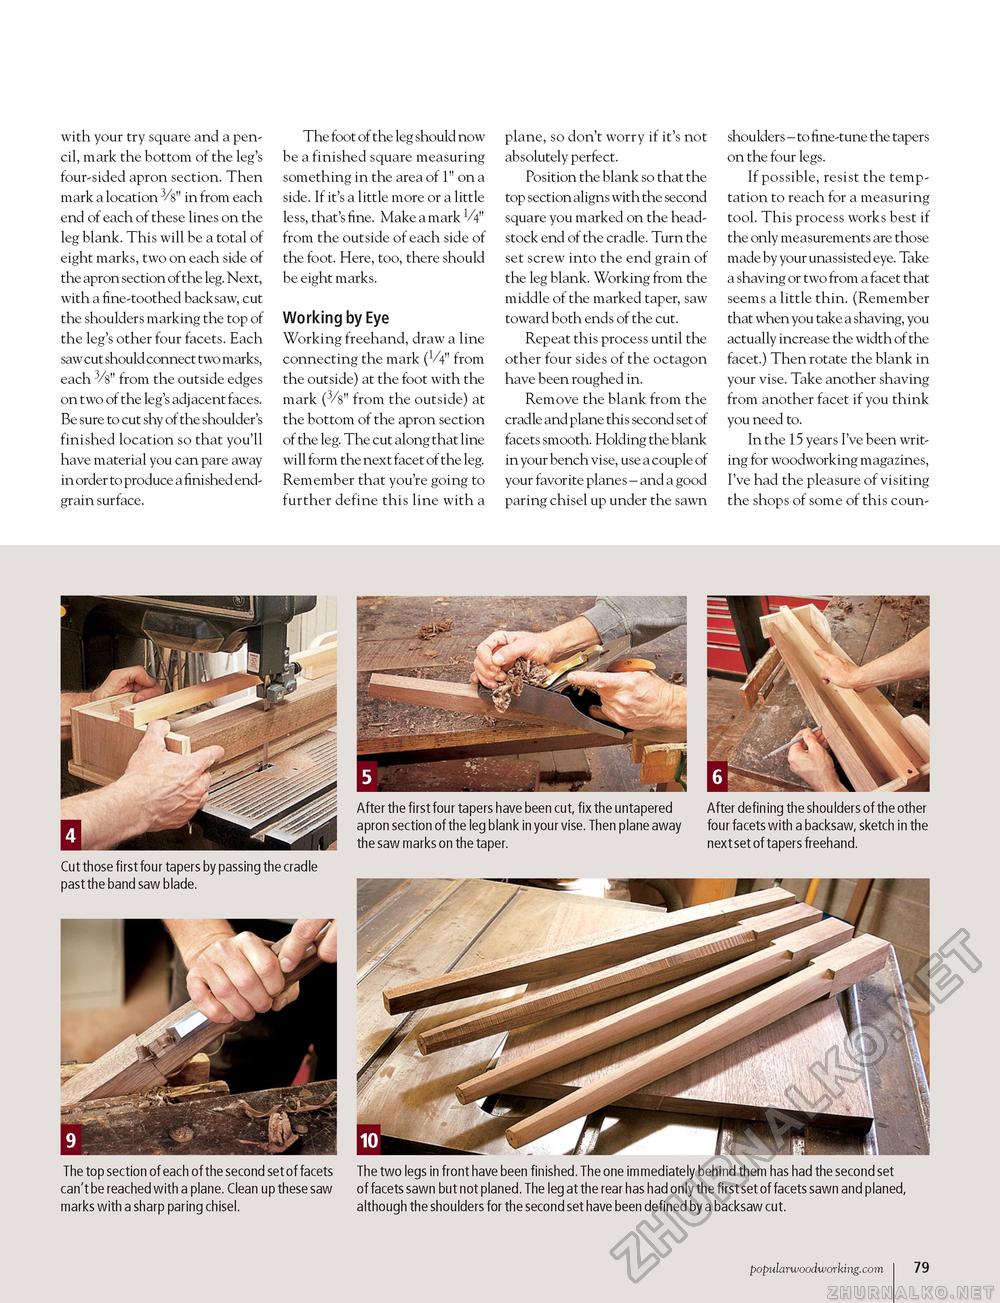
with your try square and a pencil, mark the bottom of the leg's four-sided apron section. Then mark a location 3/8" in from each end of each of these lines on the leg blank. This will be a total of eight marks, two on each side of the apron section of the leg. Next, with a fine-toothed backsaw, cut the shoulders marking the top of the leg's other four facets. Each saw cut should connect two marks, each 3/8" from the outside edges on two of the leg's adjacent faces. Be sure to cut shy of the shoulder's finished location so that you'll have material you can pare away in order to produce a finished end-grain surface. The foot of the leg should now be a finished square measuring something in the area of l" on a side. If it's a little more or a little less, that's fine. Make a mark V4" from the outside of each side of the foot. Here, too, there should be eight marks. Working by Eye Working freehand, draw a line connecting the mark (V4" from the outside) at the foot with the mark (3/8" from the outside) at the bottom of the apron section of the leg. The cut along that line will form the next facet of the leg. Remember that you're going to further define this line with a plane, so don't worry if it's not absolutely perfect. Position the blank so that the top section aligns with the second square you marked on the head-stock end of the cradle. Turn the set screw into the end grain of the leg blank. Working from the middle of the marked taper, saw toward both ends of the cut. Repeat this process until the other four sides of the octagon have been roughed in. Remove the blank from the cradle and plane this second set of facets smooth. Holding the blank in your bench vise, use a couple of your favorite planes - and a good paring chisel up under the sawn shoulders - to fine-tune the tapers on the four legs. If possible, resist the temptation to reach for a measuring tool. This process works best if the only measurements are those made by your unassisted eye. Take a shaving or two from a facet that seems a little thin. (Remember that when you take a shaving, you actually increase the width of the facet.) Then rotate the blank in your vise. Take another shaving from another facet if you think you need to. In the 15 years I've been writing for woodworking magazines, I've had the pleasure of visiting the shops of some of this coun- Cut those first four tapers by passing the cradle past the band saw blade. The top section of each of the second set of facets can't be reached with a plane. Clean up these saw marks with a sharp paring chisel. After the first four tapers have been cut, fix the untapered After defining the shou lders of the other apron section of the leg blank in your vise. Then plane away four facets with a backsaw, sketch in the the saw marks on the taper. next set of tapers freehand. The two legs in front have been finished. The one immediately behind them has had the second set of facets sawn but not planed. The leg at the rear has had only the first set of facets sawn and planed, although the shoulders for the second set have been defined by a backsaw cut. popularwoodworking.com i 79 |


