Popular Woodworking 2006-06 № 155, страница 39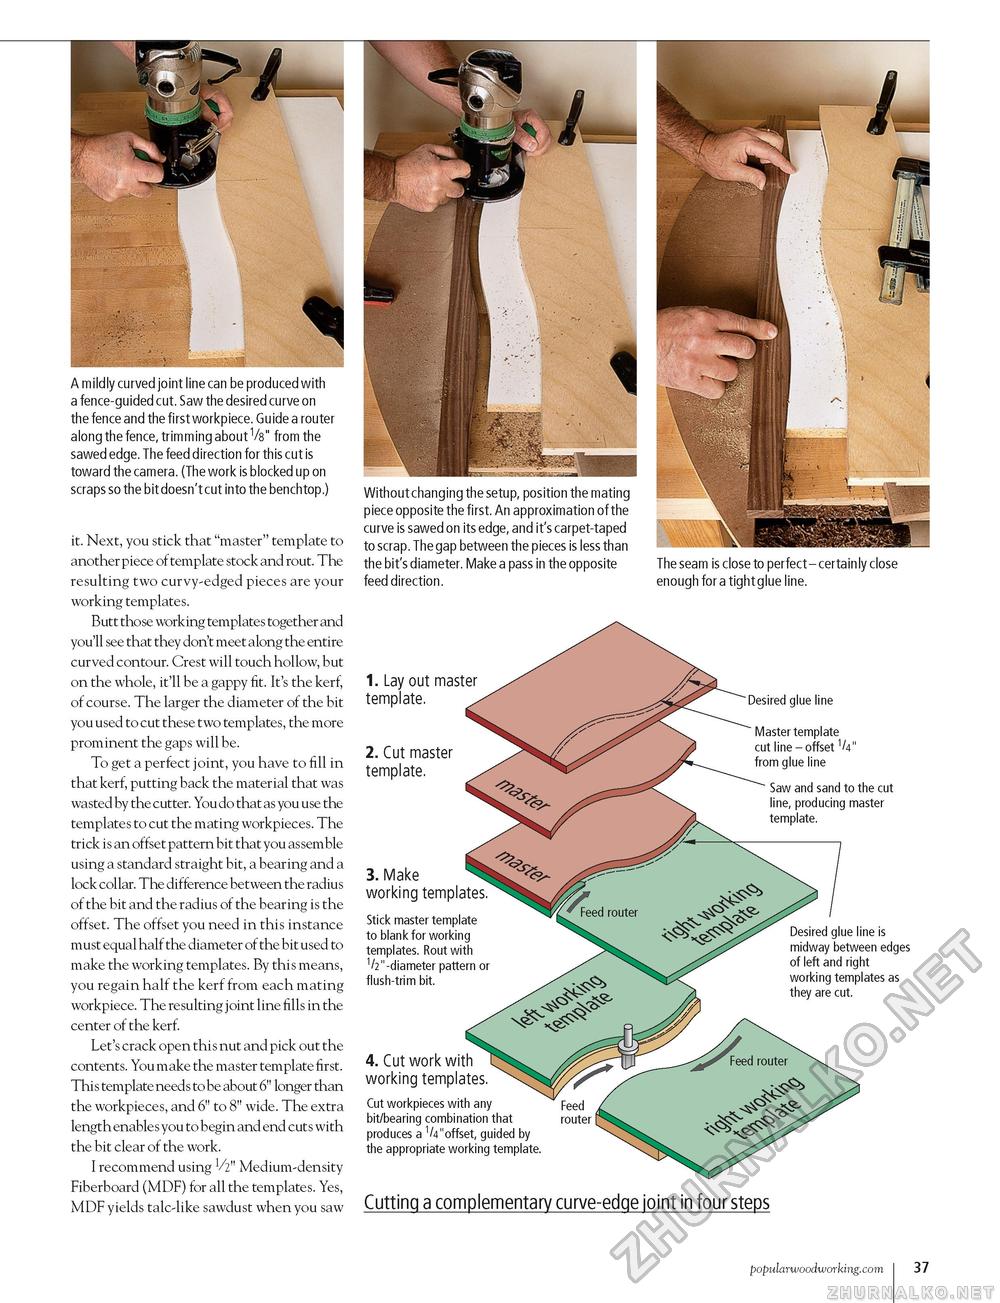
A mildly curved joint line can be produced with a fence-guided cut. Saw the desired curve on the fence and the first workpiece. Guide a router along the fence, trimming about Vs" from the sawed edge. The feed direction for this cut is toward the camera. (The work is blocked up on scraps so the bit doesn't cut into the benchtop.) it. Next, you stick that "master" template to another piece of template stock and rout. The resulting two curvy-edged pieces are your working templates. Butt those working templates together and you'll see that they don't meet along the entire curved contour. Crest will touch hollow, but on the whole, it'll be a gappy fit. It's the kerf, of course. The larger the diameter of the bit you used to cut these two templates, the more prominent the gaps will be. To get a perfect joint, you have to fill in that kerf, putting back the material that was wasted by the cutter. You do that as you use the templates to cut the mating workpieces. The trick is an offset pattern bit that you assemble using a standard straight bit, a bearing and a lock collar. The difference between the radius of the bit and the radius of the bearing is the offset. The offset you need in this instance must equal half the diameter of the bit used to make the working templates. By this means, you regain half the kerf from each mating workpiece. The resulting joint line fills in the center of the kerf. Let's crack open this nut and pick out the contents. You make the master template first. This template needs to be about 6" longer than the workpieces, and 6" to 8" wide. The extra length enables you to begin and end cuts with the bit clear of the work. I recommend using V2" Medium-density Fiberboard (MDF) for all the templates. Yes, MDF yields talc-like sawdust when you saw Without changing the setup, position the mating piece opposite the first. An approximation of the curve is sawed on its edge, and it's carpet-taped to scrap. The gap between the pieces is less than the bit's diameter. Make a pass in the opposite feed direction. The seam is close to perfect - certainly close enough for a tight glue line. 1. Lay out master template. 2. Cut master template. Desired glue line Mastertemplate cut line-offset1k11 from glue line Saw and sand to the cut line, producing master template. 3. Make working templates, Stick master template to blankforworking templates. Routwith 1/2"-diameter pattern or flush-trim bit. 4. Cut workwith working templates, Cut workpieces with any bit/bearing combination that produces a 1/4"offset, guided by the appropriate working template. Desired glue line is midway between edges of left and right working templates as they are cut. Cutting a complementary curve-edge joint in four steps popularwoodworking.com I 37 |


