Popular Woodworking 2006-06 № 155, страница 62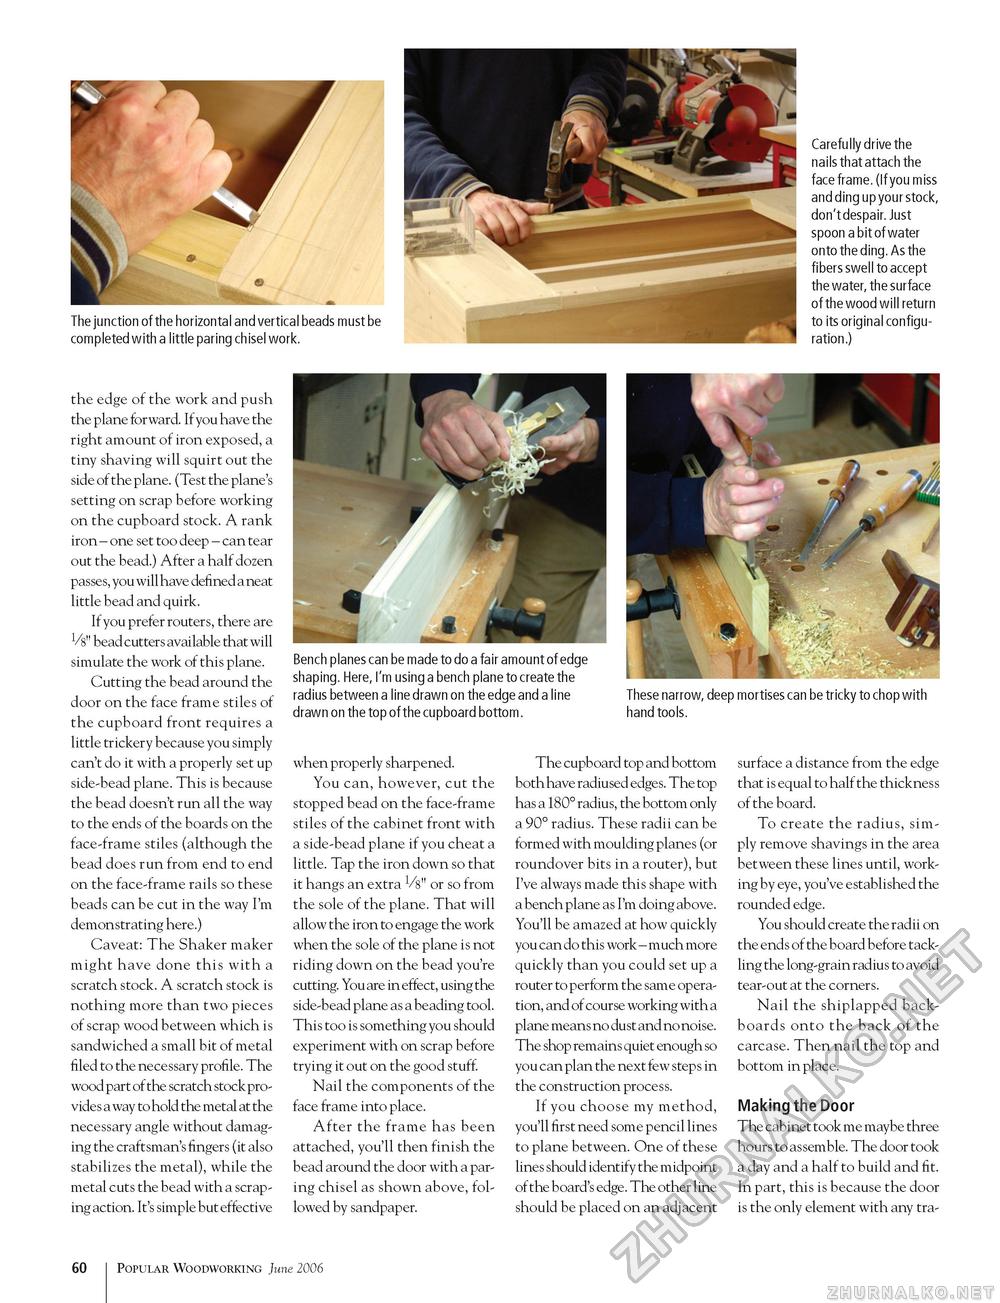
The junction of the horizontal and vertical beads must be completed with a little paring chisel work. Carefully drive the nails that attach the face frame. (If you miss and ding up your stock, don't despair. Just spoon a bit of water onto the ding. As the fibers swell to accept the water, the surface of the wood will return to its original configuration.) the edge of the work and push the plane forward. If you have the right amount of iron exposed, a tiny shaving will squirt out the side of the plane. (Test the plane's setting on scrap before working on the cupboard stock. A rank iron - one set too deep - can tear out the bead.) After a half dozen passes, you will have defined a neat little bead and quirk. If you prefer routers, there are V8" bead cutters available that will simulate the work of this plane. Cutting the bead around the door on the face frame stiles of the cupboard front requires a little trickery because you simply can't do it with a properly set up side-bead plane. This is because the bead doesn't run all the way to the ends of the boards on the face-frame stiles (although the bead does run from end to end on the face-frame rails so these beads can be cut in the way I'm demonstrating here.) Caveat: The Shaker maker might have done this with a scratch stock. A scratch stock is nothing more than two pieces of scrap wood between which is sandwiched a small bit of metal filed to the necessary profile. The wood part of the scratch stock provides a way to hold the metal at the necessary angle without damaging the craftsman's fingers (it also stabilizes the metal), while the metal cuts the bead with a scraping action. It's simple but effective Bench planes can be made to do a fair amount of edge shaping. Here, I'm using a bench plane to create the radius between a line drawn on the edge and a line drawn on the top of the cupboard bottom. These narrow, deep mortises can be tricky to chop with hand tools. when properly sharpened. You can, however, cut the stopped bead on the face-frame stiles of the cabinet front with a side-bead plane if you cheat a little. Tap the iron down so that it hangs an extra Vs" or so from the sole of the plane. That will allow the iron to engage the work when the sole of the plane is not riding down on the bead you're cutting. You are in effect, using the side-bead plane as a beading tool. This too is something you should experiment with on scrap before trying it out on the good stuff. Nail the components of the face frame into place. After the frame has been attached, you'll then finish the bead around the door with a paring chisel as shown above, followed by sandpaper. The cupboard top and bottom both have radiused edges. The top has a 180° radius, the bottom only a 90° radius. These radii can be formed with moulding planes (or roundover bits in a router), but I've always made this shape with a bench plane as I'm doing above. You'll be amazed at how quickly you can do this work - much more quickly than you could set up a router to perform the same operation, and of course working with a plane means no dust and no noise. The shop remains quiet enough so you can plan the next few step s in the construction process. If you choose my method, you'll first need some pencil lines to plane between. One of these lines should identify the midpoint of the board's edge. The other line should be placed on an adjacent surface a distance from the edge that is equal to half the thickness of the board. To create the radius, simply remove shavings in the area between these lines until, working by eye, you've established the rounded edge. You should create the radii on the ends of the board before tackling the long-grain radius to avoid tear-out at the corners. Nail the shiplapped backboards onto the back of the carcase. Then nail the top and bottom in place. Making the Door The cabinet took me maybe three hours to assemble. The door took a day and a half to build and fit. In part, this is because the door is the only element with any tra 60 Popular Woodworking June 2006 |


