Popular Woodworking 2006-06 № 155, страница 63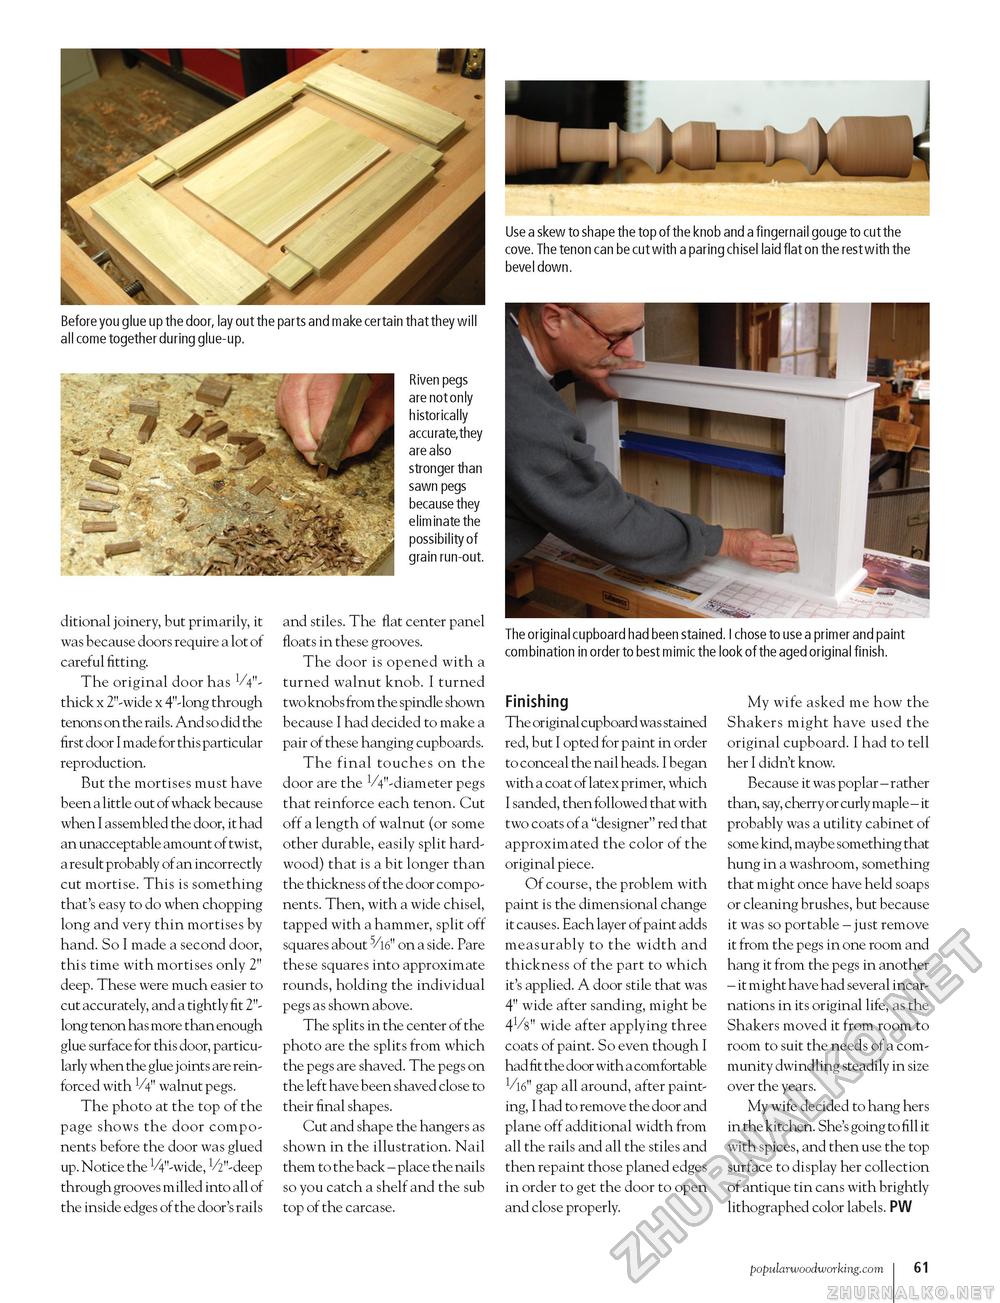
ditional joinery, but primarily, it was because doors require a lot of careful fitting. The original door has V4"-thick x 2"-wide x 4"-long through tenons on the rails. And so did the first door I made for this particular reproduction. But the mortises must have been a little out of whack because when I assembled the door, it had an unacceptable amount of twist, a result probably of an incorrectly cut mortise. This is something that's easy to do when chopping long and very thin mortises by hand. So I made a second door, this time with mortises only 2" deep. These were much easier to cut accurately, and a tightly fit 2"-long tenon has more than enough glue surface for this door, particularly when the glue j oints are reinforced with V4" walnut pegs. The photo at the top of the page shows the door components before the door was glued up. Notice the V4"-wide, ^"-deep through grooves milled into all of the inside edges of the door's rails Use a skew to shape the top of the knob and a fingernail gouge to cut the cove. The tenon can be cut with a paring chisel laid flat on the rest with the bevel down. Before you glue up the door, lay out the parts and make certain that they will all come together during glue-up. Riven pegs are not only historically accurate,they are also stronger than sawn pegs because they eliminate the possibility of grain run-out. and stiles. The flat center panel floats in these grooves. The door is opened with a turned walnut knob. I turned two knobs from the spindle shown because I had decided to make a pair of these hanging cupboards. The final touches on the door are the ^"-diameter pegs that reinforce each tenon. Cut off a length of walnut (or some other durable, easily split hardwood) that is a bit longer than the thickness of the door components. Then, with a wide chisel, tapped with a hammer, split off squares about 5/l6" on a side. Pare these squares into approximate rounds, holding the individual pegs as shown above. The splits in the center of the photo are the splits from which the pegs are shaved. The pegs on the left have been shaved close to their final shapes. Cut and shape the hangers as shown in the illustration. Nail them to the back - place the nails so you catch a shelf and the sub top of the carcase. The original cupboard had been stained. I chose to use a primer and paint combination in order to best mimic the look of the aged original finish. Finishing The original cupboard was stained red, but I opted for paint in order to conceal the nail heads. I began with a coat of latex primer, which I sanded, then followed that with two coats of a "designer" red that approximated the color of the original piece. Of course, the problem with paint is the dimensional change it causes. Each layer of paint adds measurably to the width and thickness of the part to which it's applied. A door stile that was 4" wide after sanding, might be 41/8" wide after applying three coats of paint. So even though I had fit the door with a comfortable gap all around, after painting, I had to remove the door and plane off additional width from all the rails and all the stiles and then repaint those planed edges in order to get the door to open and close properly. My wife asked me how the Shakers might have used the original cupboard. I had to tell her I didn't know. Because it was poplar - rather than, say, cherry or curly maple - it probably was a utility cabinet of some kind, maybe something that hung in a washroom, something that might once have held soaps or cleaning brushes, but because it was so portable - just remove it from the pegs in one room and hang it from the pegs in another - it might have had several incarnations in its original life, as the Shakers moved it from room to room to suit the needs of a community dwindling steadily in size over the years. My wife decided to hang hers in the kitchen. She's going to fill it with spices, and then use the top surface to display her collection of antique tin cans with brightly lithographed color labels. PW popularwoodworking.com I 61 |


