Popular Woodworking 2006-06 № 155, страница 66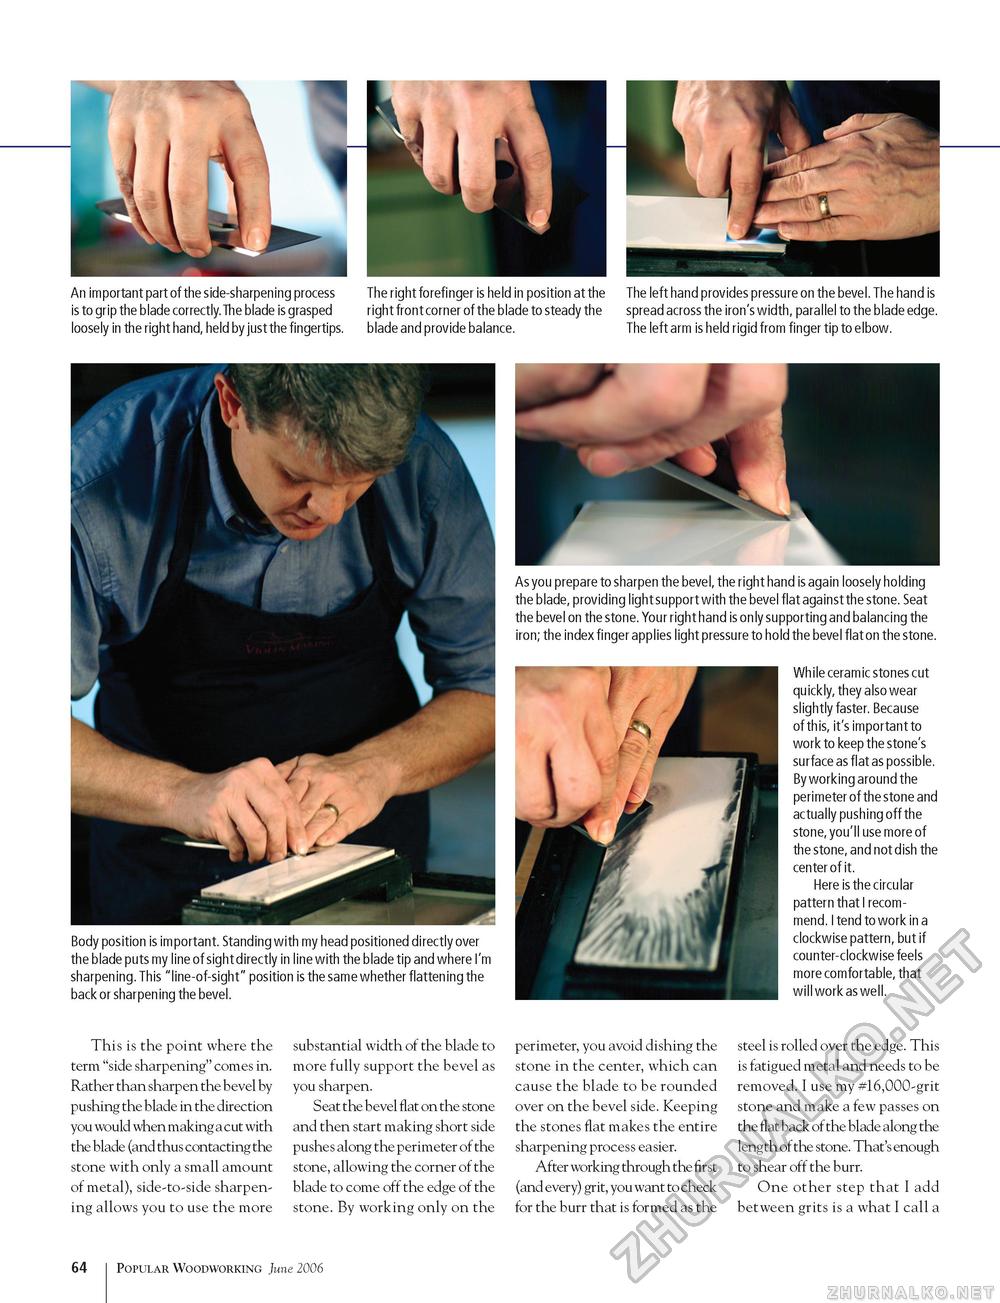
An important part of the side-sharpening process is to grip the blade correctly. The blade is grasped loosely in the right hand, held by just the fingertips. The right forefinger is held in position at the right front corner of the blade to steady the blade and provide balance. The left hand provides pressure on the bevel. The hand is spread across the iron's width, parallel to the blade edge. The left arm is held rigid from finger tip to elbow. Body position is important. Standing with my head positioned directly over the blade puts my line of sight directly in line with the blade tip and where I'm sharpening. This "line-of-sight" position is the same whether flattening the back or sharpening the bevel. As you prepare to sharpen the bevel, the right hand is again loosely holding the blade, providing light support with the bevel flat against the stone. Seat the bevel on the stone. Your right hand is only supporting and balancing the iron; the index finger applies light pressure to hold the bevel flat on the stone. While ceramic stones cut quickly, they also wear slightly faster. Because of this, it's important to work to keep the stone's surface as flat as possible. By working around the perimeter of the stone and actually pushing off the stone, you'll use more of the stone, and not dish the center of it. Here is the circular pattern that I recommend. I tend to work in a clockwise pattern, but if counter-clockwise feels more comfortable, that will work as well. This is the point where the term "side sharpening" comes in. Rather than sharpen the bevel by pushing the blade in the direction you would when making a cut with the blade (and thus contacting the stone with only a small amount of metal), side-to-side sharpening allows you to use the more substantial width of the blade to more fully support the bevel as you sharpen. Seat the bevel flat on the stone and then start making short side pushes along the perimeter of the stone, allowing the corner of the blade to come off the edge of the stone. By working only on the perimeter, you avoid dishing the stone in the center, which can cause the blade to be rounded over on the bevel side. Keeping the stones flat makes the entire sharpening process easier. After working through the first (and every) grit, you want to check for the burr that is formed as the steel is rolled over the edge. This is fatigued metal and needs to be removed. I use my #16,000-grit stone and make a few passes on the flat back of the blade along the length of the stone. That's enough to shear off the burr. One other step that I add between grits is a what I call a 64 Popular Woodworking June 2006 |


