Popular Woodworking 2006-10 № 157, страница 44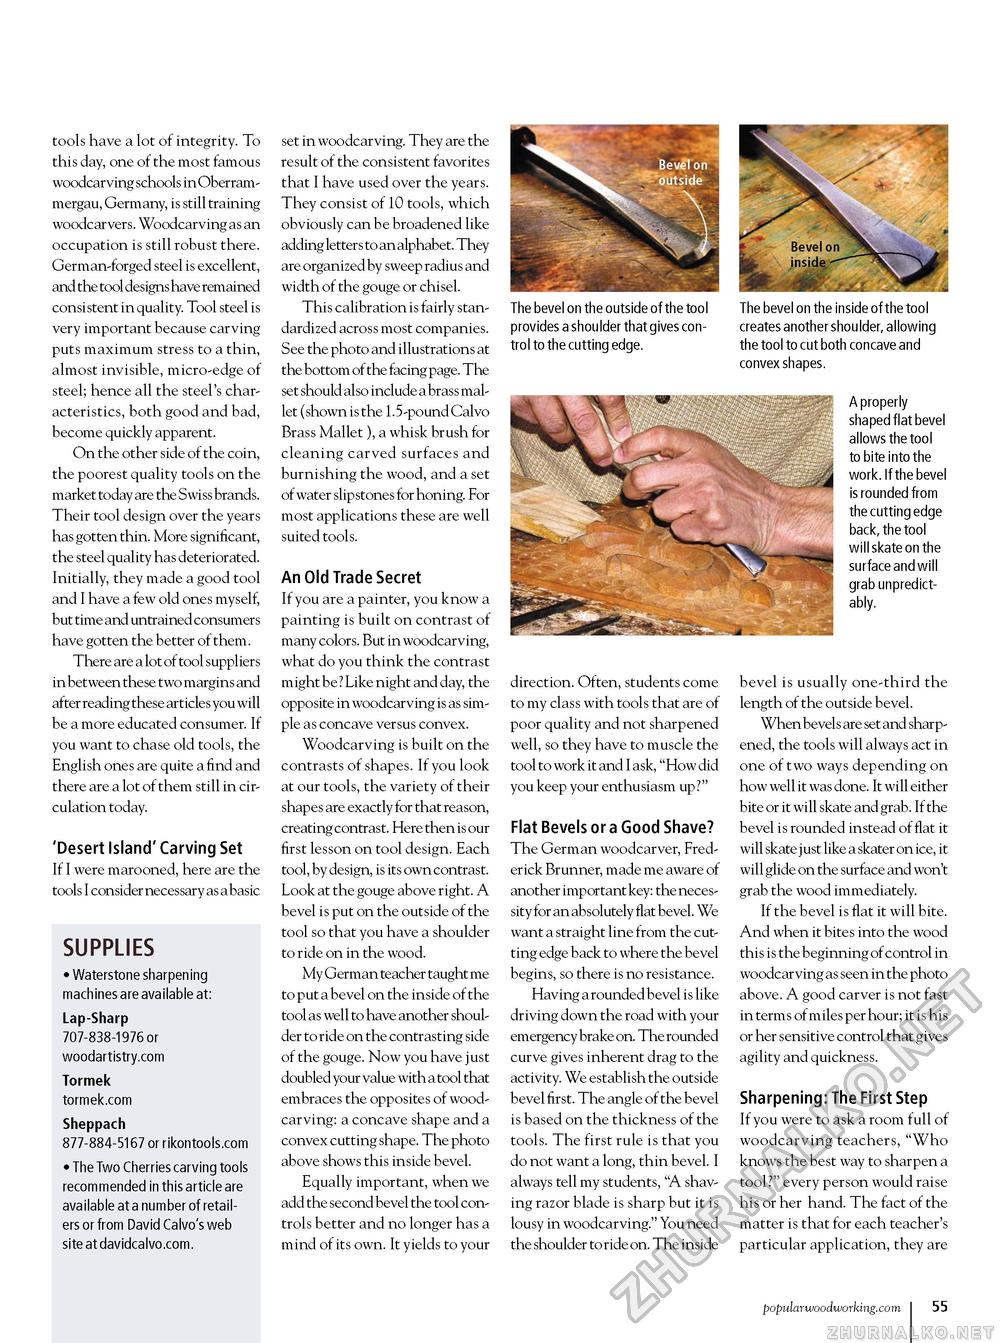
tools have a lot of integrity. To this day, one of the most famous woodcarving schools in Oberram-mergau, Germany, is still training woodcarvers. Woodcarving as an occupation is still robust there. German-forged steel is excellent, and the tool designs have remained consistent in quality. Tool steel is very important because carving puts maximum stress to a thin, almost invisible, micro-edge of steel; hence all the steel's characteristics, both good and bad, become quickly apparent. On the other side of the coin, the poorest quality tools on the market today are the Swiss brands. Their tool design over the years has gotten thin. More significant, the steel quality has deteriorated. Initially, they made a good tool and I have a few old ones myself, but time and untrained consumers have gotten the better of them. There are a lot of tool suppliers in between these two margins and after reading these articles you will be a more educated consumer. If you want to chase old tools, the English ones are quite a find and there are a lot of them still in circulation today. 'Desert Island' Carving Set If I were marooned, here are the tools I consider necessary as a basic SUPPLIES • Waterstone sharpening machines are available at: Lap-Sharp 707-838-1976 or woodartistry.com Tormek tormek.com Sheppach 877-884-5167 or rikontools.com • The Two Cherries carving tools recommended in this article are available at a number of retailers or from David Calvo's web site at davidcalvo.com. set in woodcarving. They are the result of the consistent favorites that I have used over the years. They consist of 10 tools, which obviously can be broadened like adding letters to an alphabet. They are organized by sweep radius and width of the gouge or chisel. This calibration is fairly standardized across most companies. See the photo and illustrations at the bottom of the facing page. The set should also include a brass mallet (shown is the 1.5-pound Calvo Brass Mallet ), a whisk brush for cleaning carved surfaces and burnishing the wood, and a set of water slipstones for honing. For most applications these are well suited tools. An Old Trade Secret If you are a painter, you know a painting is built on contrast of many colors. But in woodcarving, what do you think the contrast might be? Like night and day, the opposite in woodcarving is as simple as concave versus convex. Woodcarving is built on the contrasts of shapes. If you look at our tools, the variety of their shapes are exactly for that reason, creating contrast. Here then is our first lesson on tool design. Each tool, by design, is its own contrast. Look at the gouge above right. A bevel is put on the outside of the tool so that you have a shoulder to ride on in the wood. My German teacher taught me to put a bevel on the inside of the tool as well to have another shoulder to ride on the contrasting side of the gouge. Now you have just doubled your value with a tool that embraces the opposites of woodcarving: a concave shape and a convex cutting shape. The photo above shows this inside bevel. Equally important, when we add the second bevel the tool controls better and no longer has a mind of its own. It yields to your The bevel on the outside of the tool provides a shoulder that gives control to the cutting edge. direction. Often, students come to my class with tools that are of poor quality and not sharpened well, so they have to muscle the tool to work it and I ask, "How did you keep your enthusiasm up?" Flat Bevels or a Good Shave? The German woodcarver, Frederick Brunner, made me aware of another important key: the necessity for an absolutely flat bevel. We want a straight line from the cutting edge back to where the bevel begins, so there is no resistance. Having a rounded bevel is like driving down the road with your emergency brake on. The rounded curve gives inherent drag to the activity. We establish the outside bevel first. The angle of the bevel is based on the thickness of the tools. The first rule is that you do not want a long, thin bevel. I always tell my students, "A shaving razor blade is sharp but it is lousy in woodcarving." You need the shoulder to ride on. The inside Bevel on^^k-—_ t Ksit inside,— ■?V. The bevel on the inside of the tool creates another shoulder, allowing the tool to cut both concave and convex shapes. A properly shaped flat bevel allows the tool to bite into the work. If the bevel is rounded from the cutting edge back, the tool will skate on the surface and will grab unpredictably. bevel is usually one-third the length of the outside bevel. When bevels are set and sharpened, the tools will always act in one of two ways depending on how well it was done. It will either bite or it will skate and grab. If the bevel is rounded instead of flat it will skate j ust like a skater on ice, it will glide on the surface and won't grab the wood immediately. If the bevel is flat it will bite. And when it bites into the wood this is the beginning of control in woodcarving as seen in the photo above. A good carver is not fast in terms of miles per hour; it is his or her sensitive control that gives agility and quickness. Sharpening: The First Step If you were to ask a room full of woodcarving teachers, "Who knows the best way to sharpen a tool?" every person would raise his or her hand. The fact of the matter is that for each teacher's particular application, they are popularwoodworking.com i 55 |


