Popular Woodworking 2006-12 № 159, страница 31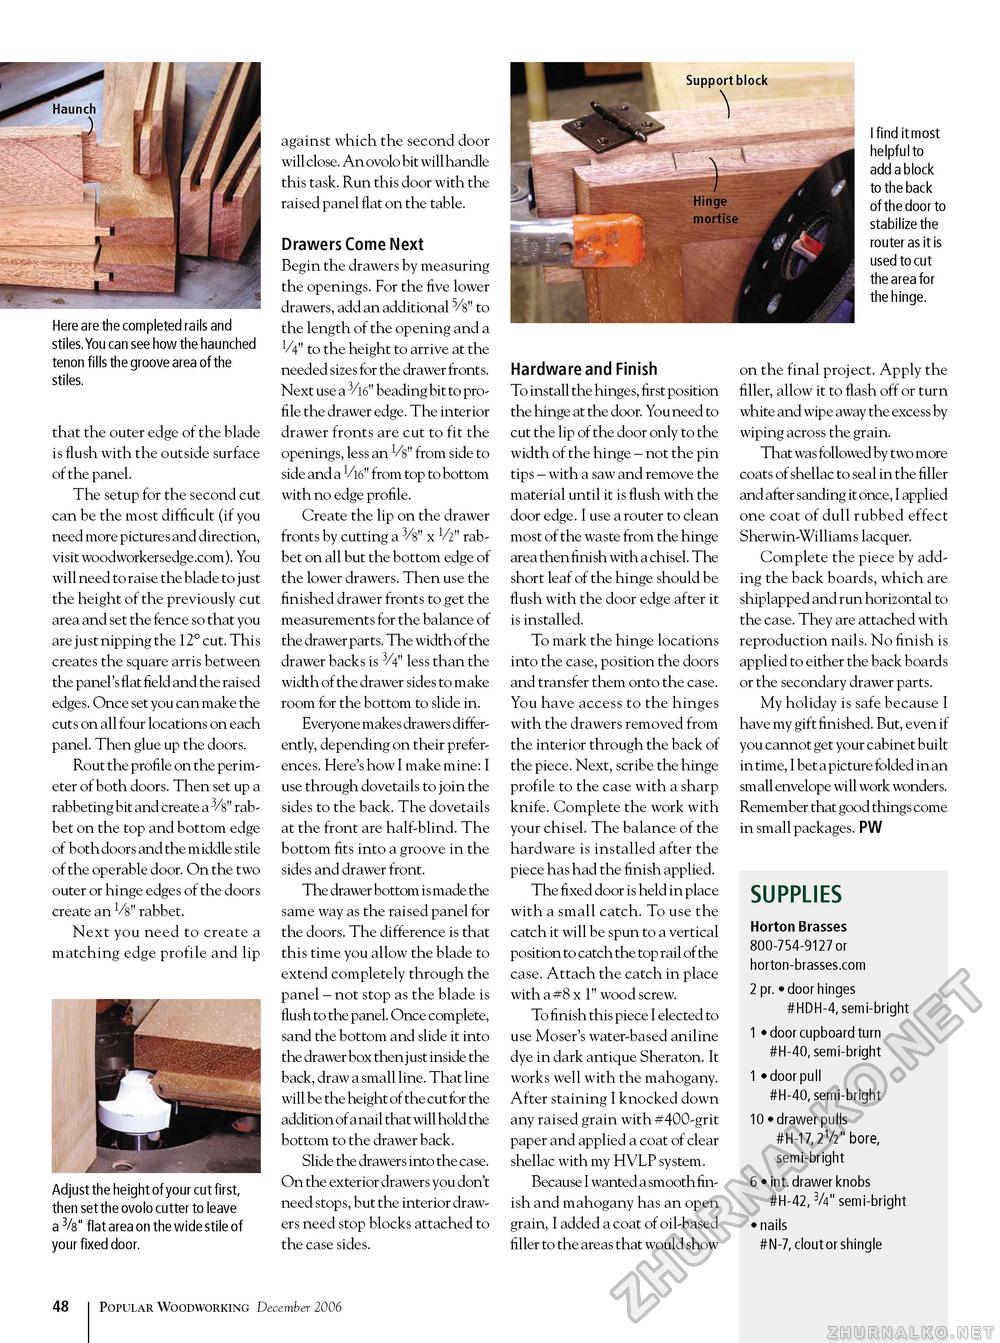
Here are the completed rails and stiles. You can see how the haunched tenon fills the groove area of the stiles. that the outer edge of the blade is flush with the outside surface of the panel. The setup for the second cut can be the most difficult (if you need more pictures and direction, visit woodworkersedge.com). You will need to raise the blade to just the height of the previously cut area and set the fence so that you are just nipping the 12° cut. This creates the square arris between the panel's flat field and the raised edges. Once set you can make the cuts on all four locations on each panel. Then glue up the doors. Rout the profile on the perimeter of both doors. Then set up a rabbeting bit and create a 3/s" rabbet on the top and bottom edge of both doors and the middle stile of the operable door. On the two outer or hinge edges of the doors create an Vs" rabbet. Next you need to create a matching edge profile and lip Adjust the height of your cut first, then set the ovolo cutter to leave a 3/8" flat area on the wide stile of your fixed door. against which the second door will close. An ovolo bit will handle this task. Run this door with the raised panel flat on the table. Drawers Come Next Begin the drawers by measuring the openings. For the five lower drawers, add an additional 5/s" to the length of the opening and a V4" to the height to arrive at the needed sizes for the drawer fronts. Next use a 3/l6" beading bit to profile the drawer edge. The interior drawer fronts are cut to fit the openings, less an s" from side to side and a Vl6" from top to bottom with no edge profile. Create the lip on the drawer fronts by cutting a 3/s" x V2" rabbet on all but the bottom edge of the lower drawers. Then use the finished drawer fronts to get the measurements for the balance of the drawer parts. The width of the drawer backs is 3/4" less than the width of the drawer sides to make room for the bottom to slide in. Everyone makes drawers differently, depending on their preferences. Here's how I make mine: I use through dovetails to join the sides to the back. The dovetails at the front are half-blind. The bottom fits into a groove in the sides and drawer front. The drawer bottom is made the same way as the raised panel for the doors. The difference is that this time you allow the blade to extend completely through the panel - not stop as the blade is flush to the panel. Once complete, sand the bottom and slide it into the drawer box then just inside the back, draw a small line. That line will be the height of the cut for the addition of a nail that will hold the bottom to the drawer back. Slide the drawers into the case. On the exterior drawers you don't need stops, but the interior drawers need stop blocks attached to the case sides. Hardware and Finish To install the hinges, first position the hinge at the door. You need to cut the lip of the door only to the width of the hinge - not the pin tips - with a saw and remove the material until it is flush with the door edge. I use a router to clean most of the waste from the hinge area then finish with a chisel. The short leaf of the hinge should be flush with the door edge after it is installed. To mark the hinge locations into the case, position the doors and transfer them onto the case. You have access to the hinges with the drawers removed from the interior through the back of the piece. Next, scribe the hinge profile to the case with a sharp knife. Complete the work with your chisel. The balance of the hardware is installed after the piece has had the finish applied. The fixed door is held in place with a small catch. To use the catch it will be spun to a vertical position to catch the top rail of the case. Attach the catch in place with a #8 x 1" wood screw. To finish this piece I elected to use Moser's water-based aniline dye in dark antique Sheraton. It works well with the mahogany. After staining I knocked down any raised grain with #400-grit paper and applied a coat of clear shellac with my HVLP system. Because I wanted a smooth finish and mahogany has an open grain, I added a coat of oil-based filler to the areas that would show I find it most helpful to add a block to the back of the door to stabilize the router as it is used to cut the area for the hinge. on the final project. Apply the filler, allow it to flash off or turn white and wipe away the excess by wiping across the grain. That was followed by two more coats of shellac to seal in the filler and after sanding it once, I applied one coat of dull rubbed effect Sherwin-Williams lacquer. Complete the piece by adding the back boards, which are shiplapped and run horizontal to the case. They are attached with reproduction nails. No finish is applied to either the back boards or the secondary drawer parts. My holiday is safe because I have my gift finished. But, even if you cannot get your cabinet built in time, I bet a picture folded in an small envelope will work wonders. Remember that good things come in small packages. PW SUPPLIES Horton Brasses 800-754-9127 or horton-brasses.com 2 pr. • door hinges #HDH-4, semi-bright 1 • door cupboard turn #H-40, semi-bright 1 • door pull #H-40, semi-bright 10 • drawer pulls #H-17,2V2" bore, semi-bright 6 • int. drawer knobs #H-42,3/4" semi-bright • nails #N-7, clout or shingle 48 Popular Woodworking December 2006 |


