Popular Woodworking 2006-12 № 159, страница 62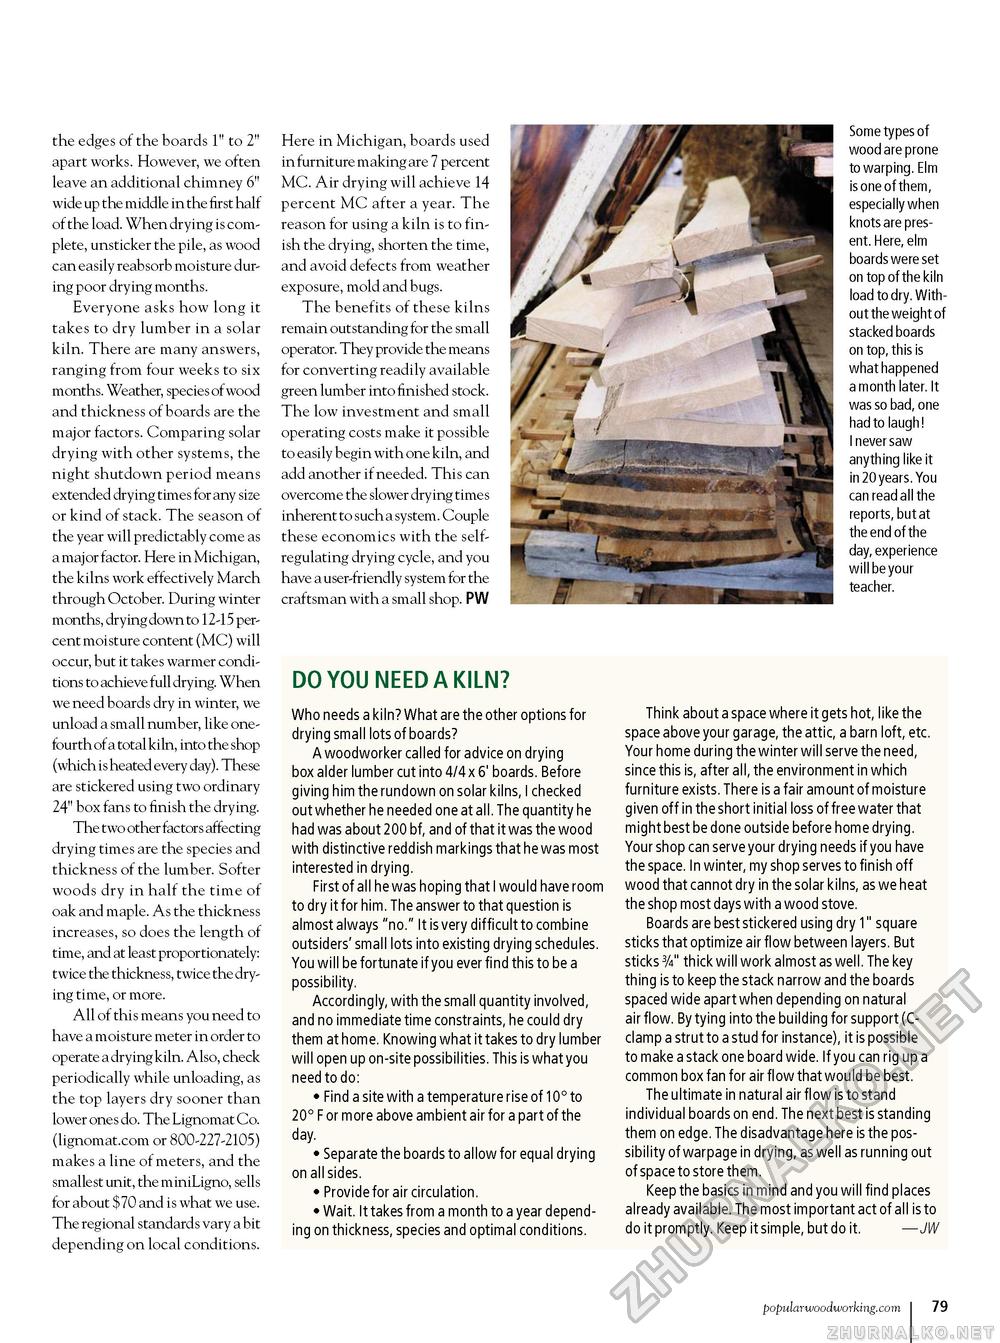
the edges of the boards 1"" to 2" apart works. However, we often leave an additional chimney 6" wide up the middle in the first half of the load. When drying is complete, unsticker the pile, as wood can easily reabsorb moisture during poor drying months. Everyone asks how long it takes to dry lumber in a solar kiln. There are many answers, ranging from four weeks to six months. Weather, species of wood and thickness of boards are the major factors. Comparing solar drying with other systems, the night shutdown period means extended drying times for any size or kind of stack. The season of the year will predictably come as a major factor. Here in Michigan, the kilns work effectively March through October. During winter months, drying down to 12-15 percent moisture content (MC) will occur, but it takes warmer conditions to achieve full drying. When we need boards dry in winter, we unload a small number, like one-fourth of a total kiln, into the shop (which is heated every day). These are stickered using two ordinary 24" box fans to finish the drying. The two other factors affecting drying times are the species and thickness of the lumber. Softer woods dry in half the time of oak and maple. As the thickness increases, so does the length of time, and at least proportionately: twice the thickness, twice the drying time, or more. All of this means you need to have a moisture meter in order to operate a drying kiln. Also, check periodically while unloading, as the top layers dry sooner than lower ones do. The Lignomat Co. (lignomat.com or 800-227-2105) makes a line of meters, and the smallest unit, the miniLigno, sells for about $70 and is what we use. The regional standards vary a bit depending on local conditions. Here in Michigan, boards used in furniture making are 7 percent MC. Air drying will achieve 14 percent MC after a year. The reason for using a kiln is to finish the drying, shorten the time, and avoid defects from weather exposure, mold and bugs. The benefits of these kilns remain outstanding for the small operator. They provide the means for converting readily available green lumber into finished stock. The low investment and small operating costs make it possible to easily begin with one kiln, and add another if needed. This can overcome the slower drying times inherent to such a system. Couple these economics with the self-regulating drying cycle, and you have a user-friendly system for the craftsman with a small shop. PW Some types of wood are prone to warping. Elm is one of them, especially when knots are present. Here, elm boards were set on top of the kiln load to dry. Without the weight of stacked boards on top, this is what happened a month later. It was so bad, one had to laugh! I never saw anything like it in 20 years. You can read all the reports, but at the end of the day, experience will be your teacher. DO YOU NEED A KILN? Who needs a kiln? What are the other options for drying small lots of boards? A woodworker called for advice on drying box alder lumber cut into 4/4 x 6' boards. Before giving him the rundown on solar kilns, I checked out whether he needed one at all. The quantity he had was about 200 bf, and of that it was the wood with distinctive reddish markings that he was most interested in drying. First of all he was hoping that I would have room to dry it for him. The answer to that question is almost always "no." It is very difficult to combine outsiders' small lots into existing drying schedules. You will be fortunate if you ever find this to be a possibility. Accordingly, with the small quantity involved, and no immediate time constraints, he could dry them at home. Knowing what it takes to dry lumber will open up on-site possibilities. This is what you need to do: • Find a site with a temperature rise of 10° to 20° F or more above ambient air for a part of the day. • Separate the boards to allow for equal drying on all sides. • Provide for air circulation. • Wait. It takes from a month to a year depending on thickness, species and optimal conditions. Think about a space where it gets hot, like the space above your garage, the attic, a barn loft, etc. Your home during the winter will serve the need, since this is, after all, the environment in which furniture exists. There is a fair amount of moisture given off in the short initial loss of free water that might best be done outside before home drying. Your shop can serve your drying needs if you have the space. In winter, my shop serves to finish off wood that cannot dry in the solar kilns, as we heat the shop most days with a wood stove. Boards are best stickered using dry 1" square sticks that optimize air flow between layers. But sticks 3A" thick will work almost as well. The key thing is to keep the stack narrow and the boards spaced wide apart when depending on natural air flow. By tying into the building for support (C-clamp a strut to a stud for instance), it is possible to make a stack one board wide. If you can rig up a common box fan for air flow that would be best. The ultimate in natural air flow is to stand individual boards on end. The next best is standing them on edge. The disadvantage here is the possibility of warpage in drying, as well as running out of space to store them. Keep the basics in mind and you will find places already available. The most important act of all is to do it promptly. Keep it simple, but do it. — JW popularwoodworking.com i 79 |


