Popular Woodworking 2007-02 № 160, страница 20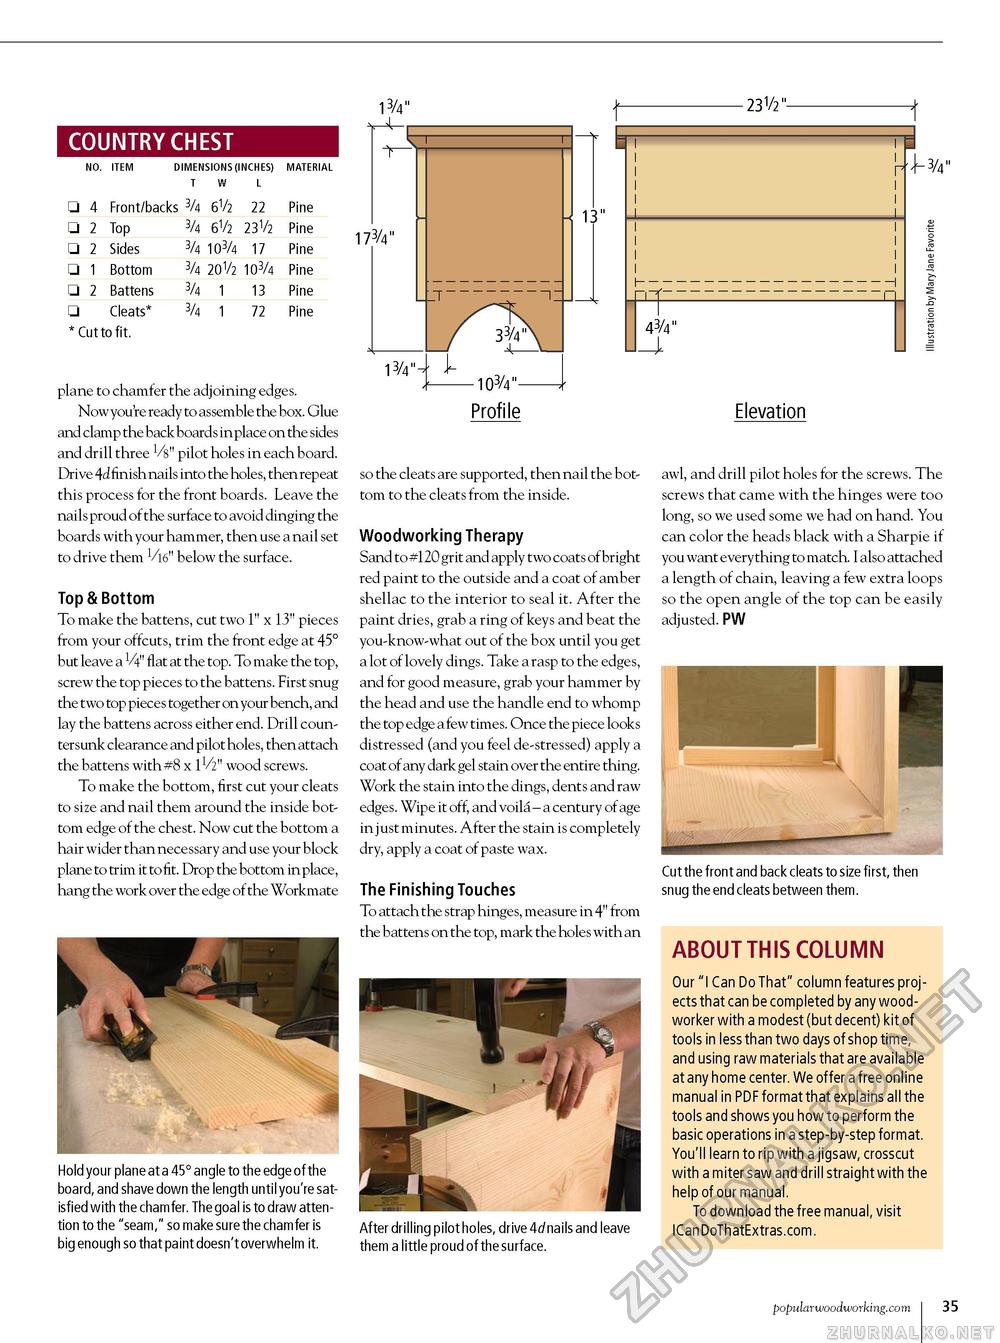
country chest dimensions (inches) material T W L □ 4 Front/backs 3/4 6V2 22 □ 2 Top □ 2 Sides □ 1 Bottom □ 2 Battens □ Cleats* * Cut to fit. 3/4 6V2 23V2 3/4 103/4 17 3/4 20 V2 103/4 3/4 1 13 3/4 1 72 Pine Pine Pine Pine Pine Pine l3/4" —1- - 23 V2"- r 173/4" 13/4% plane to chamfer the adjoining edges. Now you're ready to assemble the box. Glue and clamp the back boards in place on the sides and drill three 1/8" pilot holes in each board. Drive 4d finish nails into the holes, then repeat this process for the front boards. Leave the nails proud of the surface to avoid dinging the boards with your hammer, then use a nail set to drive them V^" below the surface. Top & Bottom To make the battens, cut two 1" x 13" pieces from your offcuts, trim the front edge at 45° but leave a V4" flat at the top. To make the top, screw the top pieces to the battens. First snug the two top pieces together on your bench, and lay the battens across either end. Drill countersunk clearance and pilot holes, then attach the battens with #8 x 11/2" wood screws. To make the bottom, first cut your cleats to size and nail them around the inside bottom edge of the chest. Now cut the bottom a hair wider than necessary and use your block plane to trim it to fit. Drop the bottom in place, hang the work over the edge of the Workmate l__7 33/4" -103/4"- Profile 13" H- T 43/4" a ^3/4" so the cleats are supported, then nail the bottom to the cleats from the inside. Woodworking Therapy Sand to #120 grit and apply two coats of bright red paint to the outside and a coat of amber shellac to the interior to seal it. After the paint dries, grab a ring of keys and beat the you-know-what out of the box until you get a lot of lovely dings. Take a rasp to the edges, and for good measure, grab your hammer by the head and use the handle end to whomp the top edge a few times. Once the piece looks distressed (and you feel de-stressed) apply a coat of any dark gel stain over the entire thing. Work the stain into the dings, dents and raw edges. Wipe it off, and voila - a century of age in just minutes. After the stain is completely dry, apply a coat of paste wax. The Finishing Touches To attach the strap hinges, measure in 4" from the battens on the top, mark the holes with an Hold your plane at a 45° angle to the edge of the board, and shave down the length until you're satisfied with the chamfer. The goal is to draw attention to the "seam," so make sure the chamfer is big enough so that paint doesn't overwhelm it. After drilling pilot holes, drive 4d nails and leave them a little proud of the surface. Elevation awl, and drill pilot holes for the screws. The screws that came with the hinges were too long, so we used some we had on hand. You can color the heads black with a Sharpie if you want everything to match. I also attached a length of chain, leaving a few extra loops so the open angle of the top can be easily adjusted. PW Cut the front and back cleats to size first, then snug the end cleats between them. about this column Our "I Can Do That" column features projects that can be completed by any woodworker with a modest (but decent) kit of tools in less than two days of shop time, and using raw materials that are available at any home center. We offer a free online manual in PDF format that explains all the tools and shows you how to perform the basic operations in a step-by-step format. You'll learn to rip with a jigsaw, crosscut with a miter saw and drill straight with the help of our manual. To download the free manual, visit ICanDoThatExtras.com. popularwoodworking.com 31 |


