Popular Woodworking 2007-02 № 160, страница 39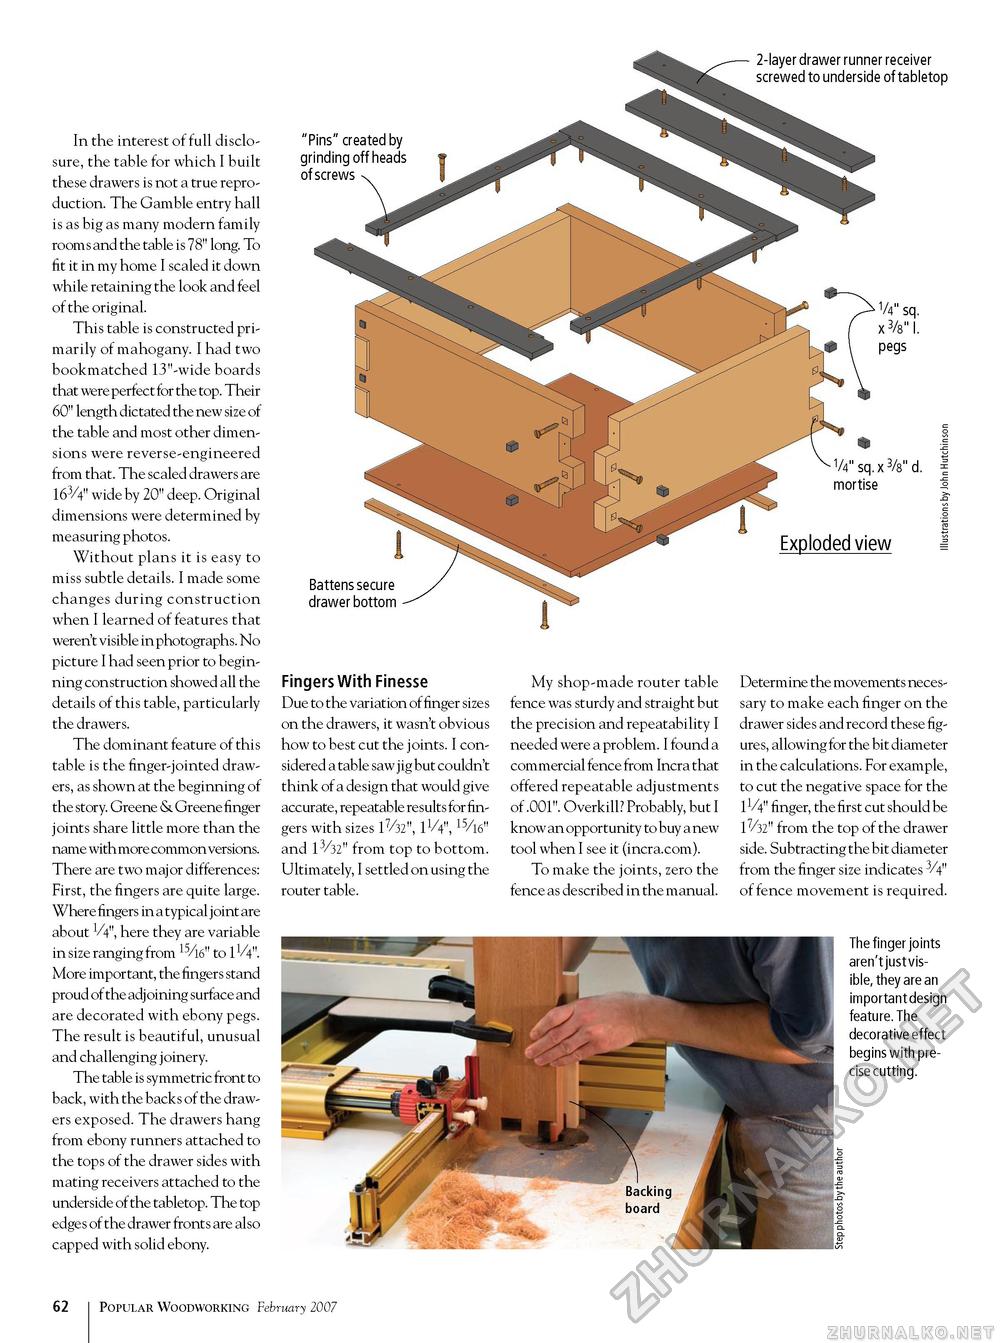
In the interest of full disclosure, the table for which I built these drawers is not a true reproduction. The Gamble entry hall is as big as many modern family rooms and the table is 78" long. To fit it in my home I scaled it down while retaining the look and feel of the original. This table is constructed primarily of mahogany. I had two bookmatched 13"-wide boards that were perfect for the top. Their 60" length dictated the new size of the table and most other dimensions were reverse-engineered from that. The scaled drawers are 163/4" wide by 20" deep. Original dimensions were determined by measuring photos. Without plans it is easy to miss subtle details. I made some changes during construction when I learned of features that weren't visible in photographs. No picture I had seen prior to beginning construction showed all the details of this table, particularly the drawers. The dominant feature of this table is the finger-jointed drawers, as shown at the beginning of the story. Greene & Greene finger joints share little more than the name with more common versions. There are two major differences: First, the fingers are quite large. Where fingers in a typical joint are about V4", here they are variable in size ranging from 15/l6" to 11/4". More important, the fingers stand proud of the adjoining surface and are decorated with ebony pegs. The result is beautiful, unusual and challenging joinery. The table is symmetric front to back, with the backs of the drawers exposed. The drawers hang from ebony runners attached to the tops of the drawer sides with mating receivers attached to the underside of the tabletop. The top edges of the drawer fronts are also capped with solid ebony. 2-layer drawer runner receiver screwed to underside of tabletop "Pins" created by grinding off heads of screws 1/4" sq. x 3/s" l. pegs V4" sq. x 3/8" d. mortise Exploded view Battens secure drawer bottom Fingers With Finesse Due to the variation of finger sizes on the drawers, it wasn't obvious how to best cut the joints. I considered a table saw jig but couldn't think of a design that would give accurate, repeatable results for fingers with sizes 17/32", IV4", 15/l6" and 13/32" from top to bottom. Ultimately, I settled on using the router table. My shop-made router table fence was sturdy and straight but the precision and repeatability I needed were a problem. I found a commercial fence from Incra that offered repeatable adjustments of .001". Overkill? Probably, but I know an opportunity to buy a new tool when I see it (incra.com). To make the joints, zero the fence as described in the manual. Determine the movements necessary to make each finger on the drawer sides and record these figure s, allowing for the bit diameter in the calculations. For example, to cut the negative space for the 11/4" finger, the first cut should be 17/32" from the top of the drawer side. Subtracting the bit diameter from the finger size indicates 3/4" of fence movement is required. The finger joints aren't just visible, they are an important design feature. The decorative effect begins with precise cutting. 10 Popular Woodworking February 2007 |


