Popular Woodworking 2007-02 № 160, страница 42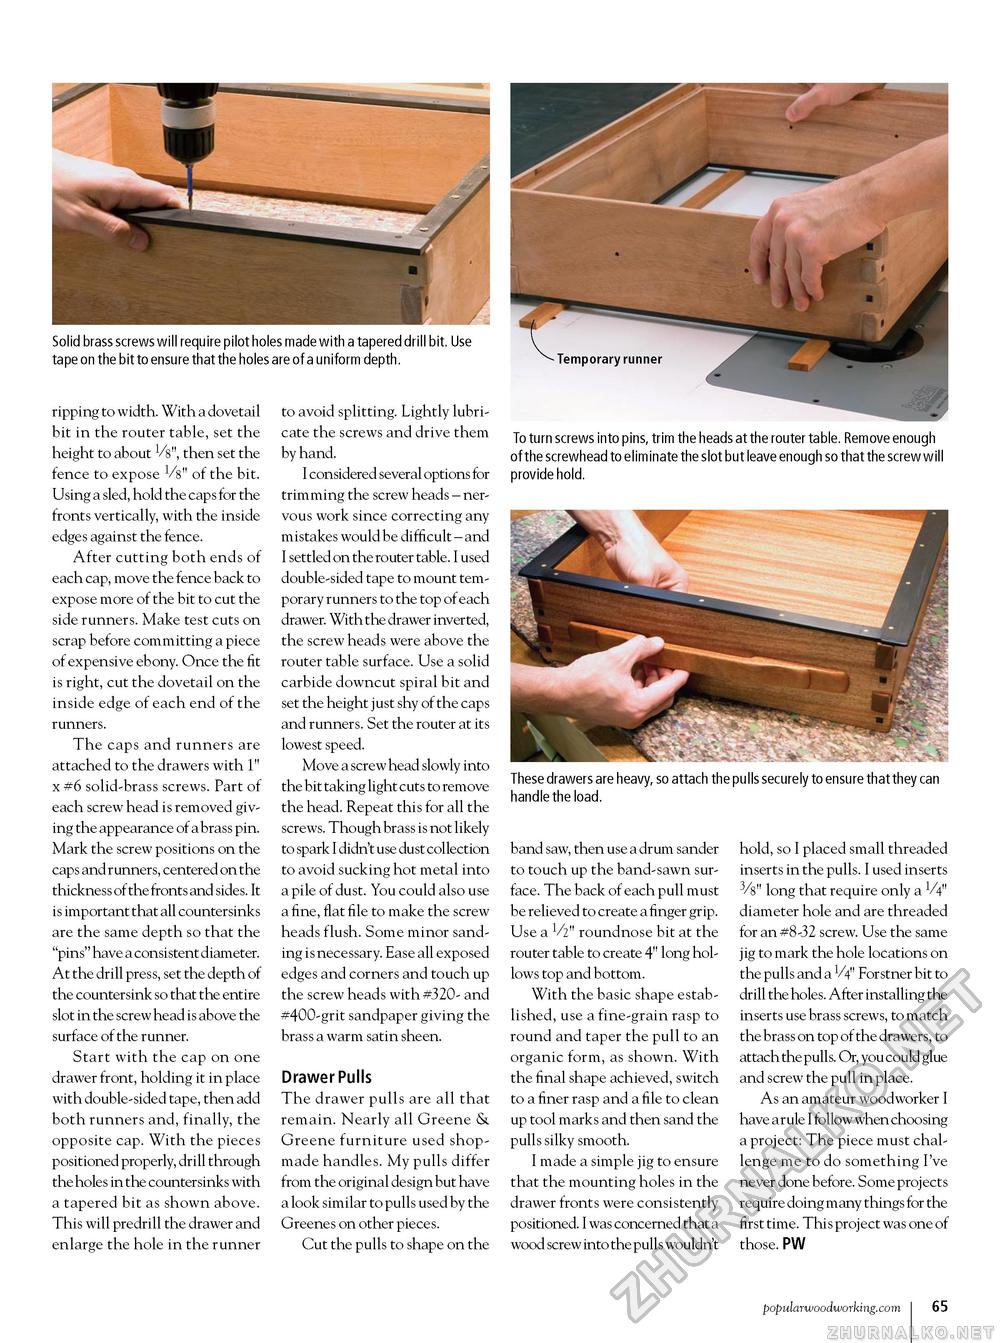
Solid brass screws will require pilot holes made with a tapered drill bit. Use tape on the bit to ensure that the holes are of a uniform depth. ripping to width. With a dovetail bit in the router table, set the height to about V8", then set the fence to expose V8" of the bit. Using a sled, hold the caps for the fronts vertically, with the inside edges against the fence. After cutting both ends of each cap, move the fence back to expose more of the bit to cut the side runners. Make test cuts on scrap before committing a piece of expensive ebony. Once the fit is right, cut the dovetail on the inside edge of each end of the runners. The caps and runners are attached to the drawers with 1" x #6 solid-brass screws. Part of each screw head is removed giving the appearance of a brass pin. Mark the screw positions on the caps and runners, centered on the thickness of the fronts and sides. It is important that all countersinks are the same depth so that the "pins" have a consistent diameter. At the drill press, set the depth of the countersink so that the entire slot in the screw head is above the surface of the runner. Start with the cap on one drawer front, holding it in place with double-sided tape, then add both runners and, finally, the opposite cap. With the pieces positioned properly, drill through the holes in the countersinks with a tapered bit as shown above. This will predrill the drawer and enlarge the hole in the runner to avoid splitting. Lightly lubricate the screws and drive them by hand. I considered several options for trimming the screw heads - nervous work since correcting any mistakes would be difficult - and I settled on the router table. I used double-sided tape to mount temporary runners to the top of each drawer. With the drawer inverted, the screw heads were above the router table surface. Use a solid carbide downcut spiral bit and set the height just shy of the caps and runners. Set the router at its lowest speed. Move a screw head slowly into the bit taking light cuts to remove the head. Repeat this for all the screws. Though brass is not likely to spark I didn't use dust collection to avoid sucking hot metal into a pile of dust. You could also use a fine, flat file to make the screw heads flush. Some minor sanding is necessary. Ease all exposed edges and corners and touch up the screw heads with #320- and #400-grit sandpaper giving the brass a warm satin sheen. Drawer Pulls The drawer pulls are all that remain. Nearly all Greene & Greene furniture used shop-made handles. My pulls differ from the original design but have a look similar to pulls used by the Greenes on other pieces. Cut the pulls to shape on the To turn screws into pins, trim the heads at the router table. Remove enough of the screwhead to eliminate the slot but leave enough so that the screw will provide hold. These drawers are heavy, so attach the pulls securely to ensure that they can handle the load. band saw, then use a drum sander to touch up the band-sawn surface. The back of each pull must be relieved to create a finger grip. Use a 1/2" roundnose bit at the router table to create 4" long hollows top and bottom. With the basic shape established, use a fine-grain rasp to round and taper the pull to an organic form, as shown. With the final shape achieved, switch to a finer rasp and a file to clean up tool marks and then sand the pulls silky smooth. I made a simple jig to ensure that the mounting holes in the drawer fronts were consistently positioned. I was concerned that a wood screw into the pulls wouldn't hold, so I placed small threaded inserts in the pulls. I used inserts 3/8" long that require only a diameter hole and are threaded for an #8-32 screw. Use the same jig to mark the hole locations on the pulls and a V4" Forstner bit to drill the holes. After installing the inserts use brass screws, to match the brass on top of the drawers, to attach the pulls. Or, you could glue and screw the pull in place. As an amateur woodworker I have a rule I follow when choosing a project: The piece must challenge me to do something I've never done before. Some projects require doing many things for the first time. This project was one of those. PW popularwoodworking.com 31 |


