Popular Woodworking 2007-02 № 160, страница 48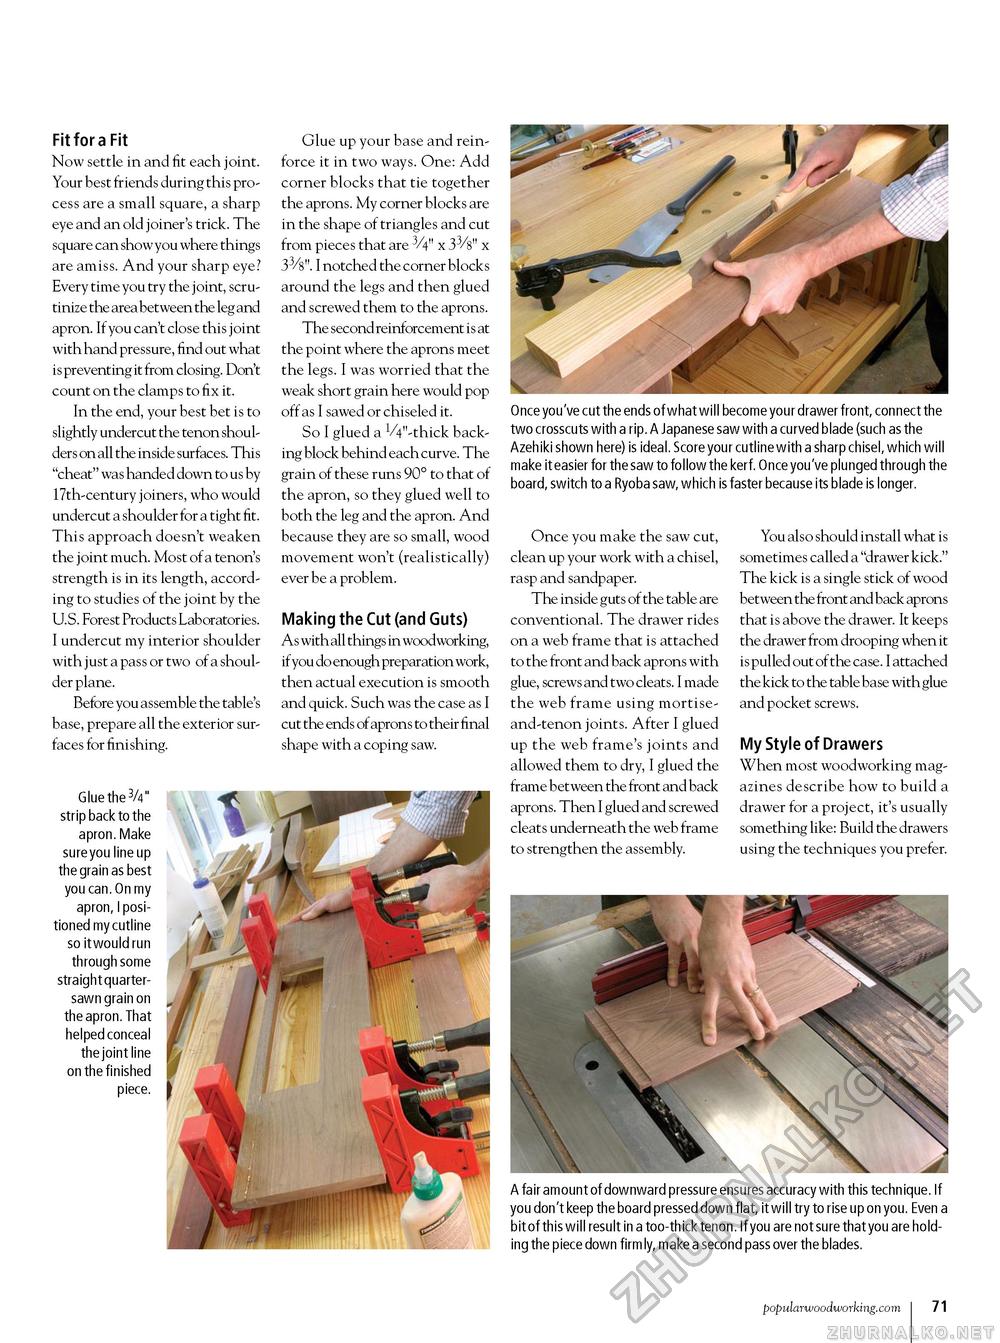
Fit for a Fit Now settle in and fit each joint. Your best friends during this process are a small square, a sharp eye and an old joiner's trick. The square can show you where things are amiss. And your sharp eye? Every time you try the joint, scrutinize the area between the leg and apron. If you can't close this joint with hand pressure, find out what is preventing it from closing. Don't count on the clamps to fix it. In the end, your best bet is to slightly undercut the tenon shoulders on all the inside surfaces. This "cheat" was handed down to us by 17th-century joiners, who would undercut a shoulder for a tight fit. This approach doesn't weaken the joint much. Most of a tenon's strength is in its length, according to studies of the joint by the U.S. Forest Products Laboratories. I undercut my interior shoulder with just a pass or two of a shoulder plane. Before you assemble the table's base, prepare all the exterior surfaces for finishing. Glue the 3/4" strip back to the apron. Make sure you line up the grain as best you can. On my apron, I positioned my cutline so it would run through some straight quarter-sawn grain on the apron. That helped conceal the joint line on the finished Glue up your base and reinforce it in two ways. One: Add corner blocks that tie together the aprons. My corner blocks are in the shape of triangles and cut from pieces that are 3/4" x 33/8" x 33/8". I notched the corner blocks around the legs and then glued and screwed them to the aprons. The second reinforcement is at the point where the aprons meet the legs. I was worried that the weak short grain here would pop off as I sawed or chiseled it. So I glued a VV-thick backing block behind each curve. The grain of these runs 90° to that of the apron, so they glued well to both the leg and the apron. And because they are so small, wood movement won't (realistically) ever be a problem. Making the Cut (and Guts) As with all things in woodworking, if you do enough preparation work, then actual execution is smooth and quick. Such was the case as I cut the ends of aprons to their final shape with a coping saw. piece. Once you've cut the ends of what will become your drawer front, connect the two crosscuts with a rip. A Japanese saw with a curved blade (such as the Azehiki shown here) is ideal. Score your cutline with a sharp chisel, which will make it easier for the saw to follow the kerf. Once you've plunged through the board, switch to a Ryoba saw, which is faster because its blade is longer. Once you make the saw cut, clean up your work with a chisel, rasp and sandpaper. The inside guts of the table are conventional. The drawer rides on a web frame that is attached to the front and back aprons with glue, screws and two cleats. I made the web frame using mortise-and-tenon joints. After I glued up the web frame's joints and allowed them to dry, I glued the frame between the front and back aprons. Then I glued and screwed cleats underneath the web frame to strengthen the assembly. You also should install what is sometimes called a "drawer kick." The kick is a single stick of wood between the front and back aprons that is above the drawer. It keeps the drawer from drooping when it is pulled out of the case. I attached the kick to the table base with glue and pocket screws. My Style of Drawers When most woodworking magazines describe how to build a drawer for a project, it's usually something like: Build the drawers using the techniques you prefer. A fair amount of downward pressure ensures accuracy with this technique. If you don't keep the board pressed down flat, it will try to rise up on you. Even a bit of this will result in a too-thick tenon. If you are not sure that you are holding the piece down firm ly, make a second pass over the blades. popularwoodworking.com 3 1 |


