Popular Woodworking 2007-04 № 161, страница 47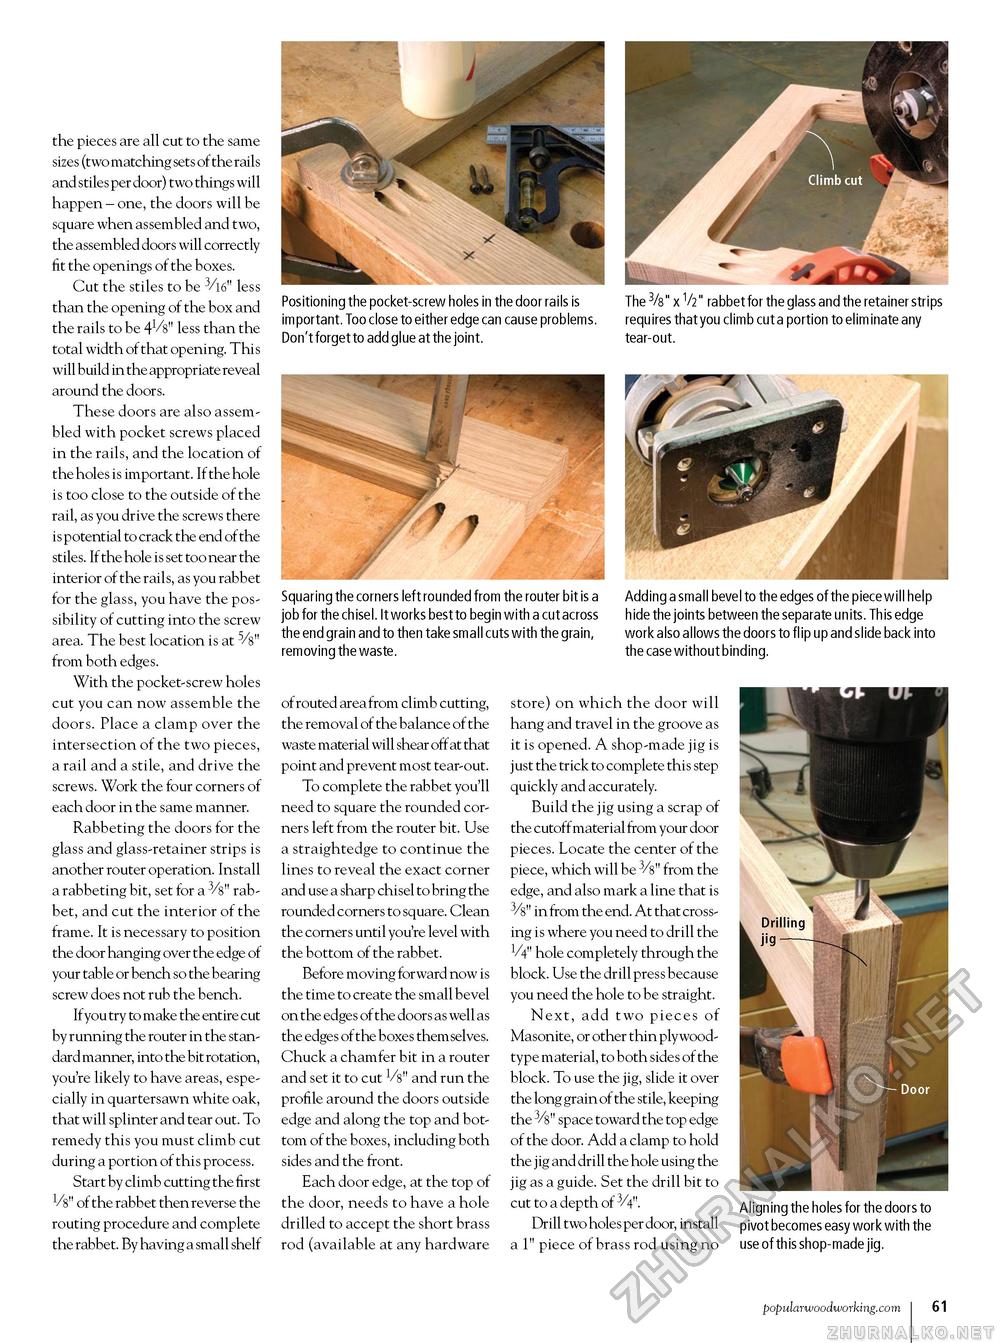
the pieces are all cut to the same sizes (two matching sets of the rails and stiles per door) two things will happen - one, the doors will be square when assembled and two, the assembled doors will correctly fit the openings of the boxes. Cut the stiles to be 3/l6" less than the opening of the box and the rails to be 41/8" less than the total width of that opening. This will build in the appropriate reveal around the doors. These doors are also assembled with pocket screws placed in the rails, and the location of the holes is important. If the hole is too close to the outside of the rail, as you drive the screws there is potential to crack the end of the stiles. If the hole is set too near the interior of the rails, as you rabbet for the glass, you have the possibility of cutting into the screw area. The best location is at from both edges. With the pocket-screw holes cut you can now assemble the doors. Place a clamp over the intersection of the two pieces, a rail and a stile, and drive the screws. Work the four corners of each door in the same manner. Rabbeting the doors for the glass and glass-retainer strips is another router operation. Install a rabbeting bit, set for a 3/8" rabbet, and cut the interior of the frame. It is necessary to position the door hanging over the edge of your table or bench so the bearing screw does not rub the bench. If you try to make the entire cut by running the router in the standard manner, into the bit rotation, you're likely to have areas, especially in quartersawn white oak, that will splinter and tear out. To remedy this you must climb cut during a portion of this process. Start by climb cutting the first V8" of the rabbet then reverse the routing procedure and complete the rabbet. By having a small shelf Positioning the pocket-screw holes in the door rails is important. Too close to either edge can cause problems. Don't forget to add glue at the joint. Squaring the corners left rounded from the router bit is a job for the chisel. It works best to begin with a cut across the end grain and to then take small cuts with the grain, removing the waste. The 3/8" x 1/2" rabbet for the glass and the retainer strips requires that you climb cut a portion to eliminate any tear-out. Adding a small bevel to the edges of the piece will help hide the joints between the separate units. This edge work also allows the doors to flip up and slide back into the case without binding. of routed area from climb cutting, the removal of the balance of the waste material will shear off at that point and prevent most tear-out. To complete the rabbet you'll need to square the rounded corners left from the router bit. Use a straightedge to continue the lines to reveal the exact corner and use a sharp chisel to bring the rounded corners to square. Clean the corners until you're level with the bottom of the rabbet. Before moving forward now is the time to create the small bevel on the edges of the doors as well as the edges of the boxes themselves. Chuck a chamfer bit in a router and set it to cut V8" and run the profile around the doors outside edge and along the top and bottom of the boxes, including both sides and the front. Each door edge, at the top of the door, needs to have a hole drilled to accept the short brass rod (available at any hardware store) on which the door will hang and travel in the groove as it is opened. A shop-made jig is just the trick to complete this step quickly and accurately. Build the jig using a scrap of the cutoff material from your door pieces. Locate the center of the piece, which will be 3/8" from the edge, and also mark a line that is in from the end. At that crossing is where you need to drill the V4" hole completely through the block. Use the drill press because you need the hole to be straight. Next, add two pieces of Masonite, or other thin plywood-type material, to both sides of the block. To use the jig, slide it over the long grain of the stile, keeping the 3/8" space toward the top edge of the door. Add a clamp to hold the jig and drill the hole using the jig as a guide. Set the drill bit to cut to a depth of 3/4". Drill two holes per door, install a 1" piece of brass rod using no Aligning the holes for the doors to pivot becomes easy work with the use of this shop-made jig. popularwoodworking.com I 61 |


