Popular Woodworking 2007-08 № 163, страница 54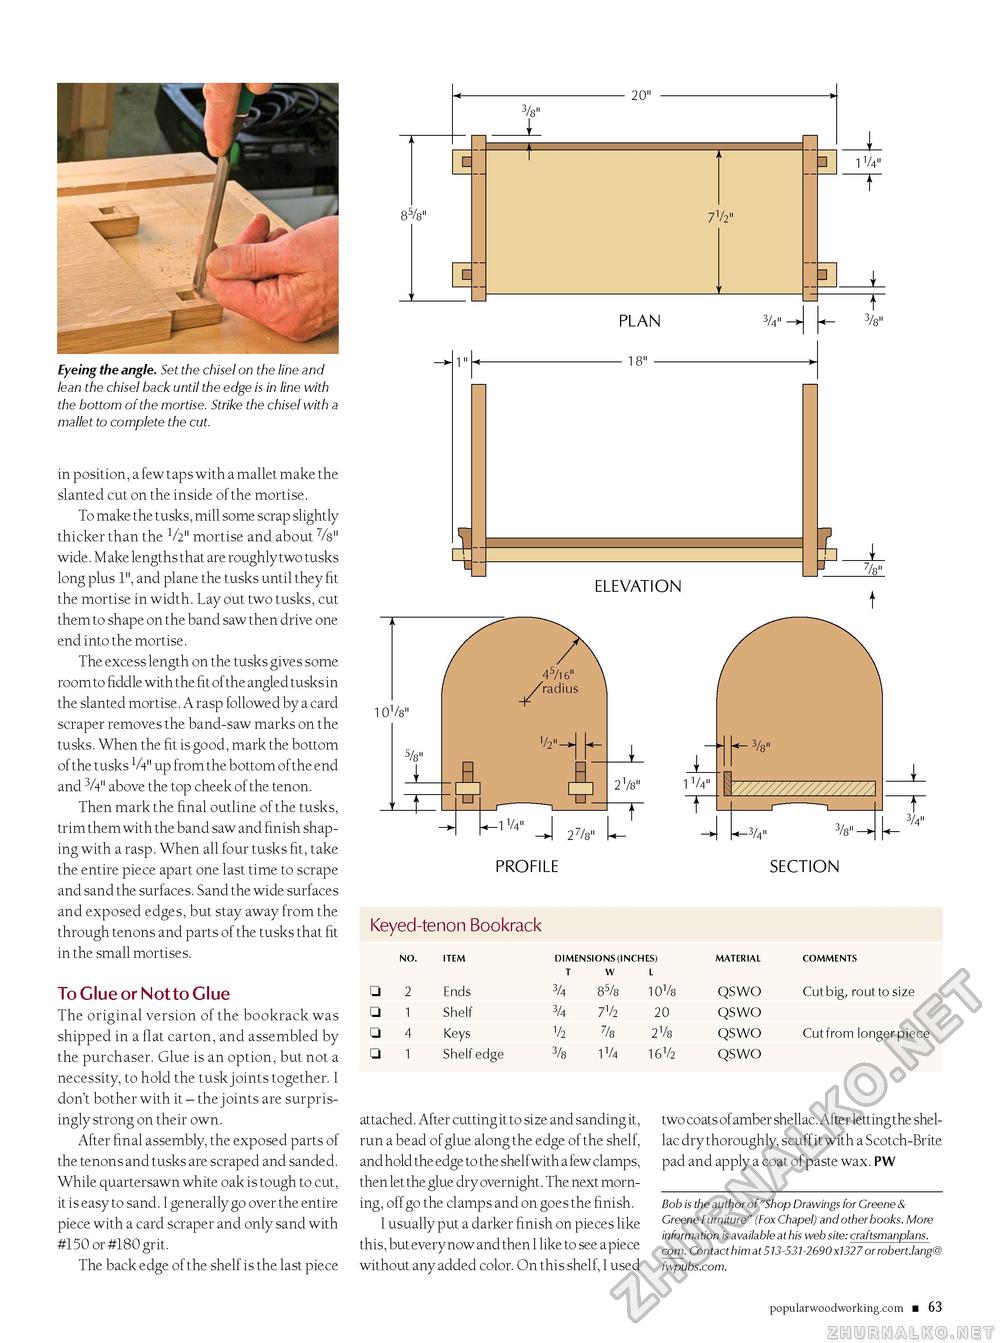
20" 1" 101/s' n TT 7V2" PLAN -18" — 3/4" 1 V4" 1. elevation 12 Hh _r -1V4" profile 27/8" 21 8" 1 1/4" J/4" T 3/4" section Keyed-tenon Bookrack
COMMENTS COMMENTS Cut big, rout to size Cut from longer piece Eyeing the angle. Set the chisel on the line and lean the chisel back until the edge is in line with the bottom of the mortise. Strike the chisel with a mallet to complete the cut. in position, a few taps with a mallet make the slanted cut on the inside of the mortise. To make the tusks, mill some scrap slightly thicker than the V2" mortise and about %" wide. M ake lengths that are roughly two tusks long plus 1", and plane the tusks until they fit the mortise in width. Lay out two tusks, cut them to shape on the band saw then drive one end into the mortise. The excess length on the tusks gives some room to fiddle with the fit of the angled tusks in the slanted mortise. A rasp followed by a card scraper removes the band-saw marks on the tusks. When the fit is good, mark the bottom of the tusks V4" up from the bottom of the end and 3A" above the top cheek of the tenon. Then mark the final outline of the tusks, trim them with the band saw and finish shaping with a rasp. When all four tusks fit, take the entire piece apart one last time to scrape and sand the surfaces. Sand the wide surfaces and exposed edges, but stay away from the through tenons and parts of the tusks that fit in the small mortises. To Glue or Not to Glue The original version of the bookrack was shipped in a flat carton, and assembled by the purchaser. Glue is an option, but not a necessity, to hold the tusk joints together. I don't bother with it - the joints are surprisingly strong on their own. After final assembly, the exposed parts of the tenons and tusks are scraped and sanded. While quartersawn white oak is tough to cut, it is easy to sand. I generally go over the entire piece with a card scraper and only sand with #150 or #180 grit. The back edge of the shelf is the last piece attached. After cutting it to size and sanding it, run a bead of glue along the edge of the shelf, and hold the edge to the shelfwith a few clamps, then let the glue dry overnight. The next morning, off go the clamps and on goes the finish. I usually put a darker finish on pieces like this, but every now and then I like to see a piece without any added color. On this shelf, I used two coats of amber shellac. After letting the shellac dry thoroughly, scuff it with a Scotch-Brite pad and apply a coat of paste wax. PW Bob is the author of "Shop Drawings for Greene & Greene Furniture" (Fox Chapel) and other books. More information is available at his web site: craftsmanplans. com. Contact him at 513-531-2690 x1327 or robert.lang@ fwpubs.com. popularwoodworking.com ■ 63 |
||||||||||||||||||||||||||||||||||||||||||


