Popular Woodworking 2007-10 № 164, страница 44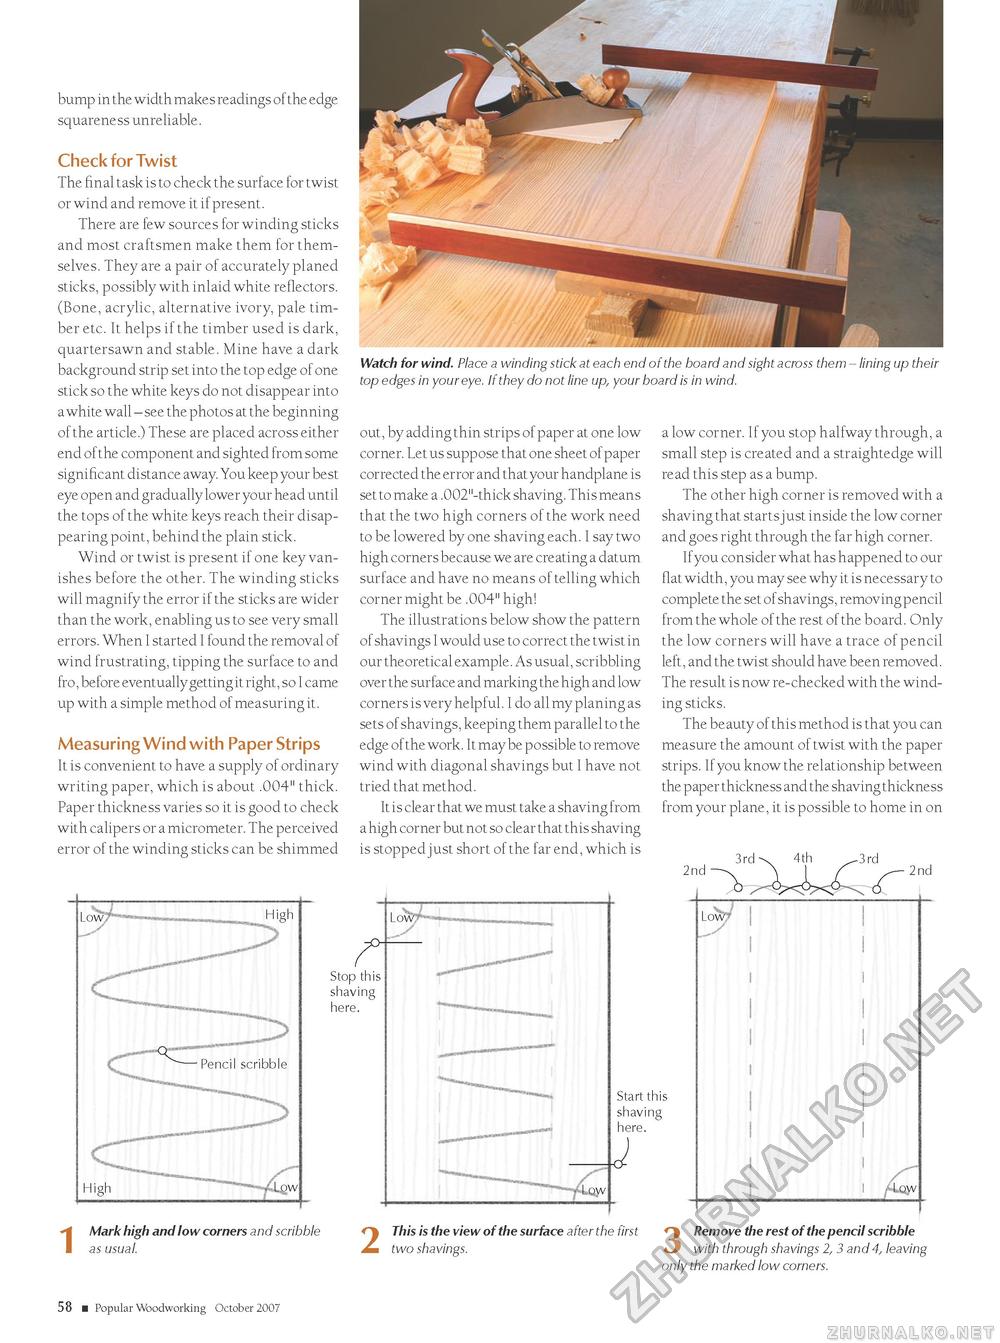
bump in the width makes readings of the edge squareness unreliable. Check for Twist The final task is to check the surface for twist or wind and remove it if present. There are few sources for winding sticks and most craftsmen make them for themselves. They are a pair of accurately planed sticks, possibly with inlaid white reflectors. (Bone, acrylic, alternative ivory, pale timber etc. It helps if the timber used is dark, quartersawn and stable. Mine have a dark background strip set into the top edge of one stick so the white keys do not disappear into a white wall - see the photos at the beginning of the article.) These are placed across either end of the component and sighted from some significant distance away. You keep your best eye open and gradually lower your head until the tops of the white keys reach their disappearing point, behind the plain stick. Wind or twist is present if one key vanishes before the other. The winding sticks will magnify the error if the sticks are wider than the work, enabling us to see very small errors. When I started I found the removal of wind frustrating, tipping the surface to and fro, before eventually getting it right, so I came up with a simple method of measuring it. Measuring Wind with Paper Strips It is convenient to have a supply of ordinary writing paper, which is about .004" thick. Paper thickness varies so it is good to check with calipers or a micrometer. The perceived error of the winding sticks can be shimmed Low c High . - ■ Pencil scribble Watch for wind. Place a winding stick at each end of the board and sight across them - lining up their top edges in your eye. If they do not line up, your board is in wind. out, by adding thin strips of paper at one low corner. Let us suppose that one sheet of paper corrected the error and that your handplane is set to make a .002"-thick shaving. This means that the two high corners of the work need to be lowered by one shaving each. I say two high corners because we are creating a datum surface and have no means of telling which corner might be .004" high! The illustrations below show the pattern of shavings I would use to correct the twist in our theoretical example. As usual, scribbling over the surface and marking the high and low corners is very helpful. I do all my planing as sets of shavings, keeping them parallel to the edge of the work. It may be possible to remove wind with diagonal shavings but I have not tried that method. It is clear that we must take a shaving from a high corner but not so clear that this shaving is stopped just short of the far end, which is a low corner. If you stop halfway through, a small step is created and a straightedge will read this step as a bump. The other high corner is removed with a shaving that starts just inside the low corner and goes right through the far high corner. If you consider what has happened to our flat width, you may see why it is necessary to complete the set of shavings, removing pencil from the whole of the rest of the board. Only the low corners will have a trace of pencil left, and the twist should have been removed. The result is now re-checked with the winding sticks. The beauty of this method is that you can measure the amount of twist with the paper strips. If you know the relationship between the paper thickness and the shaving thickness from your plane, it is possible to home in on 2nd Stop this shaving here. Start this shaving here. IMark high and low corners and scribble as usual. 2 This is the view of the surface after the first two shavings. 3 Remove the rest of the pencil scribble with through shavings 2, 3 and4, leaving only the marked low corners. 58 ■ Popular Woodworking October 2007 |


