Popular Woodworking 2007-10 № 164, страница 45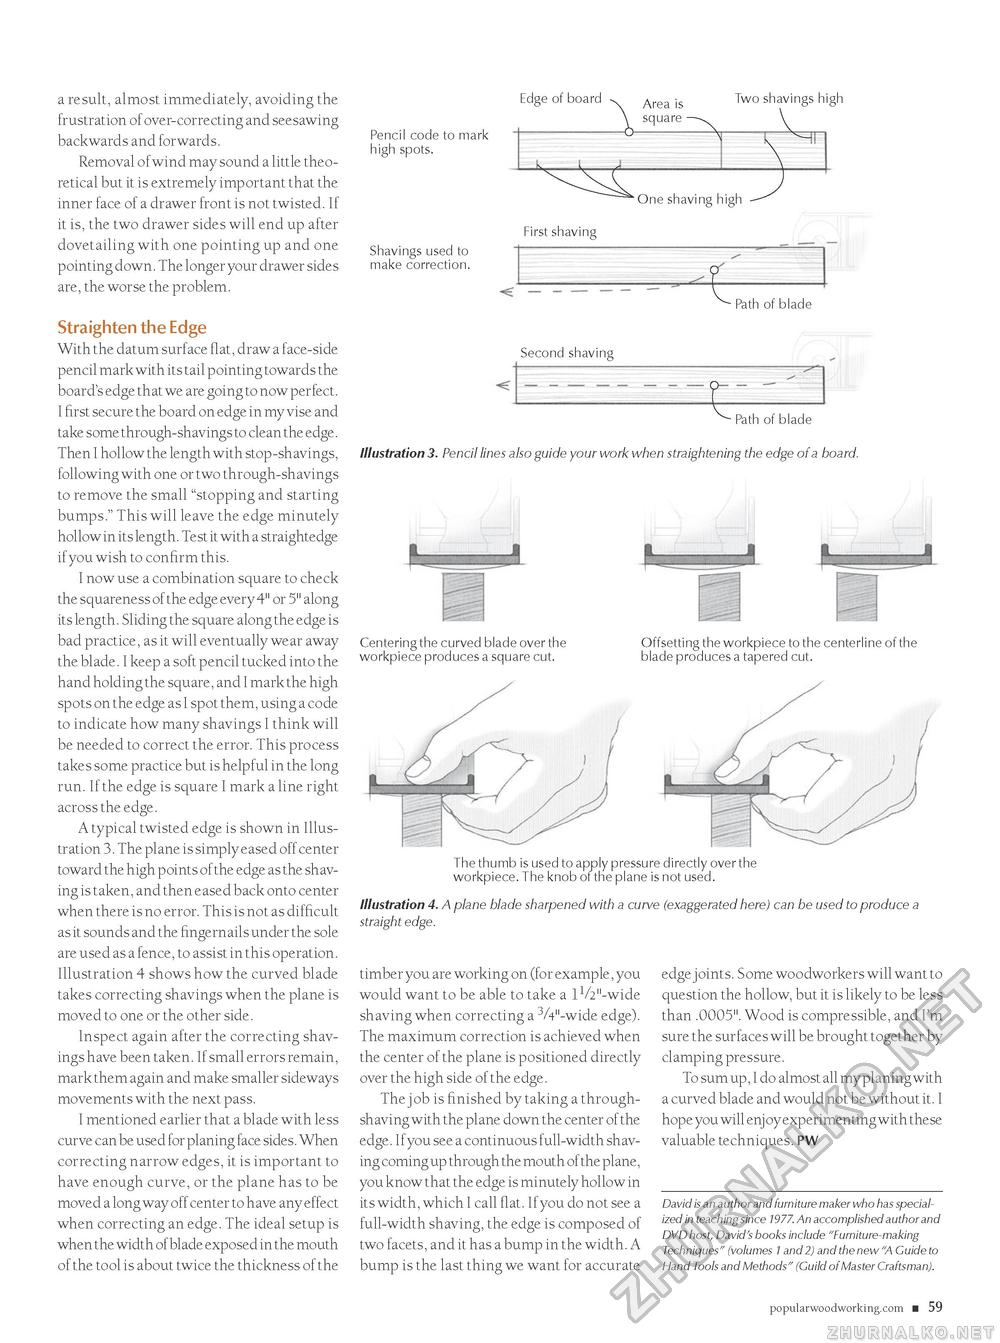
a result, almost immediately, avoiding the frustration of over-correcting and seesawing backwards and forwards. Removal of wind may sound a little theoretical but it is extremely important that the inner face of a drawer front is not twisted. If it is, the two drawer sides will end up after dovetailing with one pointing up and one pointing down. The longer your drawer sides are, the worse the problem. Straighten the Edge With the datum surface flat, draw a face-side pencil mark with its tail pointing towards the board's edge that we are going to now perfect. I first secure the board on edge in my vise and take some through-shavings to clean the edge. Then I hollow the length with stop-shavings, following with one or two through-shavings to remove the small "stopping and starting bumps." This will leave the edge minutely hollow in its length. Test it with a straightedge if you wish to confirm this. I now use a combination square to check the squareness of the edge every 4" or 5" along its length. Sliding the square along the edge is bad practice, as it will eventually we ar away the blade. I keep a soft pencil tucked into the hand holding the square, and I mark the high spots on the edge as I spot them, using a code to indicate how many shavings I think will be needed to correct the error. This process takes some practice but is helpful in the long run. If the edge is square I mark a line right across the edge. A typical twisted edge is shown in Illustration 3. The plane is simply eased off center toward the high points of the edge as the shaving is taken, and then eased back onto center when there is no error. This is not as difficult as it sounds and the fingernails under the sole are used as a fence, to assist in this operation. Illustration 4 shows how the curved blade takes correcting shavings when the plane is moved to one or the other side. Inspect again after the correcting shavings have been taken. If small errors remain, mark them again and make smaller sideways movements with the next pass. I mentioned earlier that a blade with less curve can be used for planing face sides. When correcting narrow edges, it is important to have enough curve, or the plane has to be moved a long way off center to have any effect when correcting an edge. The ideal setup is when the width of blade exposed in the mouth of the tool is about twice the thickness of the Centering the curved blade over the workpiece produces a square cut. timber you are working on (for example, you would want to be able to take a 11/2"-wide shaving when correcting a 3/4"-wide edge). The maximum correction is achieved when the center of the plane is positioned directly over the high side of the edge. The j ob is finished by taking a through-shaving with the plane down the center of the edge. If you see a continuous full-width shaving coming up through the mouth of the plane, you know that the edge is minutely hollow in its width, which I call flat. If you do not see a full-width shaving, the edge is composed of two facets, and it has a bump in the width. A bump is the last thing we want for accurate offsetting the workpiece to the centerline of the blade produces a tapered cut. edge joints. Some woodworkers will want to question the hollow, but it is likely to be less than .0005". Wood is compressible, and I'm sure the surfaces will be brought together by clamping pressure. To sum up, I do almost all my planing with a curved blade and would not be without it. I hope you will enjoy experimenting with these valuable techniques. PW David is an author and furniture maker who has specialized in teaching since 1977. An accomplished author and DVD host, David's books include "Furniture-making Techniques" (volumes 1 and 2) and the new "A Guide to Hand Tools and Methods" (Guild of Master Craftsman). The thumb is used to apply pressure directly over the workpiece. the knob of the plane is not used. Illustration 4. A plane blade sharpened with a curve (exaggerated here) can be used to produce a straight edge. Pencil code to mark high spots. Edge of board ^ Area is Two shavings high square —^ \ _L-_L_A. One shaving high First shaving Shavings used to make correction. Path of blade Second shaving Path of blade Illustration 3. Pencil lines also guide your work when straightening the edge of a board. popularwoodworking.com ■ 59 CIRCLE #152 ON FREE INFORMATION CARD. |


