Popular Woodworking 2007-12 № 166, страница 20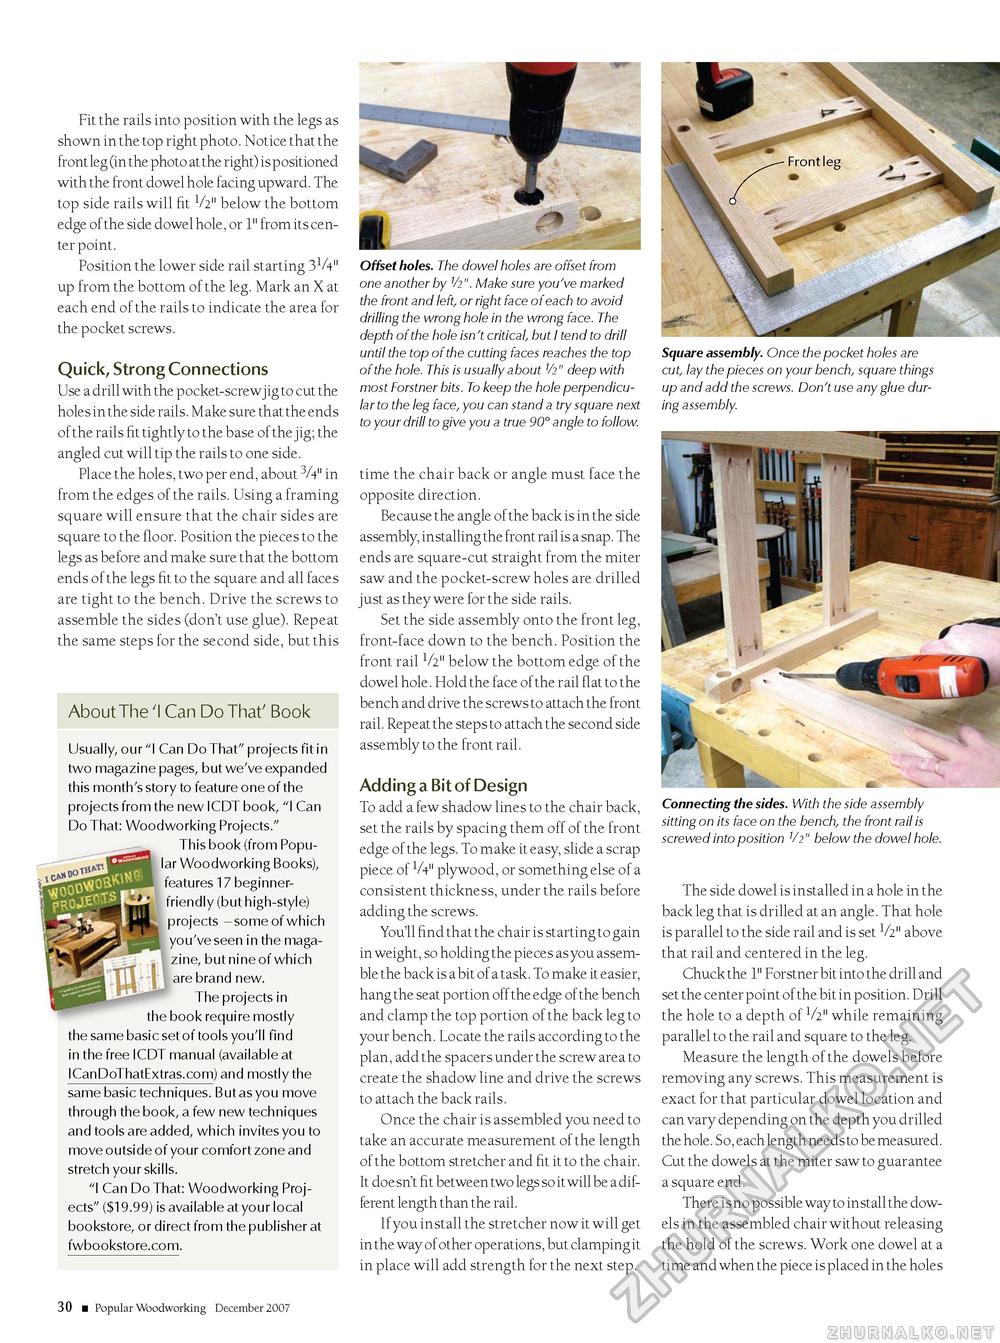
Fit the rails into position with the legs as shown in the top right photo. Notice that the front leg (in the photo at the right) is positioned with the front dowel hole facing upward. The top side rails will fit V2" below the bottom edge of the side dowel hole, or 1" from its center point. Position the lower side rail starting 31A" up from the bottom of the leg. Mark an X at each end of the rails to indicate the area for the pocket screws. Quick, Strong Connections Use a drill with the pocket-screwjig to cut the holes in the side rails. Make sure that the ends of the rails fit tightly to the base of the jig; the angled cut will tip the rails to one side. Place the holes, two per end, about 3A" in from the edges of the rails. Using a framing square will ensure that the chair sides are square to the floor. Position the pieces to the legs as before and make sure that the bottom ends of the legs fit to the square and all faces are tight to the bench. Drive the screws to assemble the sides (don't use glue). Repeat the same steps for the second side, but this About The 'I Can Do That' Book Usually, our "I Can Do That" projects fit in two magazine pages, but we've expanded this month's story to feature one of the projects from the new ICDT book, "I Can Do That: Woodworking Projects." This book (from Popular Woodworking Books), features 17 beginner-friendly (but high-style) projects - some of which you've seen in the magazine, but nine of which are brand new. The projects in the book require mostly the same basic set of tools you'll find in the free ICDT manual (available at ICanDoThatExtras.com) and mostly the same basic techniques. But as you move through the book, a few new techniques and tools are added, which invites you to move outside of your comfort zone and stretch your skills. "I Can Do That: Woodworking Projects" ($19.99) is available at your local bookstore, or direct from the publisher at fwbookstore.com. Offset holes. The dowel holes are offset from one another by V2". Make sure you've marked the front and left, or right face of each to avoid drilling the wrong hole in the wrong face. The depth of the hole isn't critical, but I tend to drill until the top of the cutting faces reaches the top of the hole. This is usually about V2" deep with most Forstner bits. To keep the hole perpendicular to the leg face, you can stand a try square next to your drill to give you a true 90° angle to follow. time the chair back or angle must face the opposite direction. Because the angle of the back is in the side assembly, installing the front rail is a snap. The ends are square-cut straight from the miter saw and the pocket-screw holes are drilled just as they were for the side rails. Set the side assembly onto the front leg, front-face down to the bench. Position the front rail V2" below the bottom edge of the dowel hole. Hold the face of the rail flat to the bench and drive the screws to attach the front rail. Repeat the steps to attach the second side assembly to the front rail. Adding a Bit of Design To add a few shadow lines to the chair back, set the rails by spacing them off of the front edge of the legs. To make it easy, slide a scrap piece of V4" plywood, or something else of a consistent thickness, under the rails before adding the screws. You'll find that the chair is starting to gain in weight, so holding the pieces as you assemble the back is a bit of a task. To make it easier, hang the seat portion off the edge of the bench and clamp the top portion of the back leg to your bench. Locate the rails according to the plan, add the spacers under the screw area to create the shadow line and drive the screws to attach the back rails. Once the chair is assembled you need to take an accurate measurement of the length of the bottom stretcher and fit it to the chair. It doesn't fit between two legs so it will be a different length than the rail. If you install the stretcher now it will get in the way of other operations, but clamping it in place will add strength for the next step. Square assembly. Once the pocket holes are cut, lay the pieces on your bench, square things up and add the screws. Don't use any glue during assembly. Connecting the sides. With the side assembly sitting on its face on the bench, the front rail is screwed into position 1/2" below the dowel hole. The side dowel is installed in a hole in the back leg that is drilled at an angle. That hole is parallel to the side rail and is set V2" above that rail and centered in the leg. Chuck the 1" Forstner bit into the drill and set the center point of the bit in position. Drill the hole to a depth of V2" while remaining parallel to the rail and square to the leg. Measure the length of the dowels before removing any screws. This measurement is exact for that particular dowel location and can vary depending on the depth you drilled the hole. So, each length needs to be measured. Cut the dowels at the miter saw to guarantee a square end. There is no possible way to install the dowels in the assembled chair without releasing the hold of the screws. Work one dowel at a time and when the piece is placed in the holes 30 ■ Popular Woodworking December 2007 |


