Popular Woodworking 2008-04 № 168, страница 54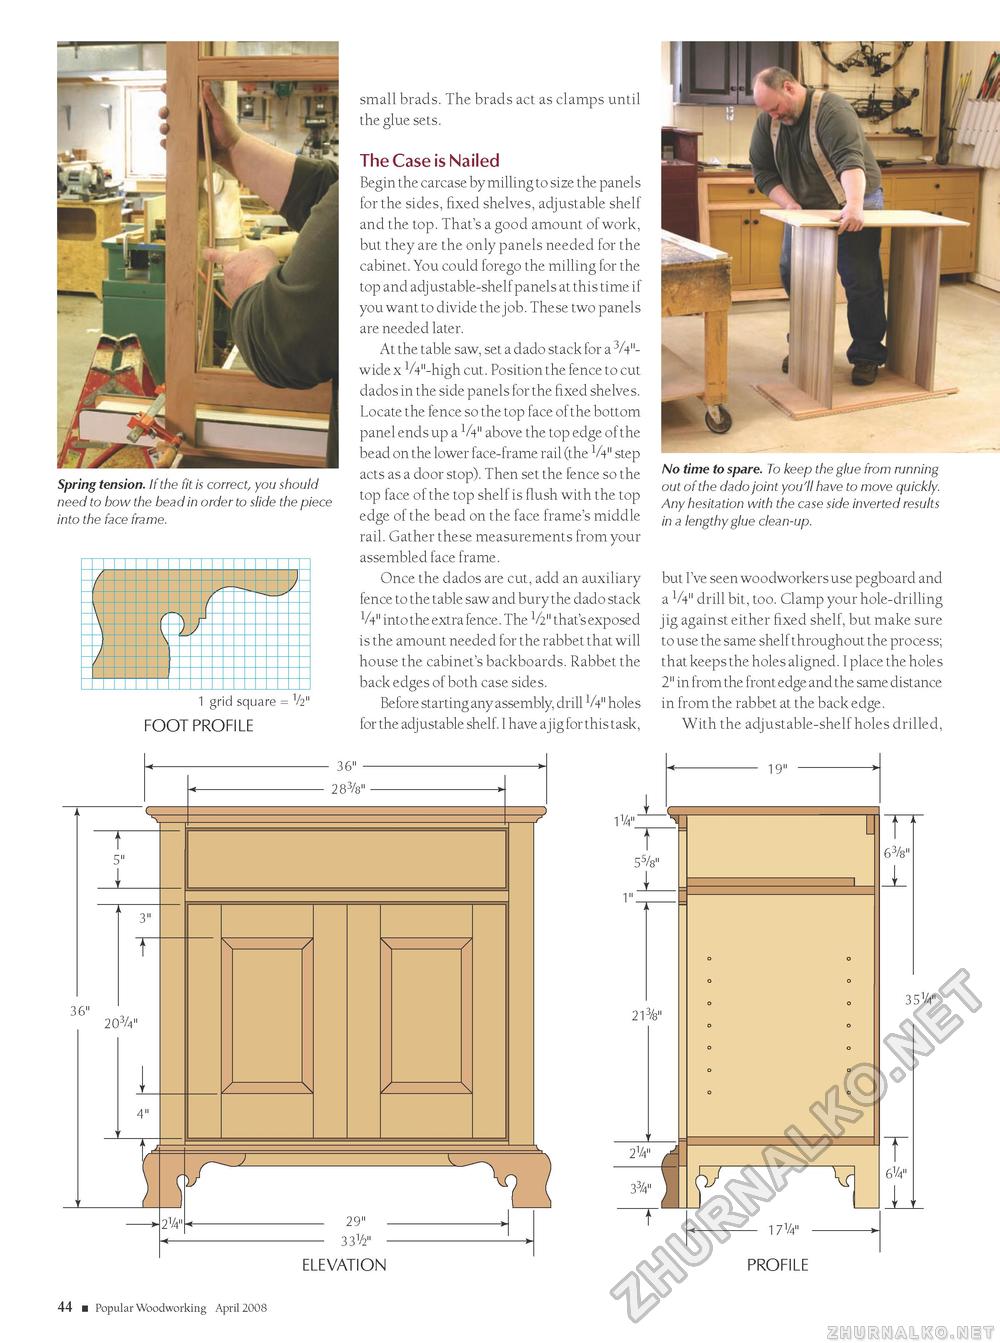
Spring tension. If the fit is correct, you should need to bow the bead in order to slide the piece into the face frame. 1 grid square = V2" FOOT PROFILE small brads. The brads act as clamps until the glue sets. The Case is Nailed Begin the carcase by milling to size the panels for the sides, fixed shelves, adjustable shelf and the top. That's a good amount of work, but they are the only panels needed for the cabinet. You could forego the milling for the top and adjustable-shelf panels at this time if you want to divide the job. These two panels are needed later. At the table saw, set a dado stack for a 3A"-wide x VV'-high cut. Position the fence to cut dados in the side panels for the fixed shelves. Locate the fence so the top face of the bottom panel ends up a V4" above the top edge of the bead on the lower face-frame rail (the V4" step acts as a door stop). Then set the fence so the top face of the top shelf is flush with the top edge of the bead on the face frame's middle rail. Gather these measurements from your assembled face frame. Once the dados are cut, add an auxiliary fence to the table saw and bury the dado stack V4" into the extra fence. The 1/2" that's exposed is the amount needed for the rabbet that will house the cabinet's backboards. Rabbet the back edges of both case sides. Before starting any assembly, drill V4" holes for the adjustable shelf. I have ajig for this task, No time to spare. To keep the glue from running out of the dado joint you'll have to move quickly. Any hesitation with the case side inverted results in a lengthy glue clean-up. but I've seen woodworkers use pegboard and a V4" drill bit, too. Clamp your hole-drilling jig against either fixed shelf, but make sure to use the same shelf throughout the process; that keeps the holes aligned. I place the holes 2" in from the front edge and the same distance in from the rabbet at the back edge. With the adjustable-shelf holes drilled, 11/4" i 19" T~ 5s/8" 1 213/8" 2V4" A \ ii-fj^ 35V4" 17V4" T 6V4" 1 ELEVATION PROFILE 44 ■ Popular Woodworking April 2008 MX |


