Popular Woodworking 2008-04 № 168, страница 55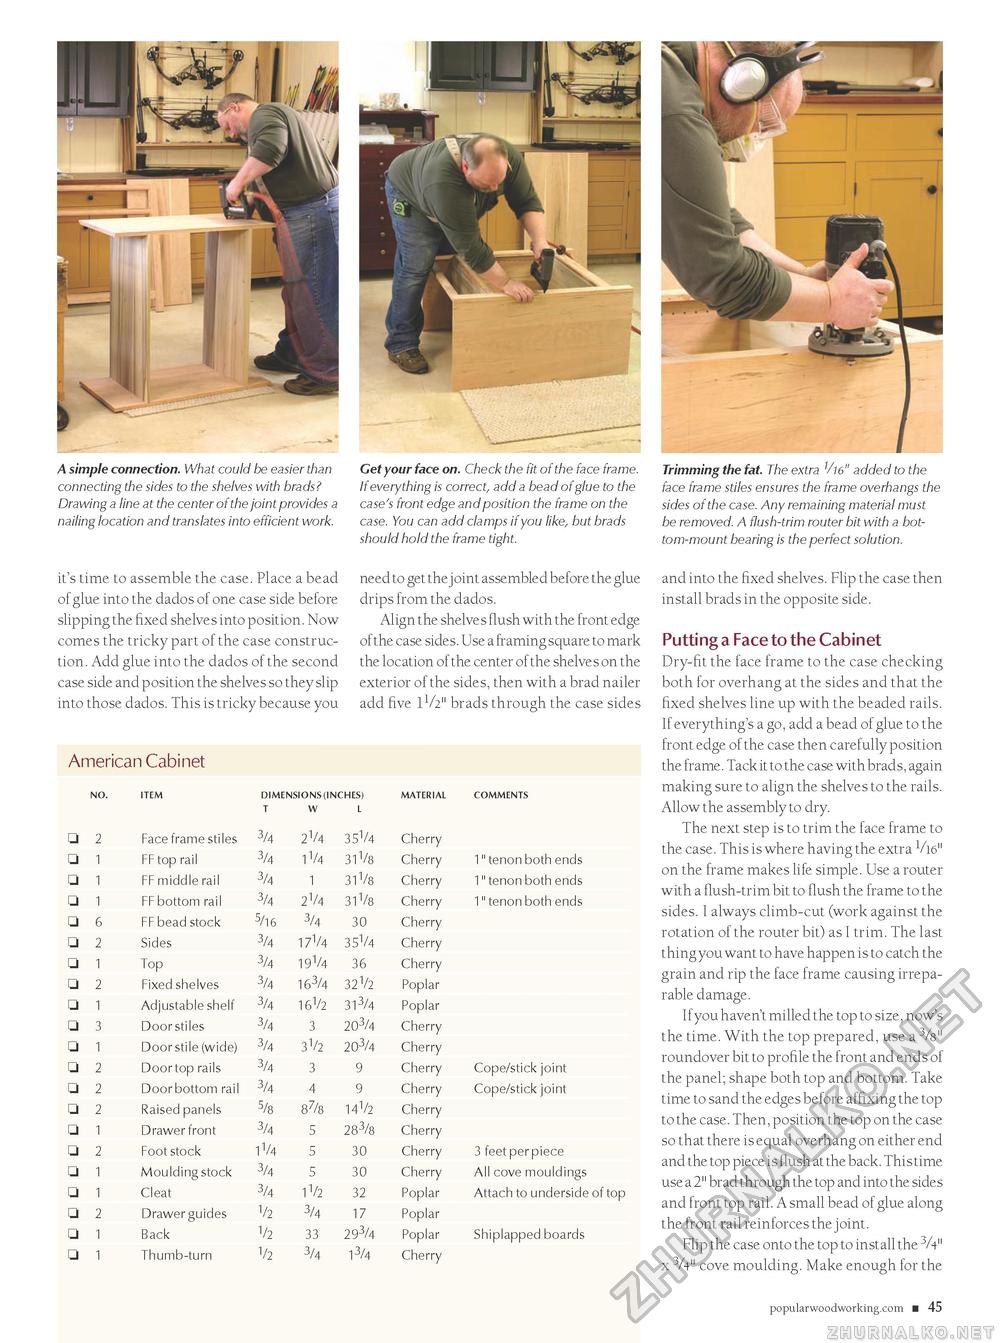
A simple connection. What could be easier than connecting the sides to the shelves with brads? Drawing a line at the center of the joint provides a nailing location and translates into efficient work. it's time to assemble the case. Place a bead of glue into the dados of one case side before slipping the fixed shelves into position. Now comes the tricky part of the case construction. Add glue into the dados of the second case side and position the shelves so they slip into those dados. This is tricky because you Get your face on. Check the fit of the face frame. If everything is correct, add a bead of glue to the case's front edge and position the frame on the case. You can add clamps if you like, but brads should hold the frame tight. need to get the j oint assembled before the glue drips from the dados. Align the shelves flush with the front edge of the case sides. Use a framing square to mark the location of the center of the shelves on the exterior of the sides, then with a brad nailer add five 11/2" brads through the case sides American Cabinet DiMENSiONS (iNCHES) T W L COMMENTS □ □ □ □ □ □ □ □ □ □ □ □ □ □ □ □ □ □ □ □ □ Face frame stiles FF top rail FF middle rail FF bottom rail FF bead stock Sides Top Fixed shelves Adjustable shelf Door stiles Door stile (wide) Door top rails Door bottom rail Raised panels Drawer front Foot stock Moulding stock Cleat Drawer guides Back Thumb-turn 3/4 3/4 3/4 3/4 S/16 3/4 3/4 3/4 3/4 3/4 3/4 3/4 3/4 5/8 3/4 1V4 3/4 3/4 12 12 12 2V4 35V4 1V4 31V8 1 3 4 87/8 5 5 5 1V2 3/4 33 3/4 31V8 2V4 31V8 3/4 30 17V4 35V4 19V4 36 163/4 32V2 16V2 313^4 203/4 3V2 203/4 3 9 9 14V2 283/8 30 30 32 17 293/4 13/4 Cherry Cherry Cherry Cherry Cherry Cherry Cherry Poplar Poplar Cherry Cherry Cherry Cherry Cherry Cherry Cherry Cherry Poplar Poplar Poplar Cherry 1" tenon both ends 1" tenon both ends 1" tenon both ends Cope/stick joint Cope/stick joint 3 feet per piece All cove mouldings Attach to underside of top Shiplapped boards Trimming the fat. The extra V16" added to the face frame stiles ensures the frame overhangs the sides of the case. Any remaining material must be removed. A flush-trim router bit with a bottom-mount bearing is the perfect solution. and into the fixed shelves. Flip the case then install brads in the opposite side. Putting a Face to the Cabinet Dry-fit the face frame to the case checking both for overhang at the sides and that the fixed shelves line up with the beaded rails. If everything's a go, add a bead of glue to the front edge of the case then carefully position the frame. Tack it to the case with brads, again making sure to align the shelves to the rails. Allow the assembly to dry. The next step is to trim the face frame to the case. This is where having the extra 1/16" on the frame makes life simple. Use a router with a flush-trim bit to flush the frame to the sides. I always climb-cut (work against the rotation of the router bit) as I trim. The last thing you want to have happen is to catch the grain and rip the face frame causing irreparable damage. If you haven't milled the top to size, now's the time. With the top prepared, use a roundover bit to profile the front and ends of the panel; shape both top and bottom. Take time to sand the edges before affixing the top to the case. Then, position the top on the case so that there is equal overhang on either end and the top piece is flush at the back. This time use a 2" brad through the top and into the sides and front top rail. A small bead of glue along the front rail reinforces the joint. Flip the case onto the top to install the 3/4" x V4" cove moulding. Make enough for the popularwoodworking.com ■ 45 CIRCLE #100 ON FREE INFORMATION CARD. |


