Popular Woodworking 2008-06 № 169, страница 13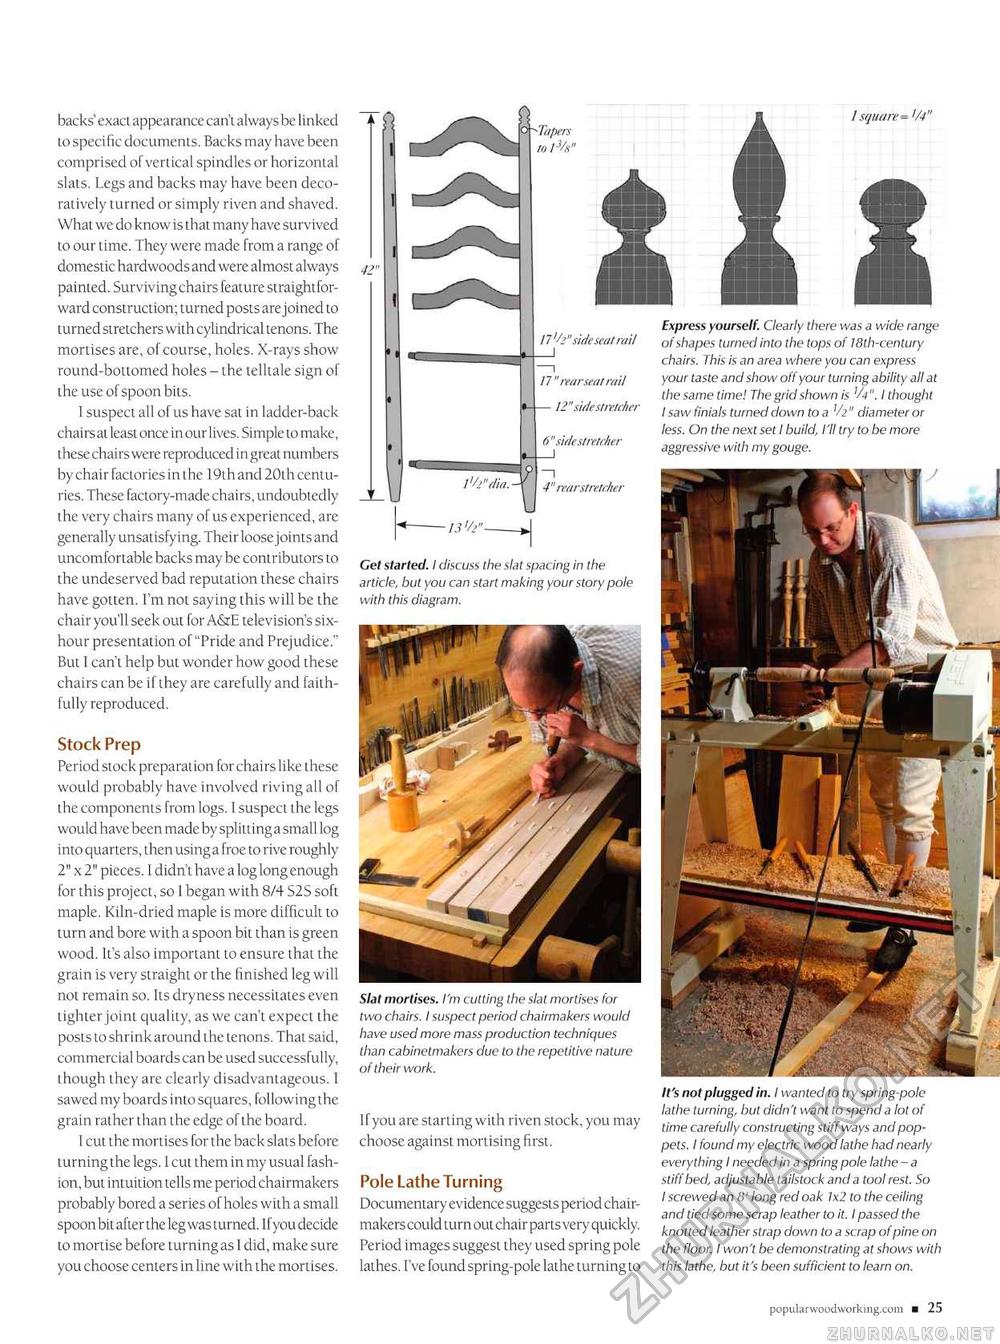
backs' exact appea ranee can't always be 1 i nked to specific documents. Backs may have been comprised of vertical spindles or horizontal slats. Legs and backs may have been deco-ratively turned or simply riven and shaved. What we do know is that many have survived to our lime. They were made from a range of domestic hardwoods and were almost always painted. Surviving chairs feature straightforward construction; turned posts are joined to turned stretchers with cylindrical tenons. The mortises are, of course, holes. X-rays show round-bottomed holes - the telltale sign of the use of spoon bits. I suspect all of us have sat in ladder-back chairsat least once in ourlives. Simple to make, these chairs were reproduced in great numbers by chair factories in the 19th and 20th centuries. These factory-made chairs, undoubtedly the very chairs many of us experienced, are generally unsatisfying. Their loose joints and uncomfortable backs may be contributors to the undeserved bad reputation these chairs have gotten. I'm not saying this will be the chair you'll seek out for A&E television's six-hour presentation of "Pride and Prejudice." But 1 can't help but wonder how good these chairs can be if they are carefully and faithfully reproduced. Stock Prep Period stock preparation forchairslike these would probably have involved riving all of the components from logs. 1 suspect the legs would have been made by splittinga small log into quarters, then usinga froe to rive roughly 2" x 2" pieces. 1 didn't have a log long enough for this project, so 1 began with 8/4 S2S soft maple. Kiln-dried maple is more difficult to turn and bore with a spoon bit than is green wood. It's also important to ensure that the grain is very straight or the finished leg will not remain so. Its dryness necessitates even tighter joint quality, as we can't expect the posts to shrink around the tenons. That said, commercial boards can be used successfully, though they are clearly disadvantageous. I sawed my boards into squares, following the grain rather than the edge of the board. I cut the mortises for the back slats before turning the legs. 1 cut them in my usual fashion, but intuition tells me period chairmakers probably bored a series of holes with a small spoon bit after the leg was turned. Ifyou decide to mortise before turning as I did, make sure you choose centers in line with the n 1 square— W n " rear seat rati 12" side stretcher Get started. I discuss the slat spacing in the article, but you can start making your story pole with this diagram. Slat mortises. I'm cutting the slat mortises for two chairs. I suspect period chairmakers would have used more mass production techniques than cabinetmakers due to the repetitive nature of their work. Ifyou are starting with riven stock, you may choose against mortising first. Pole Lathe Turning Documentary evidence suggests period chairmakers could turn out chair parts very quickly. Period images suggest they used spring pole lathes. I've found spring-pole lathe turning to Express yourself. Clearly there was a wide range of shapes turned into the tops of 18th-century chairs. This is an area where you can express your taste and show off your turning ability all at the same time! The grid shown is 'A". I thought I saw finials turned down to a '<6" diameter or less. On the next set I build, I'll try to be more aggressive with my gouge. It's not plugged in. I wanted to try spring-pole lathe turning, but didn't want to spend a lot of time carefully constructing stiff ways and poppets. I found my electric wood lathe had nearly everything I needed in a spring pole lathe - a stiff bed, adjustable tailstock and a tool rest. So I screwed an 8' long red oak 1x2 to the ceiling and tied some scrap leather to it. I passed the knotted leather strap down to a scrap of pine on the floor. I won't be demonstrating at shows with this lathe, but it's been sufficient to learn on. ■ 25 |


