Popular Woodworking 2008-06 № 169, страница 14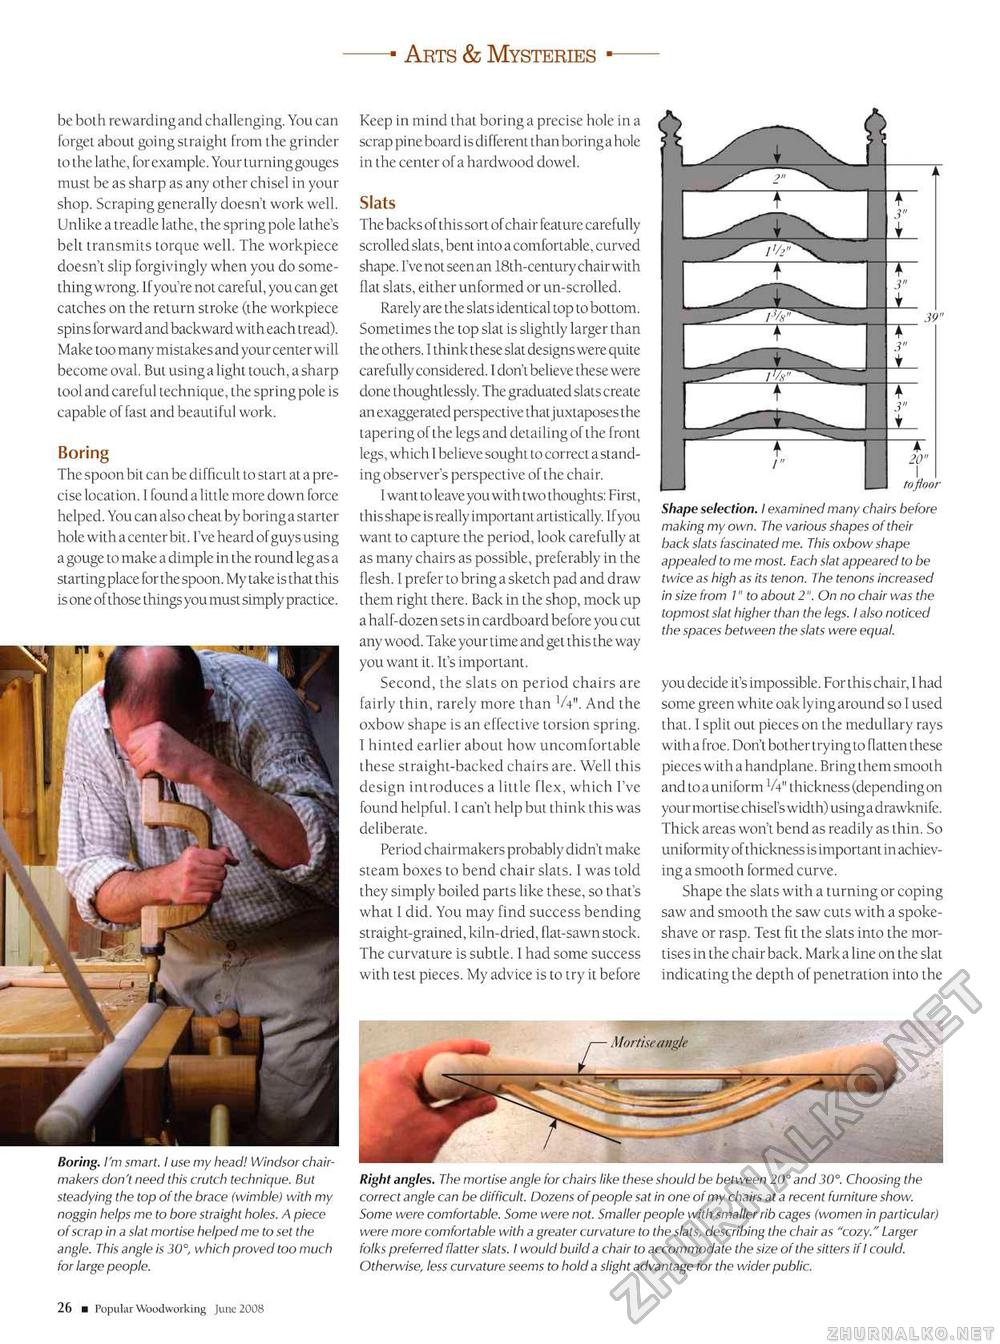
—- Arts & Mysteries ■— be bolh rewarding and challenging. You can forget about going straight from the grinder to the lathe, forexample. Your turninggouges must be as sharp as any other chisel in your shop. Scraping generally doesn't work well. Unlike a treadle lathe, the spring pole lathe's belt transmits torque well. The workpiece doesn't slip forgivingly when you do something wrong. If you're not careful, you can get catches on the return stroke (the workpiece spins forward and backward with each tread). Make too many mistakes and your center will become oval. But using a light touch, a sharp tool and careful technique, the spring pole is capable of fast and beautiful work. Boring The spoon bit can be difficult to start at a precise location. I found a little more down force helped. You can also cheat by boring a starter hole with a center bit. I've heard of guys using a gouge to make a dimple in the round leg as a starting place for the spoon. My take is that this is one of those things you must simply practice. Keep in mind that boring a precise hole in a scrap pine board is different than bori ng a hole in the center ofa hardwood dowel. Slats The backs of this sort of chair feature carefully scrolled slats, bent into a comfortable, curved shape. I've not seenan 18th-century chairwith flat slats, either unformed or un-scrolled. Rarely are the slats identical top to bottom. Sometimes the top slat is slightly larger than the others. I think these slat designs were quite carefully considered. I don't believe these were done thoughtlessly. The graduated slats create an exaggerated perspective that juxtaposes the tapering of the legs and detailing of the front legs, which 1 believe sought to correct a standing observer's perspective of the chair. I want to leave you with two thoughts: First, this shape is really important artistically. Ifyou want to capture the period, look carefully at as many chairs as possible, preferably in the flesh. 1 prefer to bring a sketch pad and draw them right there. Back in the shop, mock up a half-dozen sets in cardboard before you cut any wood. Take your time and get this the way you want it. It's important. Second, the slats on period chairs are fairly thin, rarely more than V4". And the oxbow shape is an effective torsion spring. I hinted earlier about how uncomfortable these straight-backed chairs are. Well this design introduces a little flex, which I've found helpful. 1 can't help but think this was deliberate. Period chairmakers probably didn't make steam boxes to bend chair slats. I was told they simply boiled parts like these, so that's what 1 did. You may find success bending straight-grained, kiln-dried, flat-sawn stock. The curvature is subtle. I had some success with test pieces. My advice is to try it before Shape selection. I examined many chairs before making my own. The various shapes of their back slats fascinated me. This oxbow shape appealed to me most. Each slat appeared to be twice as high as its tenon. The tenons increased in size from 1" to about 2 ". On no chair was the topmost slat higher than the legs. I also noticed the spaces between the slats were equal. you decide it's impossible. For this chair, I had some green white oak lying around so I used that. I split out pieces on the medullary rays witha froe. Don't bothertryingto flatten these pieces with a handplane. Bring them smooth and to a uniform V4" thickness (dependingon yourmortisechisel'swidth)usingadrawknife. Thick areas won't bend as readily as thin. So uni formity of thickness is important in achieving a smooth formed curve. Shape the slats with a turning or coping saw and smooth the saw cuts with a spoke-shave or rasp. Test fit the slats into the mortises in the chair back. Mark a line on the slat indicating the depth of penetration into the Boring. I'm smart. I use my head! Windsor chairmakers don't need this crutch technique. But steadying the top of the brace (wimble) with my noggin helps me to bore straight holes. A piece of scrap in a slat mortise helped me to set the angle. This angle is 30", which proved too much for large people. Right angles. The mortise angle for chairs like these should be between 20° and 30". Choosing the correct angle can be difficult. Dozens of people sat in one of my chairs at a recent furniture show. Some were comfortable. Some were not. Smaller people with smaller rib cages (women in particular) were more comfortable with a greater curvature to the slats, describing the chair as "cozy." Larger folks preferred flatter slats. I would build a chair to accommodate the size of the sitters if I could. Otherwise, less curvature seems to hold a slight advantage for the wider public. 12 ■ Popular Woodworking June 2008 |


