Popular Woodworking 2008-06 № 169, страница 40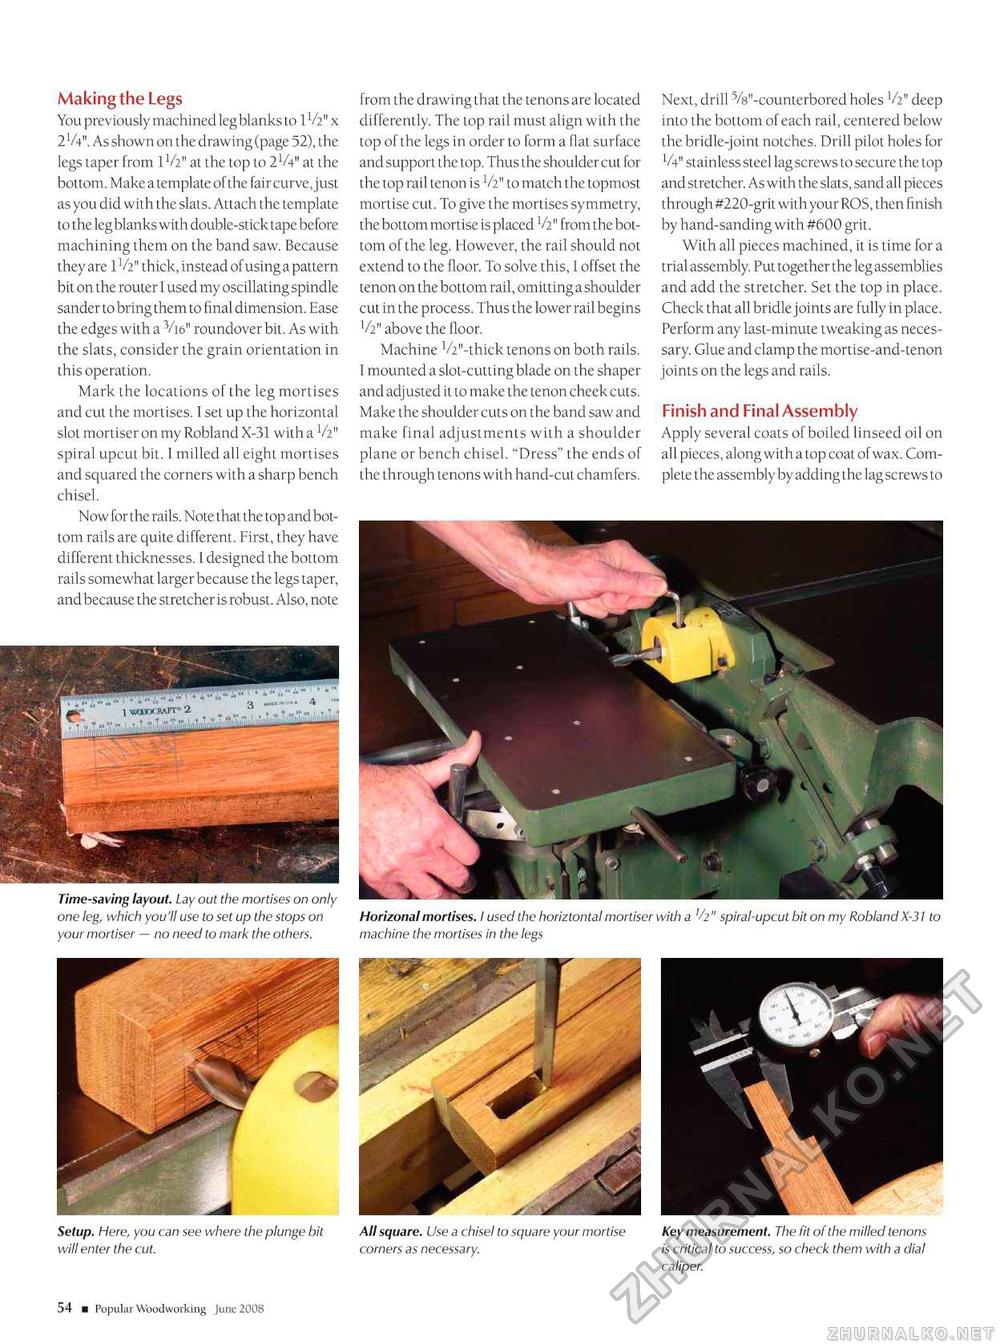
MakingtheLegs You previously machined leg blanks to 1V2" x 2V4". As shown on the drawing (page 52), the legs taper from IV2" at the top to 2'A" at the bottom. Make a template ofthe faircurve, just as you did with the slats. Attach the template to the leg blanks with double-stick tape before machining them on the band saw. Because they are IV2" thick, instead of using a pattern bit on the router 1 used my oscillating spindle sander to bring them to final dimension. Ease the edges with a 3/16" roundover bit. As with the slats, consider the grain orientation in this operation. Mark the locations of the leg mortises and cut the mortises. I set up the horizontal slot mortiseron my Robland X-31 with a V2'1 spiral upcut bit. I milled all eight mortises and squared the corners with a sharp bench chisel. Now for the rails. Note that the top and bottom rails are quite different. First, they have different thicknesses. 1 designed the bottom rails somewhat larger because the legs taper, and because the stretcher is robust. Also, note Time-saving layout. Lay out the mortises on only one leg, which you'll use to set up the stops on your mortiser — no need to mark the others. Setup. Here, you can see where the plunge bit will enter the cut. 12 ■ Popular Woodworking June 2008 from the drawing that the tenons are located differently. The lop rail must align with the top of the legs in order to form a flat surface and support the top. Thus the shoulder cut for the top rail tenon is V2" to match the topmost mortise cut. To give the mortises symmetry, ihe bottom mortise is placed V2" from the bottom ofthe leg. However, the rail should not extend to the floor. To solve this, I offset the tenon on the bottom rail, omitting a shoulder cut in the process. Thus the lower rail begins V2" above the floor. Machine '/V'-thick tenons on both rails. I mounted a slot-cutting blade on the shaper and adjusted it to make the tenon cheek cuts. Make the shoulder cuts on the band saw and make final adjustments with a shoulder plane or bench chisel. "Dress" the ends of the through tenons wiih hand-cut chamfers. All square. Use a chisel to square your mortise corners as necessary. Next, drill 5/8"-counterbored holes 'A" deep into the bottom of each rail, centered below the bridle-joint notches. Drill pilot holes for V4'1 stainless steel lag screws to secure the top and stretcher. As with the slats, sand all pieces through #220-grit with your ROS, then finish by hand-sanding with #600 grit. With all pieces machined, it is time for a trial assembly. Put togetherthe leg assemblies and add the stretcher. Set the top in place. Check that all bridle joints are fully in place. Perform any last-minute tweaking as necessary. Glue and clamp the mortise-and-tenon joints on the legs and rails. Finish and Final Assembly Apply several coats of boiled linseed oil on all pieces, along with a top coat of wax. Complete the assembly by addi ng the lag screws to Key measurement. The fit of the milled tenons is critical to success, so check them with a dial |


