Popular Woodworking 2008-08 № 170, страница 19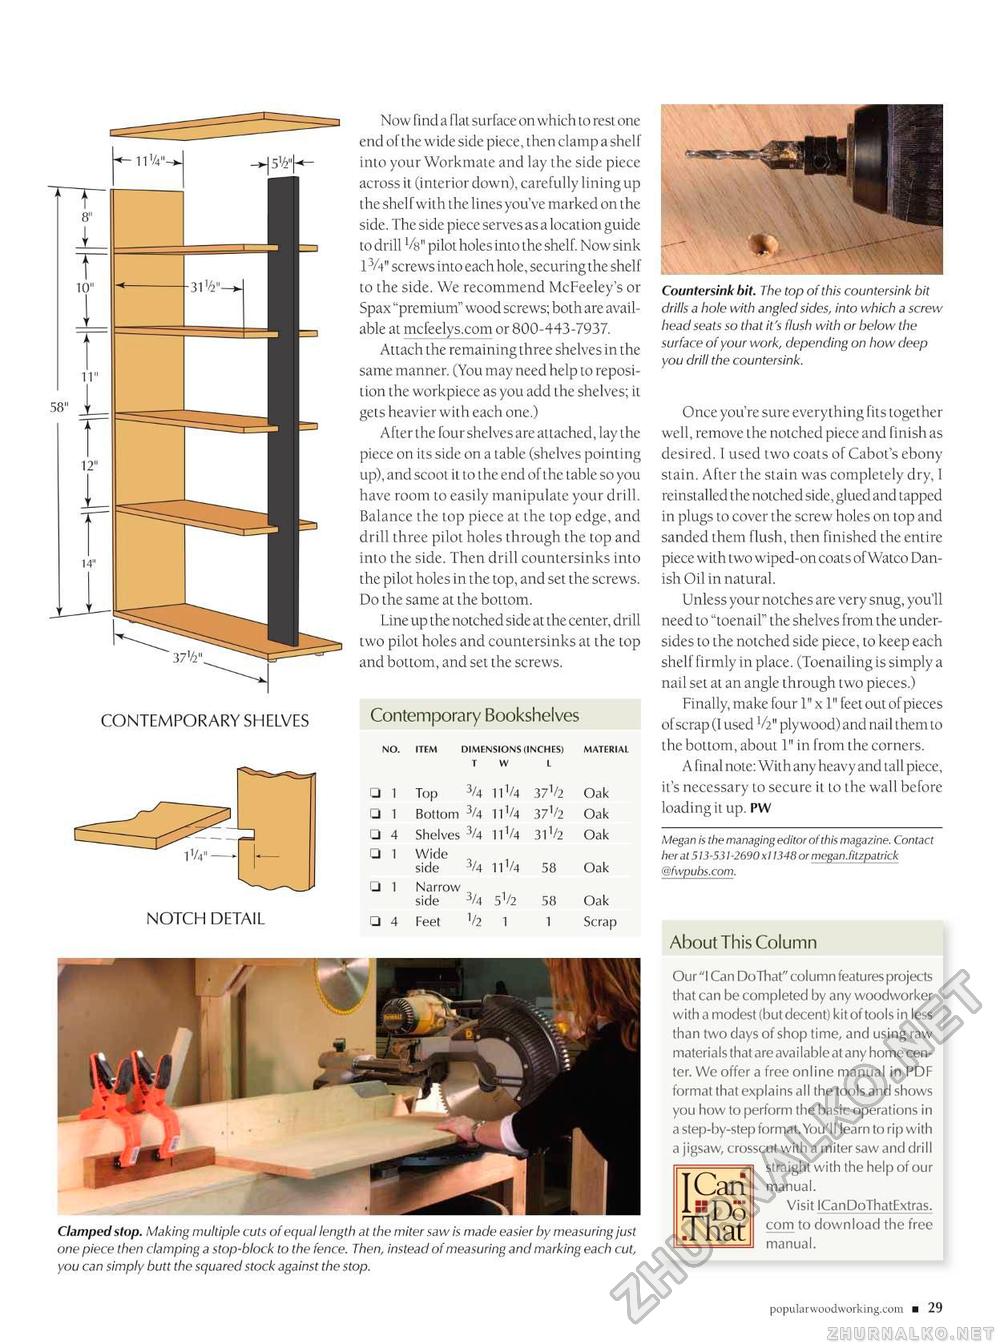
CONTEMPORARY SHELVES Now find a flat surface on which to rest one end of the wide side piece, then clamp a shelf into your Workmate and lay the side piece across it (interior down), carefully lining up the shelf with the lines you've marked on the side. The side piece serves as a location guide to drill '/b" pilot holes into the shelf. Now sink 13A" screws into each hole, securing the shelf to the side. We recommend McFeeley's or Spax "premium" wood screws; both are available at mcfeelys.com or 800-443-7937. Attach the remaining three shelves in the same manner. (You may need help to reposition the workpiece as you add the shelves; it gets heavier with each one.) After the four shelves are attached, lay the piece on its side on a table (shelves pointing up), and scoot it to the end of the table so you have room to easily manipulate your drill. Balance the top piece at the top edge, and drill three pilot holes through the top and into the side. Then drill countersinks into the pilot holes in the top, and set the screws. Do the same at the bottom. Line up the notched side at the center, drill two pilot holes and countersinks at the top and bottom, and set the screws. Contemporary Bookshelves
Clamped slop. Making multiple cuts of equal length at the miter saw is made easier by measuring just one piece then clamping a stop-block to the fence. Then, instead of measuring and marking each cut, you can simply butt the squared stock against the stop. Countersink bit. The top of this countersink bit drills a hole with angled sides, into which a screw head seats so that it's flush with or below the surface of your work, depending on how deep you drill the countersink. Once you're sure everything fits together well, remove the notched piece and finish as desired. I used two coats of Cabot's ebony stain. After the stain was completely dry, I reinstalled the notched side, glued and tapped in plugs to cover the screw holes on top and sanded them flush, then finished the entire piece with two wiped-on coats of Watco Danish Oil in natural. Unless your notches are very snug, you'll need to "toenail" the shelves from the undersides to the notched side piece, to keep each shelf firmly in place. (Toenailing is simply a nail set at an angle through two pieces.) Finally, make four 1" x 1" feet out of pieces of scrap (I used V2" plywood) and nail them to the bottom, about 1" in from the corners. A final note: With any heavy and tall piece, it's necessary to secure it to the wall before loading it up. PW Megan is the managing editor of this magazine. Contact her at 513-531-2690x11348 or megan.fitzpatrick @fwpubs.com. About This Column Our "I Can DoThat" column features projects that can be completed by any woodworker with a modest (but decent) kit of tools in less than two days of shop time, and using raw materials that are available at any home center. We offer a free online manual in PDF format that explains all the tools and shows you how to perform the basic operations in a step-by-step format. You'll learn to rip with a jigsaw, crosscut with a miter saw and drill straight with the help of our Visit ICanDoThatExtras. com to download the free manual. popularwoodworking.com ■ 29 TCari That |


