Popular Woodworking 2009-02 № 174, страница 16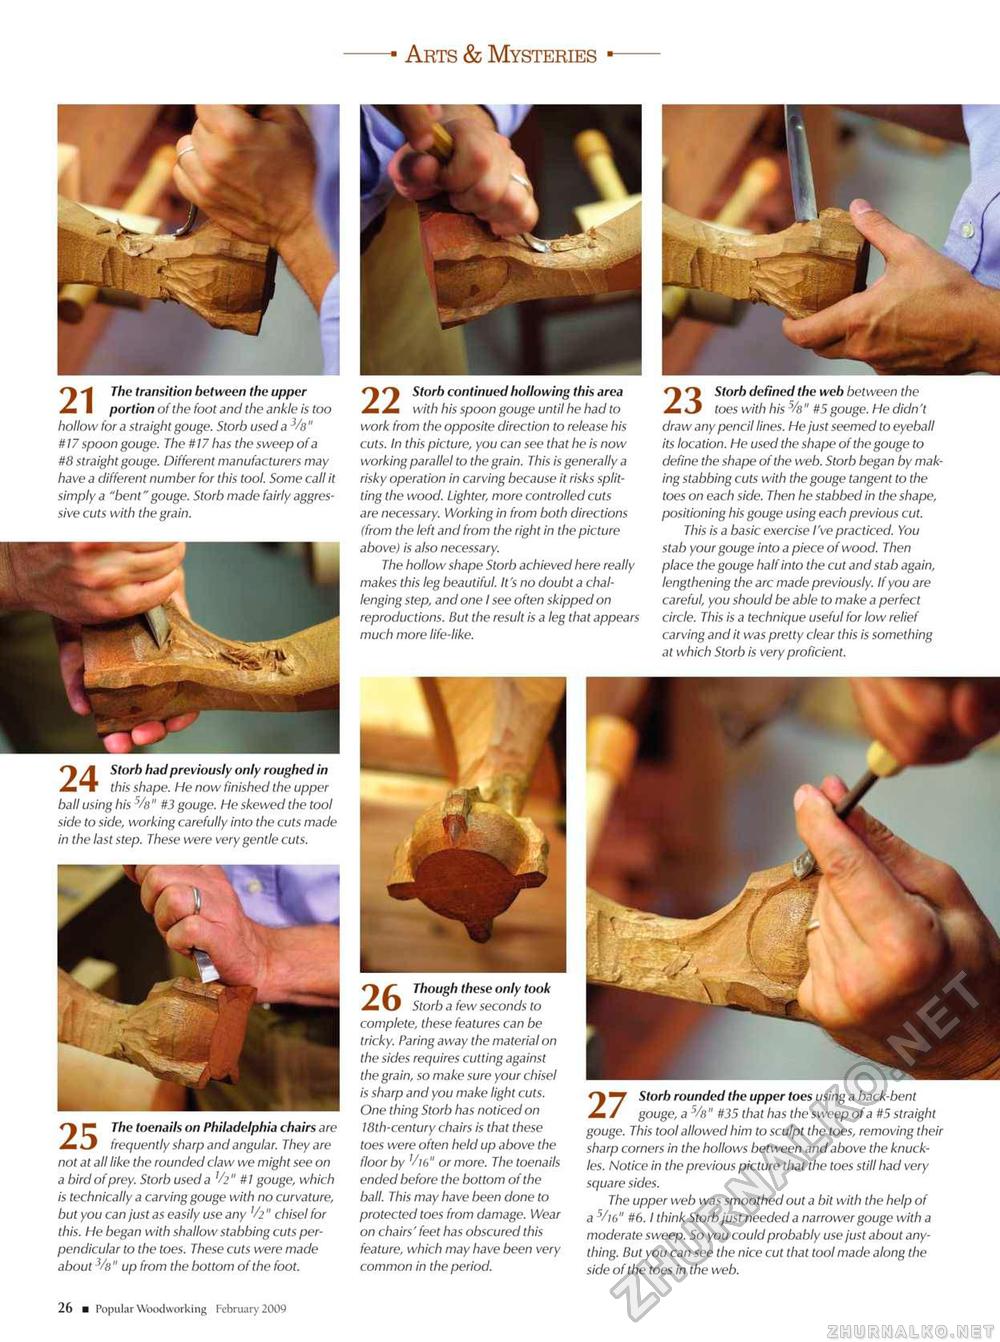
Storb had previously only roughed in this shape. He now finished the upper ball using his 5/s" #3 gouge. He skewed the tool side to side, working carefully into the cuts made in the last step. These were very gentle cuts. O The transition between the upper I portion of the foot and the ankle is too hollow for a straight gouge. Storb used a 3/fl " #17 spoon gouge. The #17 has the sweep of a #8 straight gouge. Different manufacturers may have a different number for this tool. Some call it simply a "bent" gouge. Storb made fairly aggressive cuts with the grain. O O Storb continued hollowing this area +m with his spoon gouge until he had to work from the opposite direction to release his cuts. In this picture, you can see that he is now working parallel to the grain. This is generally a risky operation in carving because it risks splitting the wood. Lighter, more controlled cuts are necessary. Working in from both directions (from the left and from the right in the picture above) is also necessary. The hollow shape Storb achieved here really makes this leg beautiful. It's no doubt a challenging step, and one I see often skipped on reproductions. But the result is a leg that appears much more life-like. Storb defined the web between the toes with his % " #5 gouge. He didn 't draw any pencil lines. He just seemed to eyeball its location. He used the shape of the gouge to define the shape of the web. Storb began by making stabbing cuts with the gouge tangent to the toes on each side. Then he stabbed in the shape, positioning his gouge using each previous cut. This is a basic exercise I've practiced. You stab your gouge into a piece of wood. Then place the gouge half into the cut and stab again, lengthening the arc made previously. If you are careful, you should be able to make a perfect circle. This is a technique useful for low relief carving and it was pretty clear this is something at which Storb is very proficient. O The toenails on Philadelphia chairs arc frequently sharp and angular. They are not at all like the rounded claw we might see on a bird of prey. Storb used a h" #7 gouge, which is technically a carving gouge with no curvature, but you can just as easily use any 16" chisel for this. He began with shallow stabbing cuts perpendicular to the toes. These cuts were made about -Vs" up from the bottom of the foot. Though these only took Storb a few seconds to complete, these features can be tricky. Paring away the material on the sides requires cutting against the grain, so make sure your chisel is sharp and you make light cuts. One thing Storb has noticed on 18th-century chairs is that these toes were often held up above the floor by '/i6" or more. The toenails ended before the bottom of the ball. This may have been done to protected toes from damage. Wear on chairs' feet has obscured this feature, which may have been very common in the period. Storb rounded the upper toes using a back-bent gouge, a s/8" #35 that has the sweep ofa #5 straight gouge. This tool allowed him to sculpt the toes, removing their sharp corners in the hollows between and above the knuckles. Notice in the previous picture that the toes still had very square sides. The upper web was smoothed out a bit with the help of a 5/16" #6.1 think Storb just needed a narrower gouge with a moderate sweep. So you could probably use just about anything. But you can see the nice cut that tool made along the side of the toes in the web. 26 ■ Popular Woodworking February 2009 |


