Popular Woodworking 2009-02 № 174, страница 39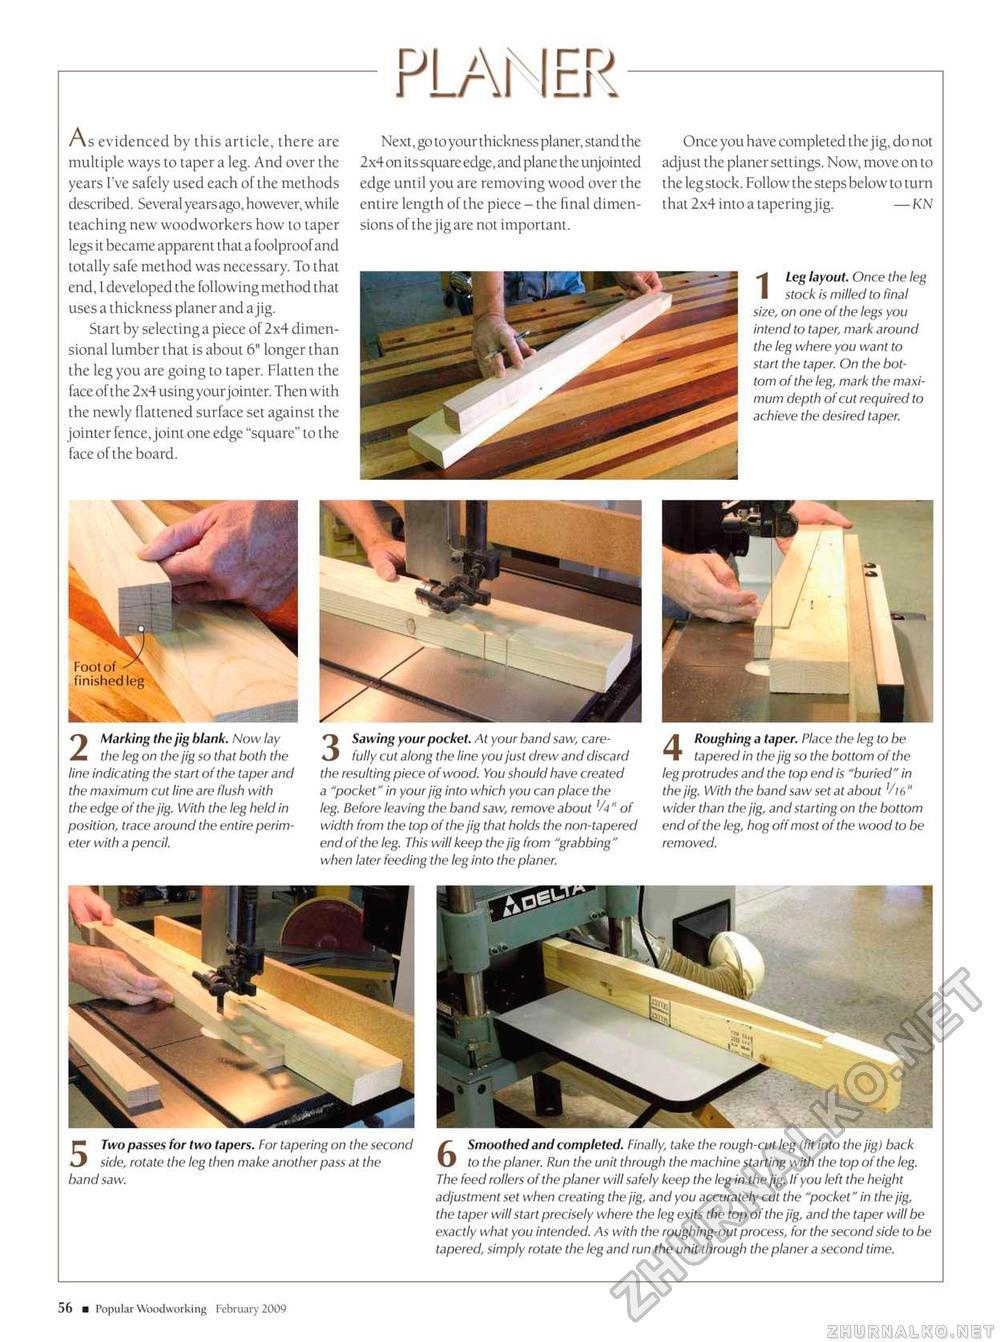
PLANER As evidenced by this article, there are multiple ways to taper a leg. And over the years I've safely used each of the methods described. Several yearsago, however, while teaching new woodworkers how to taper legs it became apparent that a foolproof and totally safe method was necessary. To that end, I developed the following method that uses a thickness planer and a jig. Start by selecting a piece of 2x4 dimensional lumber that is about 6" longer than the leg you are going to taper. Flatten the face of the 2x4 using your jointer. Then with the newly flattened surface set against the jointer fence, joint one edge "square" to the face of the board. Next, go to your thickness planer, stand the 2x4 on itssquare edge, and plane the unjointed edge until you are removing wood over the entire length of the piece - the final dimensions of the jig are not important. Once you have completed the jig, do not adjust the planer settings. Now, move on to the leg stock. Follow the steps below to turn that 2x4 into a tapering jig. —KN ILeg layout. Once the leg stock is milled to final size, on one of the legs you intend to taper, mark around the leg where you want to start the taper. On the bottom of the leg, mark the maximum depth of cut required to achieve the desired taper. finished leg 2 Marking the jig blank. Now lay the leg on the jig so that both the line indicating the start of the taper and the maximum cut line are flush with the edge of the jig. With the leg held in position, trace around the entire perimeter with a pencil. 3 Sawing your pocket. At your band saw, carefully cut along the line you just drew and discard the resulting piece of wood. You should have created a "pocket" in your jig into which you can place the leg. Before leaving the band saw, remove about 'A" of width from the top of the jig that holds the non-tapered end of the leg. This will keep the jig from "grabbing" when later feeding the leg into the planer. 4 Roughing a taper. Place the leg to be tapered in the jig so the bottom of the leg protrudes and the top end is "buried" in the jig. With the band saw set at about 'A 6 " wider than the jig, and starting on the bottom end of the leg, hog off most of the wood to be removed. 5 Two passes for two tapers. For tapering on the second Smoothed and completed. Finally, take the rough-cut leg (fit into the jig) back side, rotate the leg then make another pass at the O to the planer. Run the unit through the machine starting with the top of the leg. band saw. The feed rollers of the planer will safely keep the leg in the jig. If you left the height adjustment set when creating the jig, and you accurately cut the "pocket" in the jig, the taper will start precisely where the leg exits the top of the jig, and the taper will be exactly what you intended. As with the roughing-out process, for the second side to be tapered, simply rotate the leg and run the unit through the planer a second time. 56 ■ Popular Woodworking February 2009 |


