Popular Woodworking 2009-04 № 175, страница 10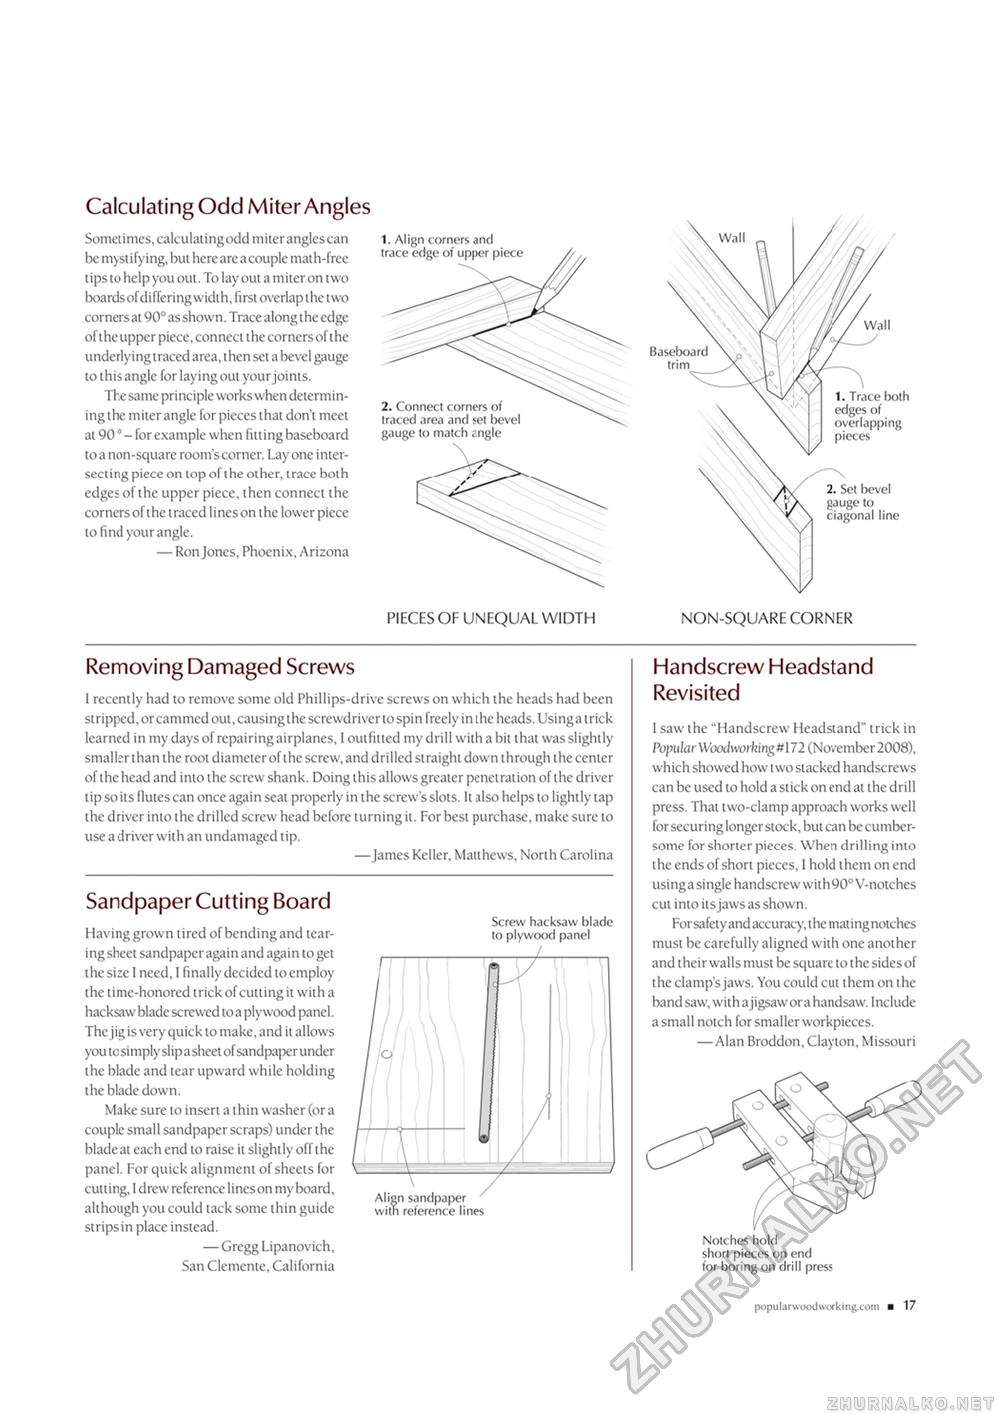
Calculating Odd Miter Angles Sometimes, calculating odd miter angles can be mystifying, but here are a couple math-free tips to help you out. To lay out a miter on two boards ofdiffering width, first overlap the two corners at 90° as shown. Trace along the edge of the upper piece, connect the corners of the underlyingtraced area, then set a bevel gauge to this angle for laying out your joints. The same principle works when determining the miter angle for pieces that don't meet at 900 - for example when fitting baseboard to a non-square room's corner. Lay one intersecting piece on top of the other, trace both edges of the upper piece, then connect the corners of the traced lines on the lower piece to find your angle. — Ron Jones, Phoenix, Arizona Removing Damaged Screws Sandpaper Cutting Board Having grown tired of bending and tearing sheet sandpaper again and again to get the size I need, I finally decided to employ the time-honored trick of cutting it with a hacksaw blade screwed to a plywood panel. The jig is very quick to make, and it allows you to simply slip a sheet of sandpaper under the blade and tear upward while holding the blade down. Make sure to insert a thin washer (or a couple small sandpaper scraps) under the blade at each end to raise it slightly off the panel. For quick alignment of sheets for cutting, 1 drew reference lines on my board, although you could tack some thin guide strips in place instead. — Gregg Lipanovich, San Clemente, California Screw hacksaw blade to plywood panel / Handscrew Headstand Revisited 1 saw the "Handscrew Headstand" trick in Popular Woodworking* 172 (November 2008), which showed how two stacked handscrews can be used to hold a stick on end at the drill press. That two-clamp approach works well for securing longer stock, but can be cumbersome for shorter pieces. When drilling into the ends of short pieces, I hold them on end using a single handscrew wit h 90° V-notches cut into its jaws as shown. For safety and accuracy, the mating notches must be carefully aligned with one another and their walls must be square to the sides of the clamp's jaws. You could cut them on the band saw, with ajigsaw or a handsaw. Include a small notch for smaller workpieces. — Alan Broddon, Clayton, Missouri Notches hold short pieces on end for boring on drill press I recently had to remove some old Phillips-drive screws on which the heads had been stripped, or cammed out, causing the screwdriver to spin freely in the heads. Usinga trick learned in my days of repairing airplanes, I outfitted my drill with a bit that was slightly smaller than the root diameter of the screw, and drilled straight down through the center of the head and into the screw shank. Doing this allows greater penetration of the driver tip so its flutes can once again seat properly in the screw's slots. It also helps to lightly tap the driver into the drilled screw head before turning it. For best purchase, make sure to use a driver with an undamaged tip. —James Keller, Matthews, North Carolina popular wxxiworki ng.com ■ 17 |


