Popular Woodworking 2009-04 № 175, страница 21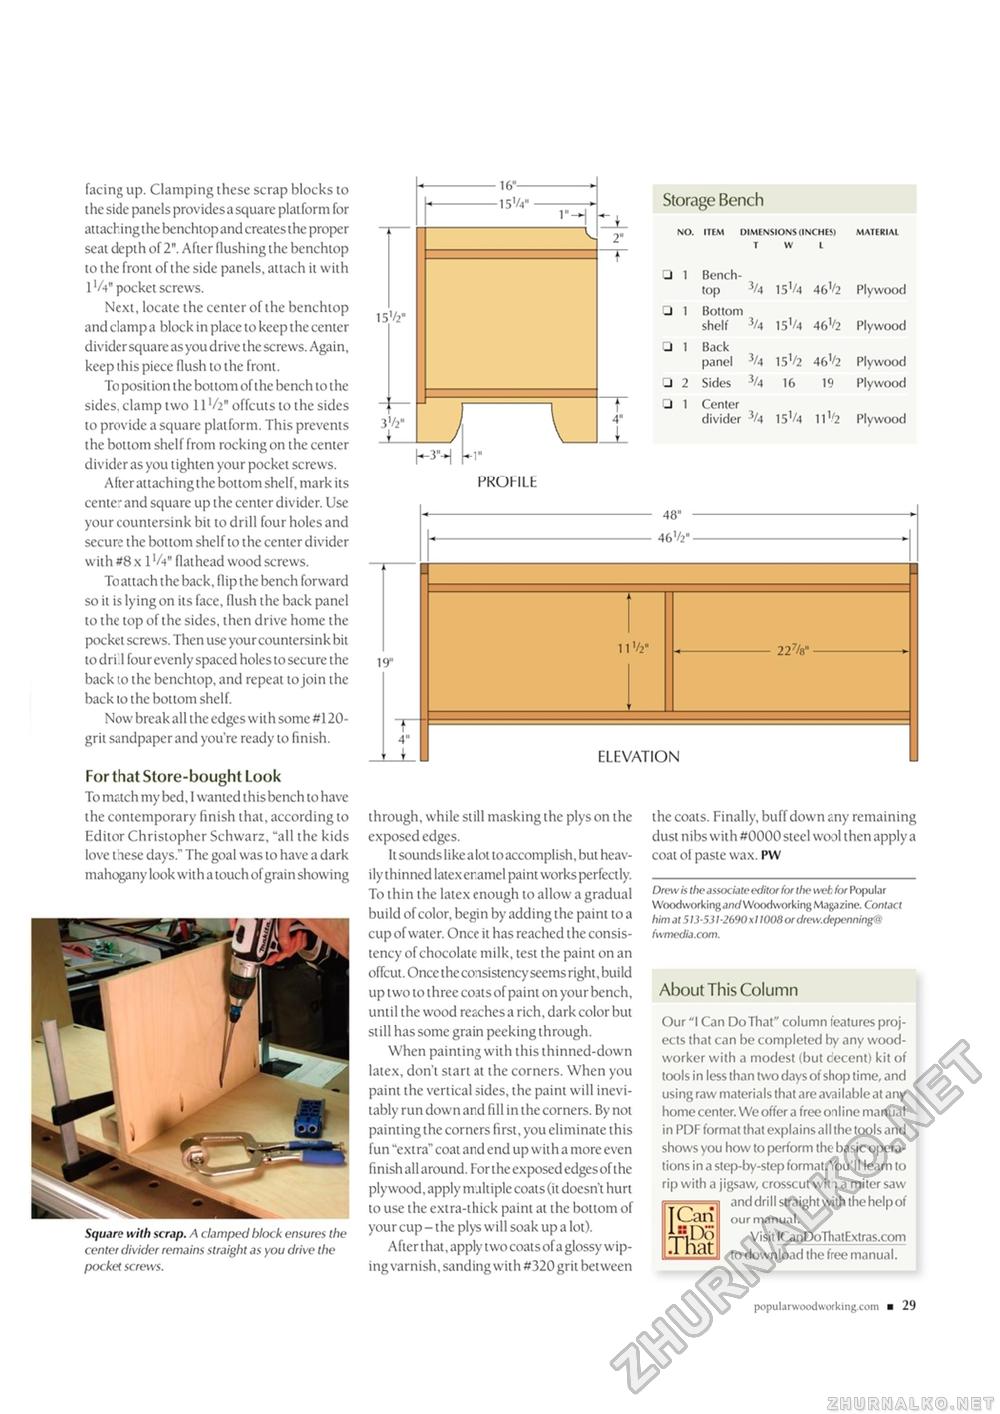
facing up. Clamping these scrap blocks to the side panels provides a square platform for attachingthe benchtop and creates the proper seat depth of 2". After flushing the benchtop to the front of the side panels, attach it with 1V4" pocket screws. Next, locate the center of the benchtop and clamp a block in place to keep the center divider square as you drive the screws. Again, keep this piece flush to the front. To position the bottom of the bench to the sides, clamp two 11V2" offcuts to the sides to provide a square platform. This prevents the bottom shelf from rocking on the center divider as you tighten your pocket screws. After attaching the bottom shelf, mark its center and square up the center divider. Use your countersink bit to drill four holes and secure the bottom shelf to the center divider with #8 x 1V4" flat head wood screws. To attach the back, flip the bench forward so it is lying on its face, flush the back panel to the top of the sides, then drive home the pocket screws. Then use your countersink bit to dri.l four evenly spaced holes to secure the back to the benchtop, and repeat to join the back to the bottom shelf. Now break all the edges with some #120-grit sandpaper and you're ready to finish. For that Store-bought Look To match my bed, 1 wanted this bench to have the contemporary finish that, according to Editor Christopher Schwarz, "all the kids love these days." The goal was to have a dark mahogany look with a touch of grain showing Square with scrap. A clamped block ensures the center divider remains straight as you drive the pocket screws. 15V2- 3V2" 16"— I5V4" HM M" PROFILE 'v Storage Bench no. item dimensions (inchem material t w l no. item dimensions (inchem material t w l
48" 46V2" 19" lV2" 227/s" ELEVATION through, while still masking the plys on the exposed edges. It sounds like a lot to accomplish, but heavily thinned latex enamel paint works perfectly. To thin the latex enough to allow a gradual build of color, begin by adding the paint to a cup of water. Once it has reached the consistency of chocolate milk, test the paint on an offcut. Once the consistency seems right, build up two to three coats of paint on your bench, until the wood reaches a rich, dark color but still has some grain peeking through. When painting with this thinned-down latex, don't start at the corners. When you paint the vertical sides, the paint will inevitably run down and fill in the corners. By not painting the corners first, you eliminate this fun "extra" coat and end up with a more even finish all around. For the exposed edges of the plywood, apply multiple coats (it doesn't hurt to use the extra-thick paint at the bottom of your cup - the plys will soak up a lot). After that, apply two coats of a glossy wiping varnish, sanding with #320 grit between the coats. Finally, buff down any remaining dust nibs with #0000 steel wool then apply a coat ol paste wax. PW Drew is the associate editor for the wet for Popular Woodworking and Woodworking Magazine. Contact him at 513-531-2690x11008 or drew.depenning@ fwmedia.com. About This Column Our "I Can Do That" column features projects that can be completed by any woodworker with a modest (but decent) kit of tools in less than two days of shop time, and using raw materials that are available at any home center. We offer a free online manual in PDF format that explains all the tools and shows you how to perform the basic operations in a step-by-step format. You'll learn to rip with a jigsaw, crosscut witi a miter saw and drill straight with the help of our manual. Visit ICanDoThatExtras.com to download the free manual. TCari That popular wxxiworki ng.com ■ 29 |


