Popular Woodworking 2009-04 № 175, страница 30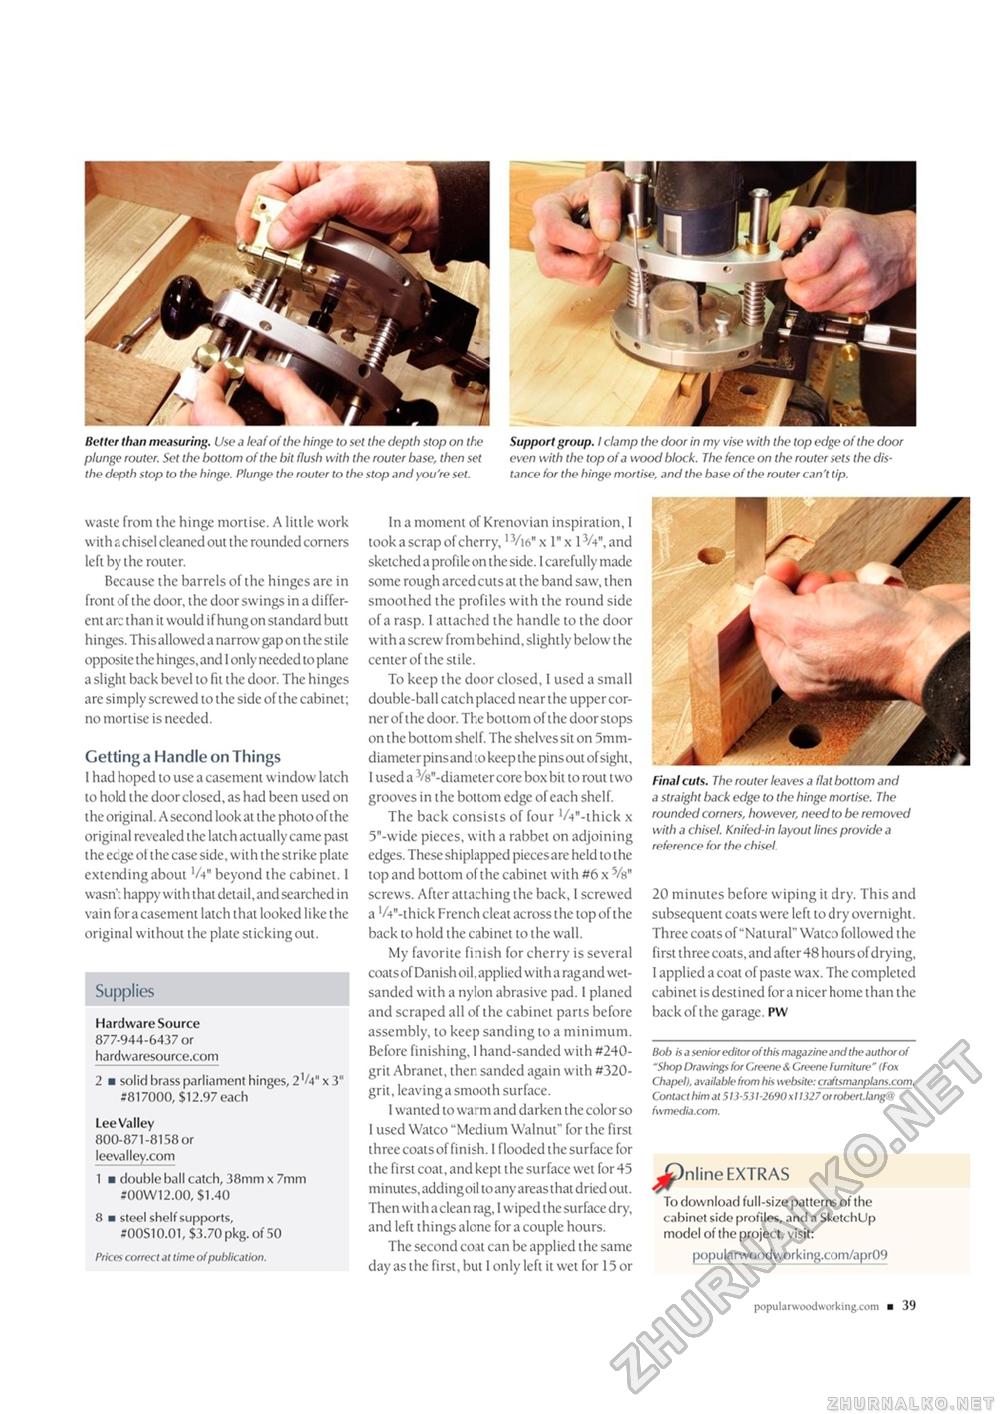
Better than measuring. Use a leaf of the hinge to set the depth stop on the plunge router. Set the bottom of the bit flush with the router base, then set the depth stop to the hinge. Plunge the router to the stop and you're set. Support group. I clamp the door in my vise with the top edge of the door even with the top of a wood block. The fence on the router sets the distance for the hinge mortise, and the base of the router can't tip. waste from the hinge mortise. A little work with a chisel cleaned out the rounded corners left by the router. Because the barrels of the hinges are in front of the door, the door swings in a different arc than it would if hung on standard butt hinges. This allowed a narrow gap on the stile opposite the hinges, and I only needed to plane a slight back bevel to fit the door. The hinges are simply screwed to the side of the cabinet; no mortise is needed. Getting a Handle on Things I had hoped to use a casement window latch to hold the door closed, as had been used on the original. A second look at the photo of the original revealed the latch actually came past the ecge ol the case side, with the strike plate extending about V4" beyond the cabinet. I wasn: happy with that detail, and searched in vain for a casement latch that looked like the original without the plate sticking out. Supplies Hardware Source 877-944-6437 or hardwaresource.com 2 ■ solid brass parliament hinges, 2 V4" x 3' 3817000, $12.97 each Lee Valley 800-871-8158 or leevalley.com 1 ■ double ball catch, 38mm x 7mm *00W12.00, $1.40 8 ■ steel shelf supports, 300S10.01, $3.70 pkg. of 50 Prices correct at time of publication. In a moment of Krenovian inspiration, I took a scrap of cherry,13/i6" x 1" x 1V4", and sketched a profile on the side. I carefully made some rough arced cuts at the band saw, then smoothed the profiles with the round side of a rasp. I attached the handle to the door with a screw from behind, slightly below the center of the stile. To keep the door closed, 1 used a small double-ball catch placed near the upper corner of the door. The bottom of the doorstops on t he bottom shelf. The shelves sit on 5mm-diameter pins and to keep the pins out of sight, I used a Vs^diameter core box bit to rout two grooves in the bottom edge of each shelf. The back consists of four V^-thick x 5"-wide pieces, with a rabbet on adjoining edges. These shiplapped piecesare held to the top and bottom of the cabinet with #6 x Vs" screws. After attaching the back, I screwed a lA"-thick French cleat across the top of the back to hold the cabinet to the wall. My favorite finish for cherry is several coatsof Danish oil. applied with a ragand wet-sanded with a nylon abrasive pad. 1 planed and scraped all of the cabinet parts before assembly, to keep sanding to a minimum. Before finishing, 1 hand-sanded with #240-grit Abranet, ther. sanded again with #320-grit, leaving a smooth surface. 1 wanted to warm and darken the color so I used Watco "Medium Walnut" for the first three coats of finish. 1 flooded the surface for the first coat, and kept the surface wet for 45 minutes, adding oil to any areas that dried out. Then with a clean rag, 1 wiped the surface dry, and left things alone for a couple hours. The second coat can be applied the same day as the first, but I only left it wet for 15 or Final cuts. The router leaves a flat bottom and a straight back edge to the hinge mortise. The rounded corners, however, need to be removed with a chisel. Knifed-in layout lines provide a reference for the chisel. 20 minutes before wiping it dry. This and subsequent coats were left to dry overnight. Three coats of "Natural" Watc3 followed the first three coats, and after 48 hours of drying, I applied a coat of paste wax. The completed cabinet is destined for a nicer home than the back of the garage. PW Boh is a senior editor of this magazine and the author of "Shop Drawings for Greene & Greene Furniture" (Fox Chapel), available from his website: craftsmanplans.com. Contact him at 513-531-2690x11327or robert.lang(» fwmedia.com. nline EXTRAS To download full-size patterns of the cabinet side profiles, and a SketchUp model of the project, visit: popularwoodworking.com/apr09 popular wxxiworki ng.com ■ 39 |


