Popular Woodworking 2009-04 № 175, страница 33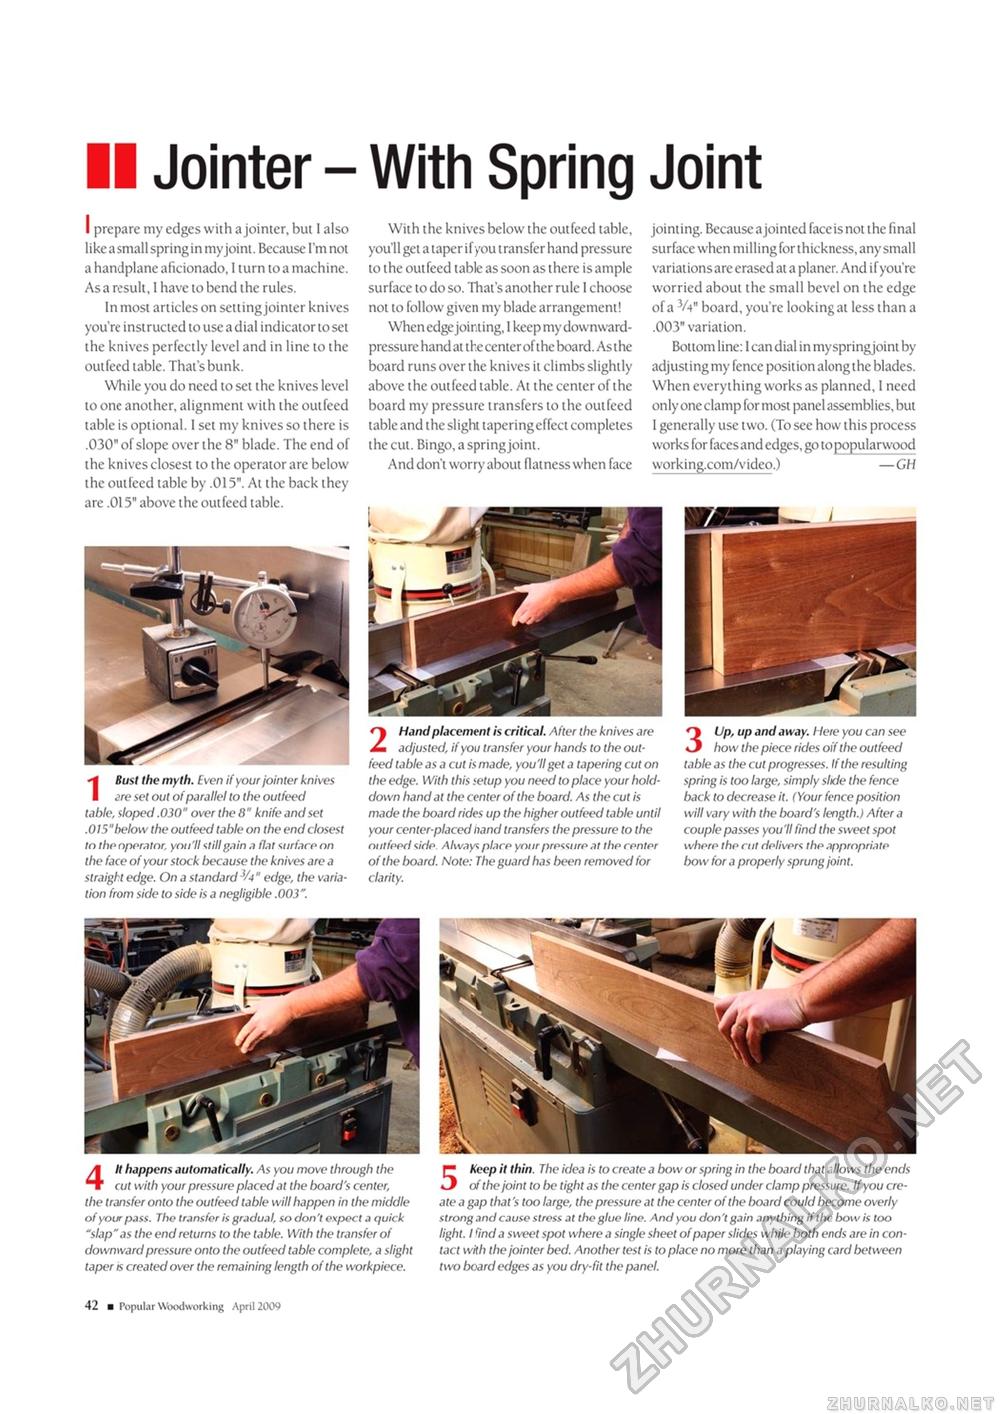
Jointer - With Spring Joint 4 It happens automatically. As you move through the cut with your pressure placed at the board's center, the transfer onto the out feed table will happen in the middle of your pass. The transfer is gradual, so don't expect a quick "slap"as the end returns to the table. With the transfer of downward pressure onto the outfeed table complete, a slight taper is created over the remaining length ofthe workpiece. 5 Keep it thin. The idea is to create a bow or spring in the board that allows the ends of the joint to be tight as the center gap is closed under clamp pressure. If you create a gap that's too large, the pressure at the center of the board could become overly strong and cause stress at the glue line. And you don't gain anything if the bow is too light. I fad a sweet spot where a single sheet of paper slides while both ends are in contact with the jointer bed. Another test is to place no more than a playing card between two board edges as you dry-fit the panel. With the knives below the outfeed table, you'll get a taper if you transfer hand pressure to the outfeed table as soon as there is ample surface to do so. That's another rule 1 choose not to follow given my blade arrangement! When edge jointing, I keep my downward-pressure hand at the center of the board. As the board runs over the knives it climbs slightly above the outfeed table. At the center of the board my pressure transfers to the outfeed table and the slight taperingeffect completes the cut. Bingo, a springjoint. And don't worry about flatness when face jointing. Because a jointed face is not the final surface when milling for thickness, any small variations are erased at a planer. And if you're worried about the small bevel on the edge of a V4" board, you're looking at less than a .003" variation. Bottom line: I can dial in my springjoint by adjusting my fence position along the blades. When everything works as planned, I need only one clamp for most panel assemblies, but 1 generally use two. (To see how this process works for faces and edges, go to popular wood working.com/video.) —GH 2 Hand placement is critical. After the knives are adjusted, if you transfer your hands to the out-feed table as a cut is made, you'll get a tapering cut on the edge. With this setup you need to place your hold-down hand at the center of the board. As the cut is made the board rides up the higher outfeed table until your center-placed nand transfers the pressure to the outfeed side Always place your pressure at the center ofthe board. Note: The guard has been removed for clarity. 3 Up, up and away. Here you can see how the piece rides oif the outfeed table as the cut progresses. If the resulting spring is too large, simply slide the fence back to decrease it. (Your fence position will vary with the board's length.) After a couple passes you'll find the sweet spot where the cut delivers the appropriate bow for a properly sprung joint. IBust the myth. Even if your jointer knives are set out of parallel to the outfeed table, sloped .030" over the 8" knife and set .015"below the outfeed table on the end closest to the operator: you'll still gain a flat surface on the face of your stock because the knives are a straight edge. On a standard3^" edge, the variation from side to side is a negligible .003". I prepare my edges with a jointer, but 1 also like a small spring in my joint. Because I'm not a handplane aficionado, I turn to a machine. As a result, I have to bend the rules. In most articles on setting jointer knives you're instructed to use a dial indicator to set the knives perfectly level and in line to the outfeed table. That's bunk. While you do need to set the knives level to one another, alignment with the outfeed table is optional. I set my knives so there is .030" of slope over the 8" blade. The end of the knives closest to the operator are below the outfeed table by .015". At the back they are .015" above the outfeed table. 10 ■ Popular Woodworking April 2009 |


