Popular Woodworking 2009-04 № 175, страница 37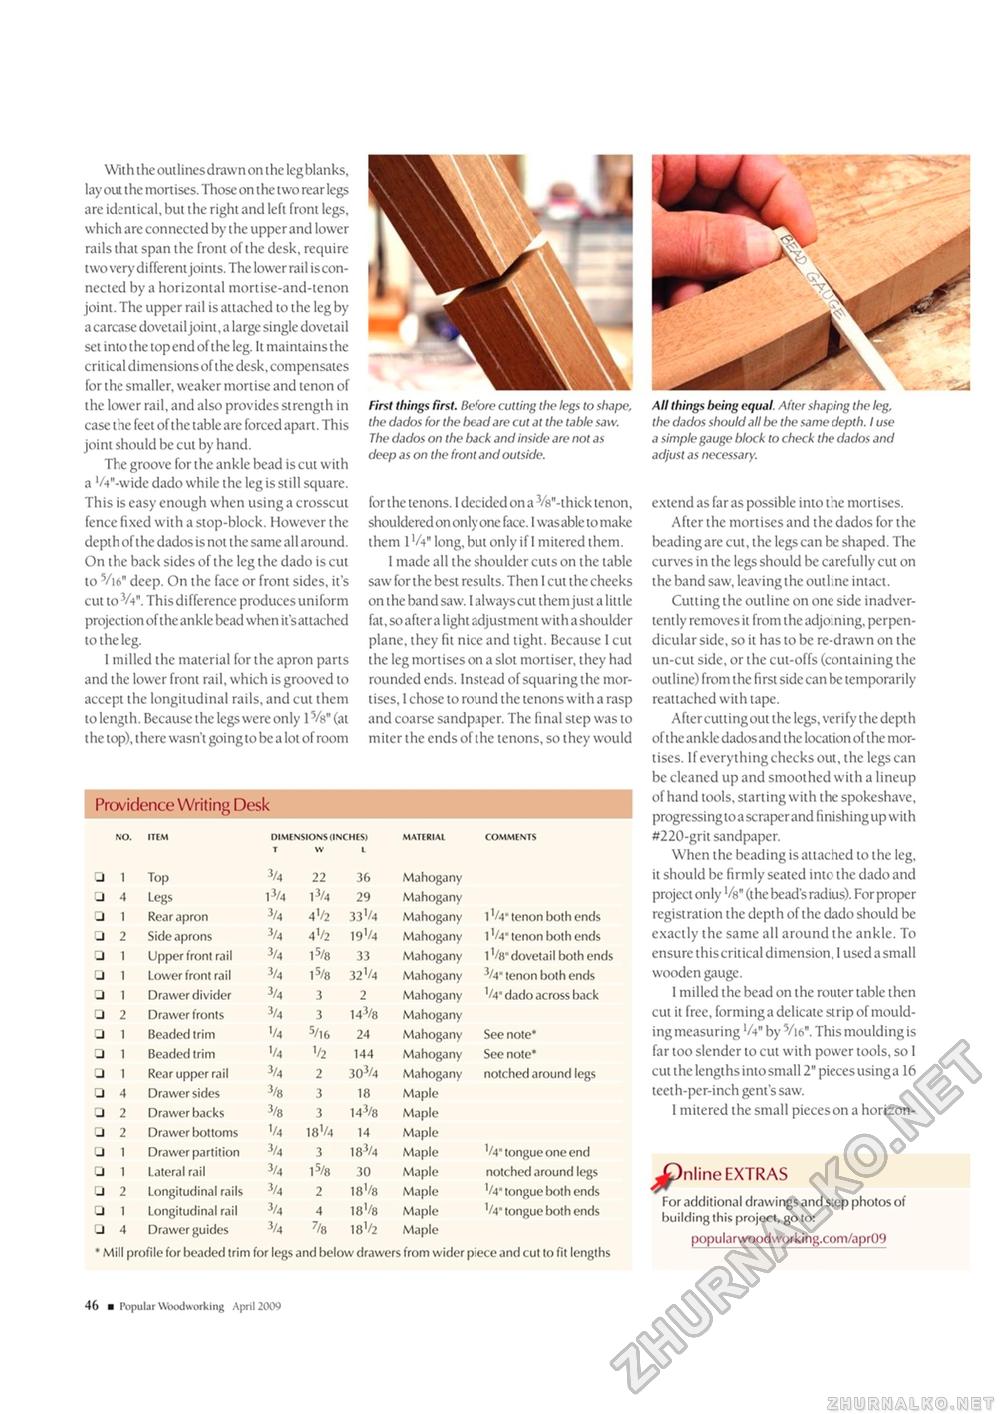
With the outlines drawn on the leg blanks, lay out the mortises. Those on the two rear legs are identical, but the right and left front legs, which are connected by the upper and lower rails that span the front of the desk, require two very different joints. The lower rail iscon-nected by a horizontal mortise-and-tenon joint. The upper rail is attached to the leg by a carcase dovetail joint, a large single dovetail set into the top end of the leg. It maintains the critical dimensions of the desk, compensates for the smaller, weaker mortise and tenon of the lower rail, and also provides strength in case the feet of the table are forced apart. This joint should be cut by hand. The groove for the ankle bead is cut with a W-wide dado while the leg is still square. This is easy enough when using a crosscut fence fixed with a stop-block. However the depth of the dados is not the same all around. On the back sides of the leg the dado is cut to Vi6n deep. On the face or front sides, it's cut to V4". This difference produces uniform projection of the ankle bead when it's attached to the leg. I milled the material for the apron parts and the lower front rail, which is grooved to accept the longitudinal rails, and cut them to length. Because the legs were only 15/s" (at the top), there wasn't going to be a lot of room First things first. Before cutting the legs to shape, the dados for the bead are cut at the table saw. The dados on the back and inside are not as deep as on the front and outside. for the tenons. I decided on a 3/8"-thick tenon, shouldered on only one face. I was able to make them 1V4" long, but only if I mitered them. I made all the shoulder cuts on the table saw for the best results. Then 1 cut the cheeks on the band saw. 1 always cut them just a little fat, so after a light adjustment with a shoulder plane, they fit nice and tight. Because I cut the leg mortises on a slot mortiser, they had rounded ends. Instead of squaring the mortises, I chose to round the tenons with a rasp and coarse sandpaper. The final step was to miter the ends of the tenons, so they would Providence Writing Desk
* Mill profile for beaded trim for legs and below drawers from wider piece and cut to fit lengths * Mill profile for beaded trim for legs and below drawers from wider piece and cut to fit lengths All things being equal. After shaping the leg, the dados should all be the same depth. I use a simple gauge block to check the dados and adjust as necessary. extend as far as possible into the mortises. After the mortises and the dados for the beading are cut, the legs can be shaped. The curves in the legs should be carefully cut on the band saw, leaving the outline intact. Cutting the outline on one side inadvertently removes it from the adjoining, perpendicular side, so it has to be re-drawn on the un-cut side, or the cut-offs (containing the outline) from the first side can be temporarily reattached with tape. After cutting out the legs, verify the depth of the ankle dadosand the location of the mortises. If everything checks out, the legs can be cleaned up and smoothed with a lineup of hand tools, starting with the spokeshave, progressing to a scraper and finishing up with #220-grit sandpaper. When the beading is attached to the leg, it should be firmly seated into the dado and project only Vs" (the bead's radius). For proper registration the depth of the dado should be exactly the same all around the ankle. To ensure this critical dimension, I used a small wooden gauge. 1 milled the bead on the router table then cut it free, forming a delicate strip of moulding measuring V4" by V16". This moulding is far too slender to cut with power tools, so I cut the lengths into small 2" pieces using a 16 teeth-per-inch gent's saw. I mitered the small pieces on a horizon- ^Dnline EXTRAS For additional drawings and step photos of building this project, go to: popularwoodworking.com/apr09 10 ■ Popular Woodworking April 2009 |
||||||||||||||||||||||||||||||||||||||||||||||||||||||||||||||||||||||||||||||||||||||||||||||||||||||||||||||||||||||||||||||||||||||||||||


