Popular Woodworking 2009-06 № 176, страница 35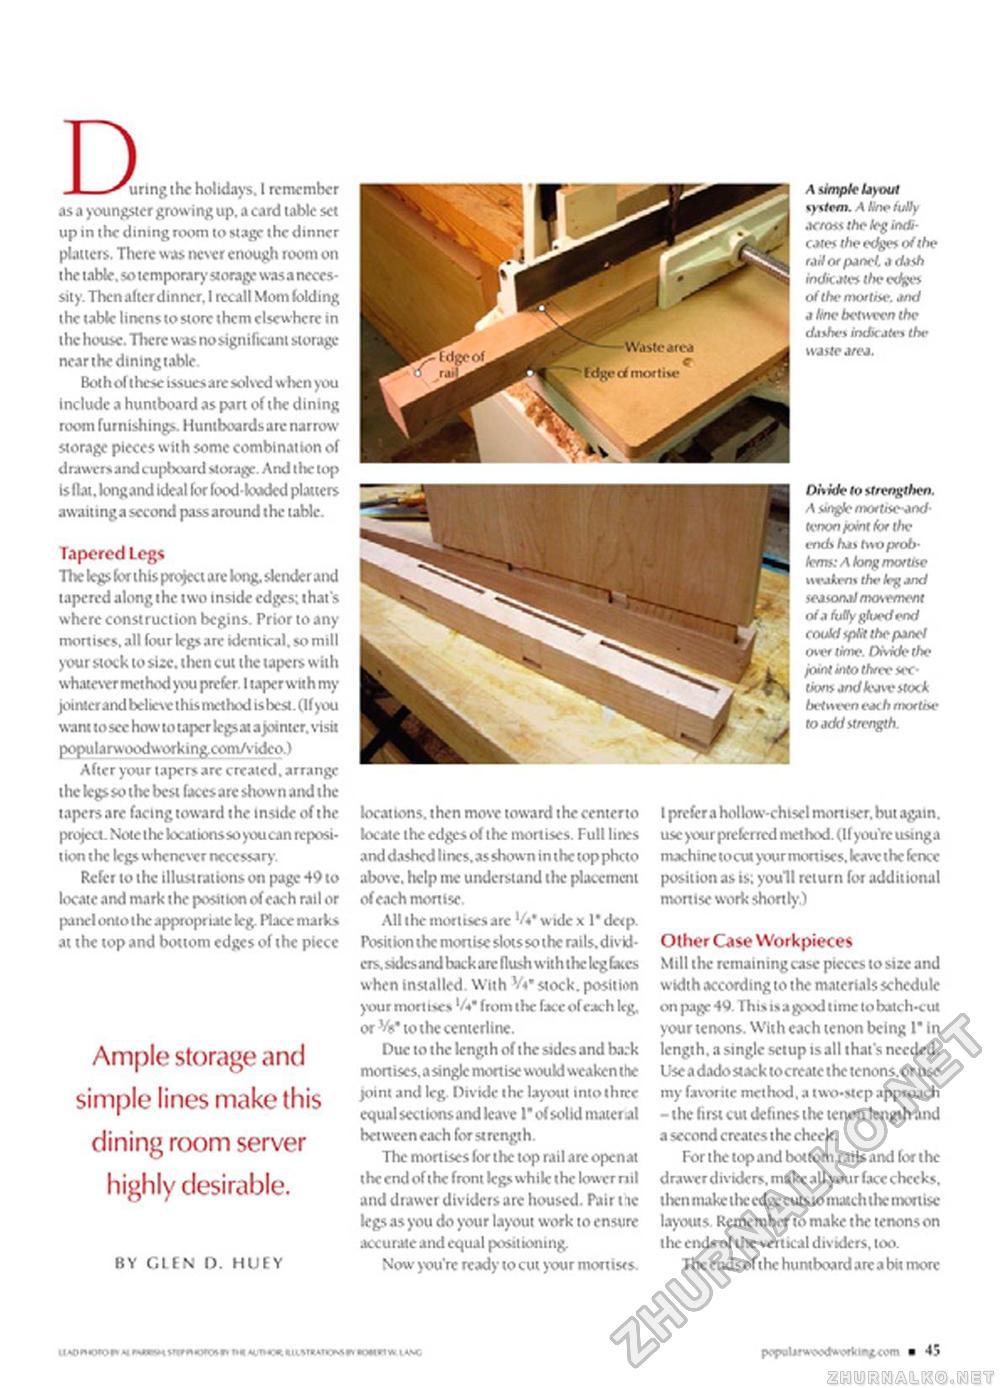
D ^uringthe holidays. 1 remember as a youngster growing up. a card table set up in the dining room to stage the dinner platters. There was never enough room on t he table, so temporary storage was a necessity. Then after dinner. I recall Mom folding the table linens to store them elsewhere in the house. Tltere was no significant storage near the dining table Both of t hese issues are solved when you include a huntboard as part of the dining room furnishings. Huntboards arc narrow storage pieces with some combination of drawers and cupboard storage. And the top Is flat, longand ideal for foodkxaded platters awaitinga second pass around the table. Tapered Legs Hie legs (or this project arc long, slender and tapered along the two inside edges: that's where construction begins. Prior to any mortises, all four legs are identical, so mill your stock to size, then cut the tapers with whatever method you prefer. I taper with my jointer and believe this method is best. (If you want to sec how to taper legs at a jointer, visit popuUrwoodworking.com/vidco.) After your tapers are created, arrange the legs so the best faces arc shown and tin* tapersare facing toward the inside of the project. Note the local ions soyou can reposition the legs whenever necessary. Refer to the illustrations on page 49 to locate and mark the position of each rail or panel onto t he appropriate leg Plate marks at the top and bottom edges of the piece Ample storage and simple lines make this dining rcx)m server highly desirable. BY CLEN O. HUEY locations, then move toward thecenterto locate the edges of the mortises. Full lines and dashed lines, as shown in the top phcto above, help me understand the placement All the mortises arc '/«* wide x 1* de<p. Position the mortise slots so the rails.divid-crs. sxicsand hackarc flush with the leg bees when installed. With V«* stock, position your mort iscs 'A" from the face of each leg, or Vs'tothccenterline. Due to the length of the sides and hark mortises, a single mortise would weaken the joint and leg. Divide the layout into three equal sect ions and leas e 1* of solid mater al between each for strength. The mortises for the top rail arc open at the end of the front legs while the lower nil and drawer dividers are housed. Pair me legs as you do your layout work to ensure accurate and equal positioning Now you're ready to cut your mortises. A simple liyoul system. A Hne fully tcroaiheleginrti-cjj« the edge* of ihe r*H or panel, a dash mdkJtes the edges of the mortne. jnd a kne betwven the d.t\he\ indicates the Dhide to strengthen. A angle mortise And-fewi fomt for the ends hit fmt problem: A long mortne »rjlm» the leg And ieaorul movement of a fully glued end could ipW the pAnel on* time. Onxk' the join! into three section* and fcavr itwk. between eAch mortise to add strength. I prefer a hollow-chisel mortiser. but again, use your preferred method. (If you're usinga machine to cut yvur mortises, leave the fence position as is; youll return for additional mortise woric shortly.) Other Case Workpieces Mill the remaining case pieces to size and width according to the materials schedule on page ■»«> This is a gixxl tune to batch-cut your tenons. With each tenon being I* In length, a single setup is all that's needed. Use a dado stack tocrcatc the tenons, or use my favorite method, a lwx>-stcpapproach - the first cut defines the tenon length and a second creates the cheek. For l he top and bottom rails and for the drawer dividers, make all your face checks, then make the edge cuisio match the mortise layouts Remember to make the tenons on the ends of the vertical dividers, too. The endsof the huntboard arc a bit more popvtirawdwertMteeai ■ 45 |


