Popular Woodworking 2009-10 № 178, страница 12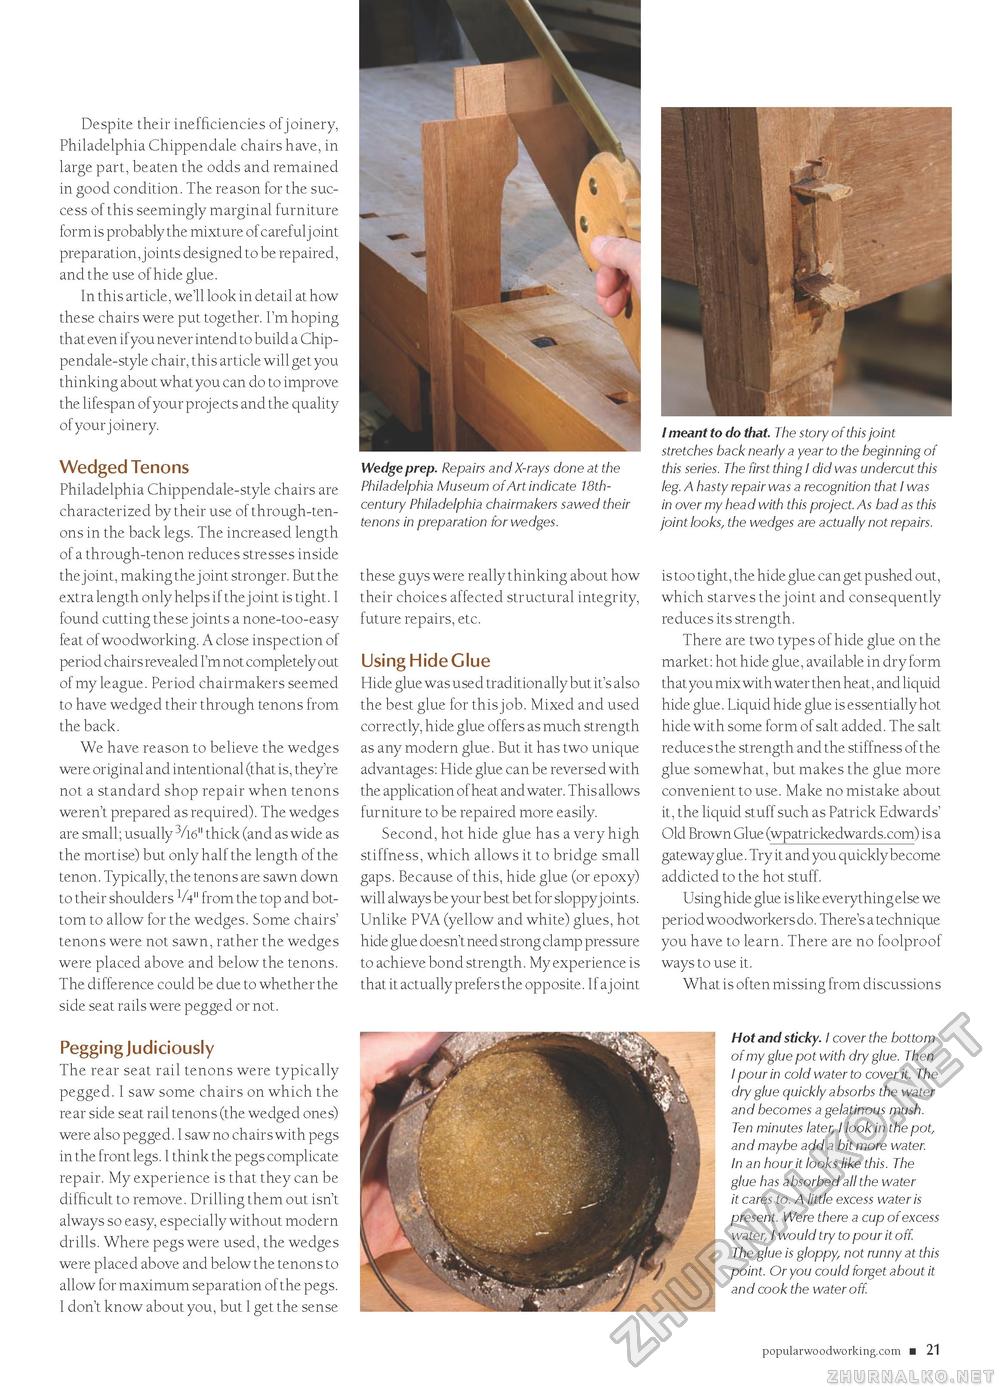
Despite their inefficiencies of joinery, Philadelphia Chippendale chairs have, in large part, beaten the odds and remained in good condition. The reason for the success of this seemingly marginal furniture form is probably the mixture of carefulj oint preparation, joints designed to be repaired, and the use of hide glue. In this article, we'll look in detail at how these chairs were put together. I'm hoping that even ifyou never intend to build a Chippendale-style chair, this article will get you thinking about what you can do to improve the lifespan of your projects and the quality of your joinery. Wedged Tenons Philadelphia Chippendale-style chairs are characterized by their use of through-tenons in the back legs. The increased length of a through-tenon reduces stresses inside the joint, making the joint stronger. But the extra length only helps if the joint is tight. I found cutting these joints a none-too-easy feat of woodworking. A close inspection of period chairs revealed I'm not completely out of my league. Period chairmakers seemed to have wedged their through tenons from the back. We have reason to believe the wedges were original and intentional (that is, they're not a standard shop repair when tenons weren't prepared as required). The wedges are small; usually 3/l6" thick (and as wide as the mortise) but only half the length of the tenon. Typically, the tenons are sawn down to their shoulders V-t" from the top and bottom to allow for the wedges. Some chairs' tenons were not sawn, rather the wedges were placed above and below the tenons. The difference could be due to whether the side seat rails were pegged or not. Pegging Judiciously The rear seat rail tenons were typically pegged. I saw some chairs on which the rear side seat rail tenons (the wedged ones) were also pegged. I saw no chairs with pegs in the front legs. I think the pegs complicate repair. My experience is that they can be difficult to remove. Drilling them out isn't always so easy, especially without modern drills. Where pegs were used, the wedges were placed above and below the tenons to allow for maximum separation of the pegs. I don't know about you, but I get the sense Wedge prep. Repairs and X-rays done at the Philadelphia Museum of Art indicate 18th-century Philadelphia chairmakers sawed their tenons in preparation for wedges. I meant to do that. The story of this joint stretches back nearly a year to the beginning of this series. The first thing I did was undercut this leg. A hasty repair was a recognition that I was in over my head with this project. As bad as this joint looks, the wedges are actually not repairs. these guys were really thinking about how their choices affected structural integrity, future repairs, etc. Using Hide Glue Hide glue was used traditionally but it's also the best glue for this job. Mixed and used correctly, hide glue offers as much strength as any modern glue. But it has two unique advantages: Hide glue can be reversed with the application of heat and water. This allows furniture to be repaired more easily. Second, hot hide glue has a very high stiffness, which allows it to bridge small gaps. Because of this, hide glue (or epoxy) will always be your best bet for sloppyj oints. Unlike PVA (yellow and white) glues, hot hide glue doesn't need strong clamp pressure to achieve bond strength. My experience is that it actually prefers the opposite. If a j oint is too tight, the hide glue can get pushed out, which starves the joint and consequently reduces its strength. There are two types of hide glue on the market: hot hide glue, available in dry form that you mix with water then heat, and liquid hide glue. Liquid hide glue is essentially hot hide with some form of salt added. The salt reduces the strength and the stiffness of the glue somewhat, but makes the glue more convenient to use. Make no mistake about it, the liquid stuff such as Patrick Edwards' Old Brown Glue (wpatrickedwards.com) is a gateway glue. Try it and you quickly become addicted to the hot stuff. Using hide glue is like everything else we period woodworkers do. There's a technique you have to learn. There are no foolproof ways to use it. What is often missing from discussions Hot and sticky. I cover the bottom of my glue pot with dry glue. Then I pour in cold water to cover it. The dry glue quickly absorbs the water and becomes a gelatinous mush. Ten minutes later, I look in the pot, and maybe add a bit more water. In an hour it looks like this. The glue has absorbed all the water it cares to. A little excess water is present. Were there a cup of excess water, I would try to pour it off. The glue is gloppy, not runny at this point. Or you could forget about it and cook the water off. popularwoodworking.com ■ 21 |


