Popular Woodworking 2009-11 № 179, страница 28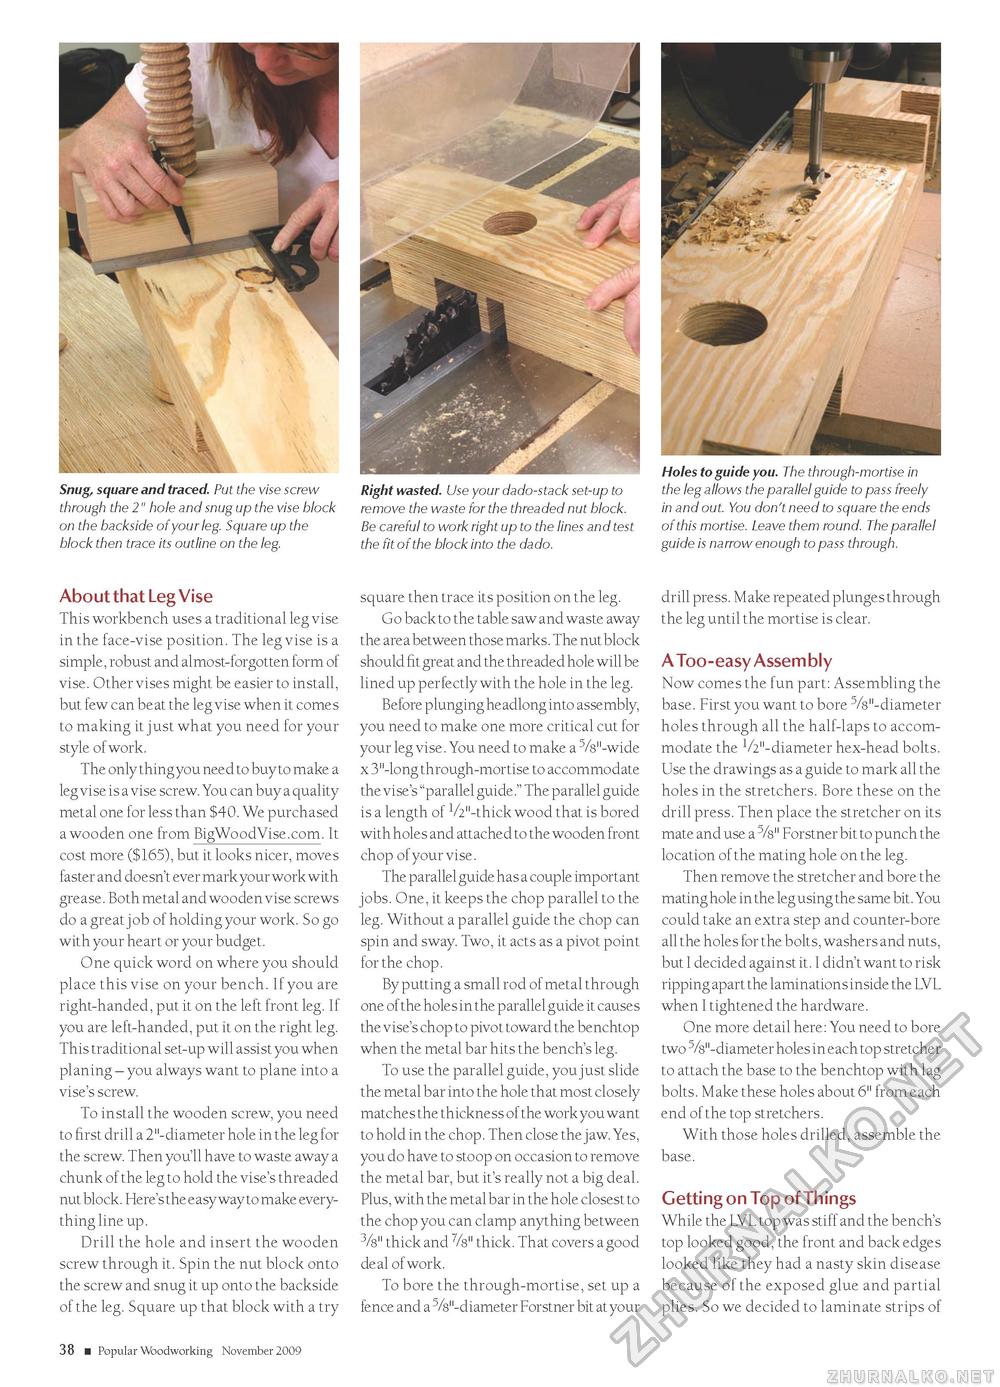
Snug, square and traced. Put the vise screw through the 2" hole and snug up the vise block on the backside of your leg. Square up the block then trace its outline on the leg. Right wasted. Use your dado-stack set-up to remove the waste for the threaded nut block. Be careful to work right up to the lines and test the fit of the block into the dado. Holes to guide you. The through-mortise in the leg allows the parallel guide to pass freely in and out. You don't need to square the ends of this mortise. Leave them round. The parallel guide is narrow enough to pass through. About that Leg Vise This workbench uses a traditional leg vise in the face-vise position. The leg vise is a simple, robust and almost-forgotten form of vise. Other vises might be easier to install, but few can beat the leg vise when it comes to making it just what you need for your style of work. The only thing you need to buy to make a leg vise is a vise screw. You can buy a quality metal one for less than $40. We purchased a wooden one from BigWoodVise.com. It cost more ($165), but it looks nicer, moves faster and doesn't ever mark your work with grease. Both metal and wooden vise screws do a great job of holding your work. So go with your heart or your budget. One quick word on where you should place this vise on your bench. If you are right-handed, put it on the left front leg. If you are left-handed, put it on the right leg. This traditional set-up will assist you when planing - you always want to plane into a vise's screw. To install the wooden screw, you need to first drill a 2"-diameter hole in the leg for the screw. Then you'll have to waste away a chunk of the leg to hold the vise's threaded nut block. Here's the easy way to make everything line up. Drill the hole and insert the wooden screw through it. Spin the nut block onto the screw and snug it up onto the backside of the leg. Square up that block with a try square then trace its position on the leg. Go back to the table saw and waste away the area between those marks. The nut block should fit great and the threaded hole will be lined up perfectly with the hole in the leg. Before plunging headlong into assembly, you need to make one more critical cut for your leg vise. You need to make a 5/8"-wide x 3"-long through-mortise to accommodate the vise's "parallel guide." The parallel guide is a length of 1/2"-thick wood that is bored with holes and attached to the wooden front chop of your vise. The parallel guide has a couple important jobs. One, it keeps the chop parallel to the leg. Without a parallel guide the chop can spin and sway. Two, it acts as a pivot point for the chop. By putting a small rod of metal through one of the holes in the parallel guide it causes the vise's chop to pivot toward the benchtop when the metal bar hits the bench's leg. To use the parallel guide, you just slide the metal bar into the hole that most closely matches the thickness of the work you want to hold in the chop. Then close the jaw. Yes, you do have to stoop on occasion to remove the metal bar, but it's really not a big deal. Plus, with the metal bar in the hole closest to the chop you can clamp anything between 3/8" thick and %" thick. That covers a good deal of work. To bore the through-mortise, set up a fence and a 5/8"-diameter Forstner bit at your drill press. Make repeated plunges through the leg until the mortise is clear. A Too-easy Assembly Now comes the fun part: Assembling the base. First you want to bore 5/8"-diameter holes through all the half-laps to accommodate the 1/2"-diameter hex-head bolts. Use the drawings as a guide to mark all the holes in the stretchers. Bore these on the drill press. Then place the stretcher on its mate and use a %" Forstner bit to punch the location of the mating hole on the leg. Then remove the stretcher and bore the mating hole in the leg using the same bit. You could take an extra step and counter-bore all the holes for the bolts, washers and nuts, but I decided against it. I didn't want to risk ripping apart the laminations inside the LVL when I tightened the hardware. One more detail here: You need to bore two 5/8"-diameter holes in each top stretcher to attach the base to the benchtop with lag bolts. Make these holes about 6" from each end of the top stretchers. With those holes drilled, assemble the base. Getting on Top of Things While the LVL top was stiff and the bench's top looked good, the front and back edges looked like they had a nasty skin disease because of the exposed glue and partial plies. So we decided to laminate strips of 38 ■ Popular Woodworking November 2009 |


