Popular Woodworking 2009-11 № 179, страница 43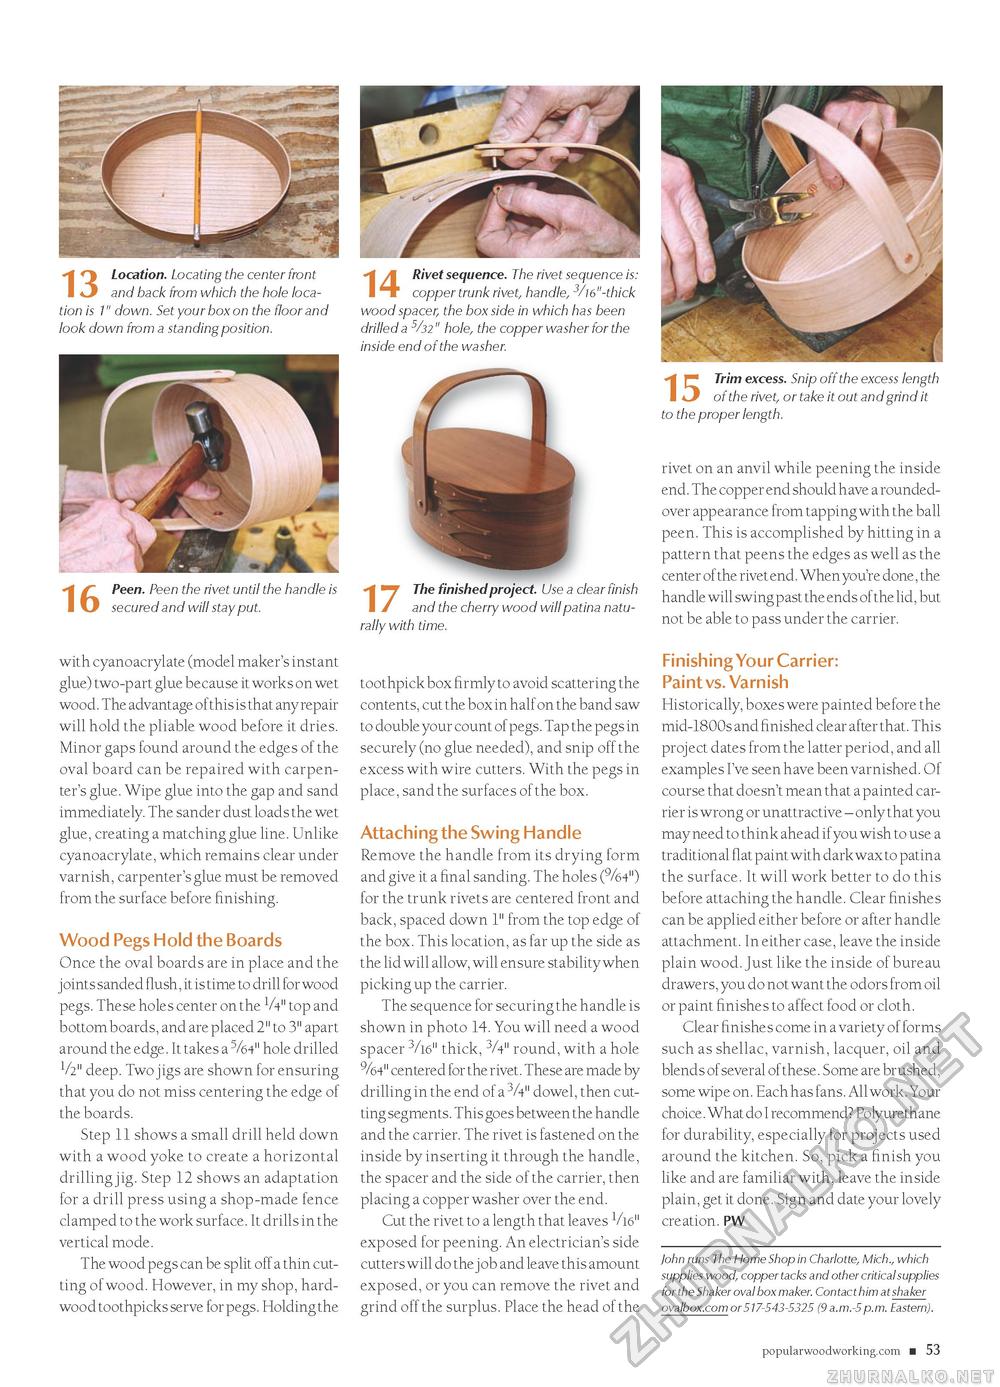
<y Location. Locating the center front I <J and back from which the hole location is 1" down. Set your box on the floor and look down from a standing position. ■*t /y Rivet sequence. The rivet sequence is: I ^r copper trunk rivet, handle, 3/16"-thick wood spacer, the box side in which has been drilled a 5/32" hole, the copper washer for the inside end of the washer. Peen. Peen the rivet until the handle is secured and will stay put. with cyanoacrylate (model maker's instant glue) two-p art glue because it works on wet wood. The advantage of this is that any repair will hold the pliable wood before it dries. Minor gaps found around the edges of the oval board can be repaired with carpenter's glue. Wipe glue into the gap and sand immediately. The sander dust loads the wet glue, creating a matching glue line. Unlike cyanoacrylate, which remains clear under varnish, carpenter's glue must be removed from the surface before finishing. Wood Pegs Hold the Boards Once the oval boards are in place and the joints sanded flush, it is time to drill for wood pegs. These holes center on the V4" top and bottom boards, and are placed 2" to 3" apart around the edge. It takes a 5/64" hole drilled V2" deep. Two jigs are shown for ensuring that you do not miss centering the edge of the boards. Step 11 shows a small drill held down with a wood yoke to create a horizontal drilling jig. Step 12 shows an adaptation for a drill press using a shop-made fence clamped to the work surface. It drills in the vertical mode. The wood pegs can be split off a thin cutting of wood. However, in my shop, hardwood toothpicks serve for pegs. Holding the ^ The finished project. Use a clear finish I J and the cherry wood will patina naturally with time. toothpick box firmly to avoid scattering the contents, cut the box in half on the band saw to double your count of pegs. Tap the pegs in securely (no glue needed), and snip off the excess with wire cutters. With the pegs in place, sand the surfaces of the box. Attaching the Swing Handle Remove the handle from its drying form and give it a final sanding. The holes (%4") for the trunk rivets are centered front and back, spaced down 1" from the top edge of the box. This location, as far up the side as the lid will allow, will ensure stability when picking up the carrier. The sequence for securing the handle is shown in photo 14. You will need a wood spacer 3/16" thick, 3/4" round, with a hole %4" centered for the rivet. These are made by drilling in the end of a 3/4" dowel, then cutting segments. This goes between the handle and the carrier. The rivet is fastened on the inside by inserting it through the handle, the spacer and the side of the carrier, then placing a copper washer over the end. Cut the rivet to a length that leaves 1/t6" exposed for peening. An electrician's side cutters will do the job and leave this amount exposed, or you can remove the rivet and grind off the surplus. Place the head of the Trim excess. Snip off the excess length I kJ of the rivet, or take it out and grind it to the proper length. rivet on an anvil while peening the inside end. The copper end should have a rounded-over appearance from tapping with the ball peen. This is accomplished by hitting in a pattern that peens the edges as well as the center of the rivet end. When you're done, the handle will swing past the ends of the lid, but not be able to pass under the carrier. Finishing Your Carrier: Paint vs. Varnish Historically, boxes were painted before the mid-1800s and finished clear after that. This project dates from the latter period, and all examples I've seen have been varnished. Of course that doesn't mean that a painted carrier is wrong or unattractive - only that you may need to think ahead if you wish to use a traditional flat paint with dark wax to patina the surface. It will work better to do this before attaching the handle. Clear finishes can be applied either before or after handle attachment. In either case, leave the inside plain wood. Just like the inside of bureau drawers, you do not want the odors from oil or paint finishes to affect food or cloth. Clear finishes come in a variety of forms such as shellac, varnish, lacquer, oil and blends of several of these. Some are brushed, some wipe on. Each has fans. All work. Your choice. What do I recommend? Polyurethane for durability, especially for projects used around the kitchen. So, pick a finish you like and are familiar with, leave the inside plain, get it done. Sign and date your lovely creation. PW fohn runs The Home Shop in Charlotte, Mich., which supplies wood, copper tacks and other critical supplies for the Shaker oval box maker. Contact him at shaker ovalbox.com or517-543-5325 (9 a.m.-5p.m. Eastern). popularwoodworking.com ■ 53 |


