Popular Woodworking 2009-11 № 179, страница 40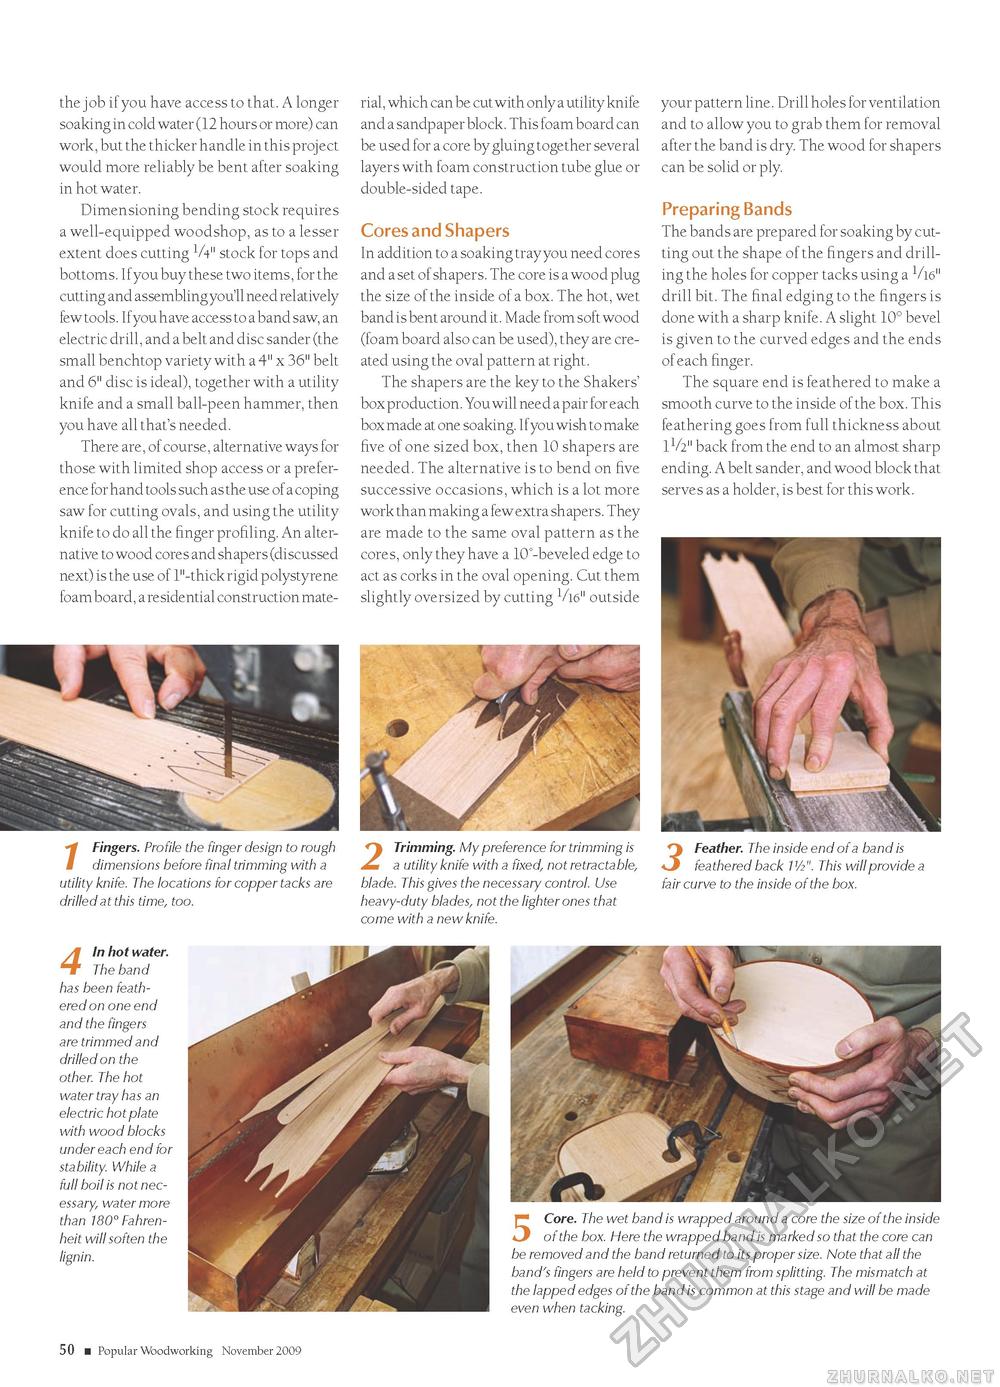
the job if you have access to that. A longer soaking in cold water (12 hours or more) can work, but the thicker handle in this project would more reliably be bent after soaking in hot water. Dimensioning bending stock requires a well-equipped woodshop, as to a lesser extent does cutting V4" stock for tops and bottoms. If you buy these two items, for the cutting and assembling you'll need relatively few tools. Ifyou have access to a band saw, an electric drill, and a belt and disc sander (the small benchtop variety with a 4" x 36" belt and 6" disc is ideal), together with a utility knife and a small ball-peen hammer, then you have all that's needed. There are, of course, alternative ways for those with limited shop access or a preference for hand tools such as the use of a coping saw for cutting ovals, and using the utility knife to do all the finger profiling. An alternative to wood cores and shapers (discussed next) is the use of 1"-thick rigid polystyrene foam board, a residential construction mate- / Fingers. Profile the finger design to rough dimensions before final trimming with a utility knife. The locations for copper tacks are drilled at this time, too. rial, which can be cut with only a utility knife and a sandpaper block. This foam board can be used for a core by gluing together several layers with foam construction tube glue or double-sided tape. Cores and Shapers In addition to a soaking tray you need cores and a set of shapers. The core is a wood plug the size of the inside of a box. The hot, wet band is bent around it. Made from soft wood (foam board also can be used), they are created using the oval pattern at right. The shapers are the key to the Shakers' box production. You will need a pair for each box made at one soaking. If you wish to make five of one sized box, then 10 shapers are needed. The alternative is to bend on five successive occasions, which is a lot more work than making a few extra shapers. They are made to the same oval pattern as the cores, only they have a 10°-beveled edge to act as corks in the oval opening. Cut them slightly oversized by cutting 1/t6" outside your pattern line. Drill holes for ventilation and to allow you to grab them for removal after the band is dry. The wood for shapers can be solid or ply. Preparing Bands The bands are prepared for soaking by cutting out the shape of the fingers and drilling the holes for copper tacks using a V16" drill bit. The final edging to the fingers is done with a sharp knife. A slight 10° bevel is given to the curved edges and the ends of each finger. The square end is feathered to make a smooth curve to the inside of the box. This feathering goes from full thickness about 1V2" back from the end to an almost sharp ending. A belt sander, and wood block that serves as a holder, is best for this work. 2 Trimming. My preference for trimming is a utility knife with a fixed, not retractable, blade. This gives the necessary control. Use heavy-duty blades, not the lighter ones that come with a new knife. O Feather. The inside end of a band is *J feathered back V/2". This will provide a fair curve to the inside of the box. 4 In hot water. The band has been feathered on one end and the fingers are trimmed and drilled on the other. The hot water tray has an electric hot plate with wood blocks under each end for stability. While a full boil is not necessary, water more than 180° Fahrenheit will soften the lignin. 5 Core. The wet band is wrapped around a core the size of the inside of the box. Here the wrapped band is marked so that the core can be removed and the band returned to its proper size. Note that all the band's fingers are held to prevent them from splitting. The mismatch at the lapped edges of the band is common at this stage and will be made even when tacking. 50 ■ Popular Woodworking November 2009 |


