Popular Woodworking 2009-11 № 179, страница 42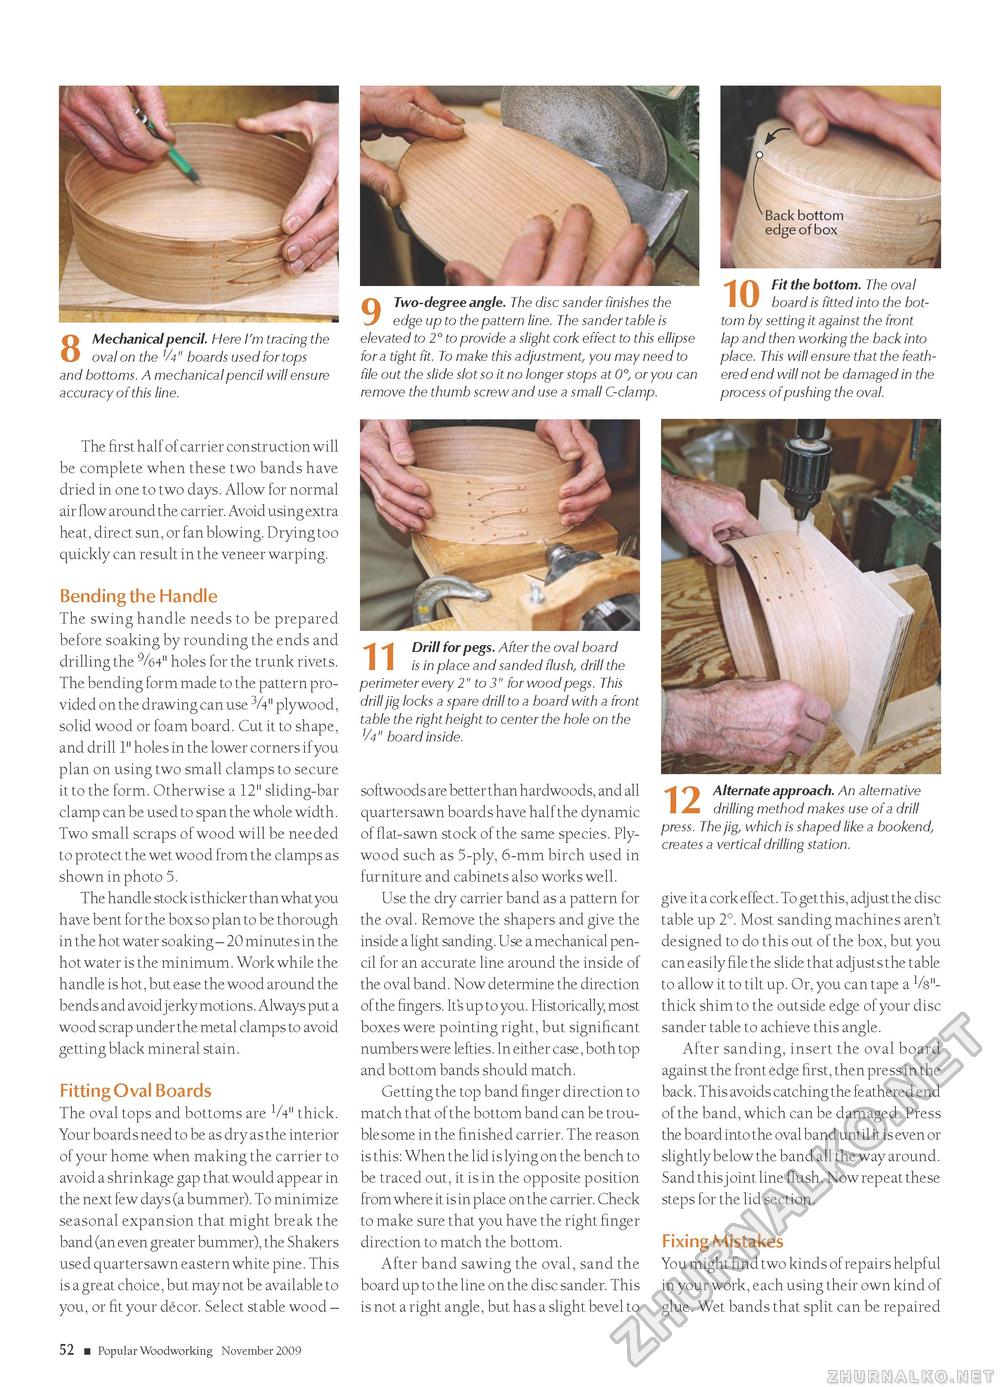
Back bottom edge of box 8 Mechanical pencil. Here I'm tracing the oval on the V4" boards used for tops and bottoms. A mechanical pencil will ensure accuracy of this line. The first half of carrier construction will be complete when these two bands have dried in one to two days. Allow for normal air flow around the carrier. Avoid using extra heat, direct sun, or fan blowing. Drying too quickly can result in the veneer warping. Bending the Handle The swing handle needs to be prepared before soaking by rounding the ends and drilling the 9/64" holes for the trunk rivets. The bending form made to the pattern provided on the drawing can use 3/4" plywood, solid wood or foam board. Cut it to shape, and drill 1" holes in the lower corners if you plan on using two small clamps to secure it to the form. Otherwise a 12" sliding-bar clamp can be used to span the whole width. Two small scraps of wood will be needed to protect the wet wood from the clamps as shown in photo 5. The handle stock is thicker than what you have bent for the box so plan to be thorough in the hot water soaking - 20 minutes in the hot water is the minimum. Work while the handle is hot, but ease the wood around the bends and avoidjerky motions. Always put a wood scrap under the metal clamps to avoid getting black mineral stain. Fitting Oval Boards The oval tops and bottoms are 1/4" thick. Your boards need to be as dry as the interior of your home when making the carrier to avoid a shrinkage gap that would appear in the next few days (a bummer). To minimize seasonal expansion that might break the band (an even greater bummer), the Shakers used quartersawn eastern white pine. This is a great choice, but may not be available to you, or fit your decor. Select stable wood - 9 Two-degree angle. The disc sander finishes the edge up to the pattern line. The sander table is elevated to 2° to provide a slight cork effect to this ellipse for a tight fit. To make this adjustment, you may need to file out the slide slot so it no longer stops at 0°, or you can remove the thumb screw and use a small C-clamp. Fit the bottom. The oval board is fitted into the bottom by setting it against the front lap and then working the back into place. This will ensure that the feathered end will not be damaged in the process of pushing the oval. Drill for pegs. After the oval board I I is in place and sanded flush, drill the perimeter every 2" to 3" for wood pegs. This drill jig locks a spare drill to a board with a front table the right height to center the hole on the V4" board inside. softwoods are better than hardwoods, and all quartersawn boards have half the dynamic of flat-sawn stock of the same species. Plywood such as 5-ply, 6-mm birch used in furniture and cabinets also works well. Use the dry carrier band as a pattern for the oval. Remove the shapers and give the inside a light sanding. Use a mechanical pencil for an accurate line around the inside of the oval band. Now determine the direction of the fingers. Its up to you. Historically, most boxes were pointing right, but significant numbers were lefties. In either case, both top and bottom bands should match. Getting the top band finger direction to match that of the bottom band can be troublesome in the finished carrier. The reason is this: When the lid is lying on the bench to be traced out, it is in the opposite position from where it is in place on the carrier. Check to make sure that you have the right finger direction to match the bottom. After band sawing the oval, sand the board up to the line on the disc sander. This is not a right angle, but has a slight bevel to Alternate approach. An alternative I ^ drilling method makes use of a drill press. The jig, which is shaped like a bookend, creates a vertical drilling station. give it a cork effect. To get this, adjust the disc table up 2°. Most sanding machines aren't designed to do this out of the box, but you can easily file the slide that adjusts the table to allow it to tilt up. Or, you can tape a Vs"-thick shim to the outside edge of your disc sander table to achieve this angle. After sanding, insert the oval board against the front edge first, then press in the back. This avoids catching the feathered end of the band, which can be damaged. Press the board into the oval band until it is even or slightly below the band all the way around. Sand thisjoint line flush. Now repeat these steps for the lid section. Fixing Mistakes You might find two kinds of repairs helpful in your work, each using their own kind of glue. Wet bands that split can be repaired 52 ■ Popular Woodworking November 2009 |


