19 - Clamp Storage System, страница 14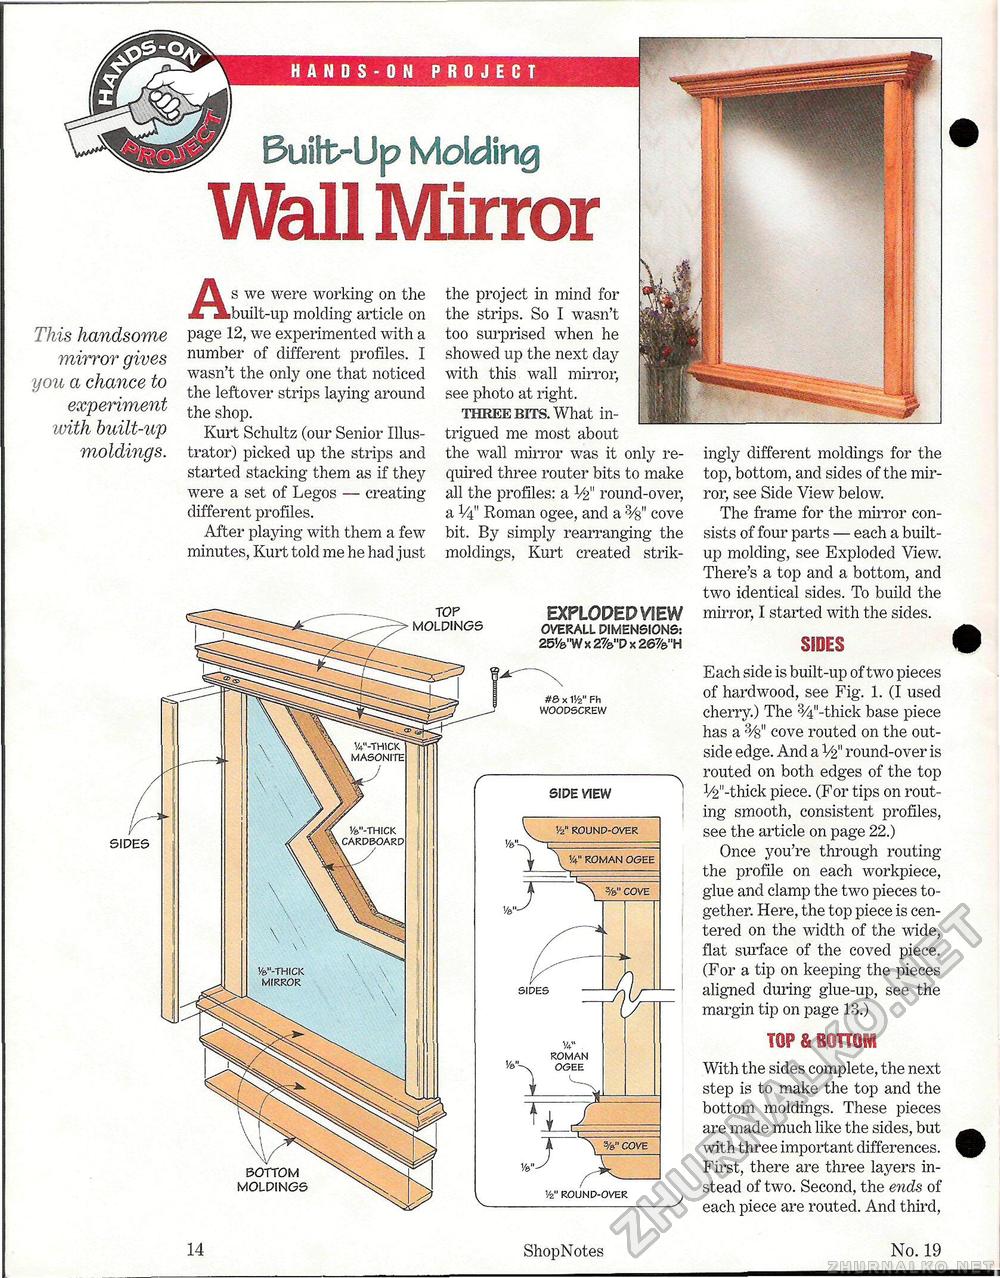
HANDS-ON PROJECT Buifc-Up Molding Wall MirrorThis handsome mirror gives you a chance to experiment ivith built-up moldings. #& x 1'/2" Fh WOODSCREW ingly different moldings for the top, bottom, and sides of the mirror, see Side View below. The frame for the mirror consists of four parts — each a built-up molding, see Exploded View. There's a top and a bottom, and two identical sides. To build the mirror, I started with the sides. SIDES 0 SIPES BOTTOM MOLDINGS SIDES Vz" ROUND-OVER As we were working on the built-up molding article on page 12, we experimented with a number of different profiles. I wasn't the only one that noticed the leftover strips laying around the shop. Kurt Schultz (our Senior Illustrator) picked up the strips and started stacking them as if they were a set of Legos — creating different profiles. After playing with them a few minutes, Kurt told me he had just the project in mind for the strips. So I wasn't too surprised when he showed up the next day with this wall mirror, see photo at right. three bits. What intrigued me most about the wall mirror was it only required three router bits to make all the profiles: a V2" round-over, a V4" Roman ogee, and a cove bit. By simply rearranging the moldings, Kurt created strik- TOP MOLDINGS EXPLODEDVieW OVERALL DIMENSIONS: 251/8"W x 2%'V x 26%"H SIDE VIEW Vz" ROUND-OVER Each side is built-up of two pieces of hardwood, see Fig. 1. (I used cherry.) The %"-thick base piece has a cove routed on the outside edge. And a V2" round-over is routed on both edges of the top 1/2l'-thick piece. (For tips on routing smooth, consistent profiles, see the article on page 22.) Once you're through routing the profile on each workpiece, glue and clamp the two pieces together. Here, the top piece is centered on the width of the wide, flat surface of the coved piece. (For a tip on keeping the pieces aligned during glue-up, see the margin tip on page 13.) TOP & B0TTO1 With the sides complete, the next step is to make the top and the bottom moldings. These pieces are made much like the sides, but with three important differences. First, there are three layers instead of two. Second, the ends of each piece are routed. And third, 14 ShopNotes No. 19 |


