19 - Clamp Storage System, страница 15
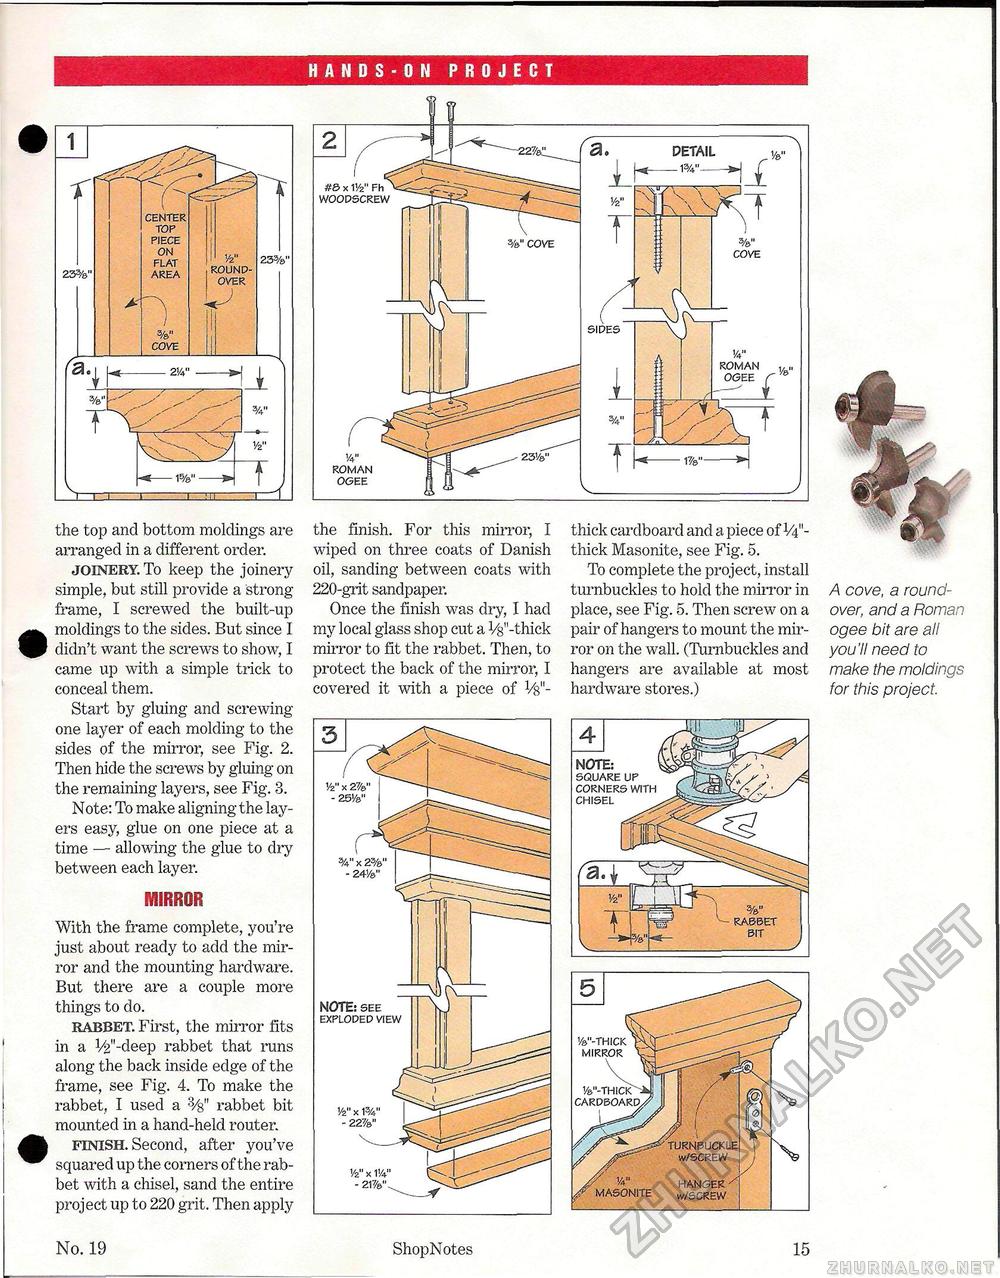
HANDS-ON PROJECT the top and bottom moldings are arranged in a different order. joinery. To keep the joinery simple, but still provide a strong frame, I screwed the built-up moldings to the sides. But since I didn't want the screws to show, I came up with a simple trick to conceal them. Start by gluing and screwing one layer of each molding to the sides of the mirror, see Fig. 2. Then hide the screws by gluing on the remaining layers, see Fig. 3. Note: To make aligning the layers easy, glue on one piece at a time — allowing the glue to dry between each layer. MIRROR With the frame complete, you're just about ready to add the mirror and the mounting hardware. But there are a couple more things to do. rabbet. First, the mirror fits in a V£"-deep rabbet that runs along the back inside edge of the frame, see Fig. 4. To make the rabbet, I used a rabbet bit mounted in a hand-held router. finish. Second, after you've squared up the corners of the rabbet with a chisel, sand the entire project up to 220 grit. Then apply the finish. For this mirror, I wiped on three coats of Danish oil, sanding between coats with 220-grit sandpaper. Once the finish was dry, I had my local glass shop cut a Vs"-thick mirror to fit the rabbet. Then, to protect the back of the mirror, I covered it with a piece of Vfc"- thick cardboard and a piece of V411-thick Masonite, see Fig. 5. To complete the project, install turnbuckles to hold the mirror in place, see Fig. 5. Then screw on a pair of hangers to mount the mirror on the wall. (Turnbuckles and hangers are available at most hardware stores.) /A cove, a round-over, and a Roman ogee bit are all you'll need to make the moldings for this project. No. 19 ShopNotes 15 PIECE ON FLAT AREA COVE 1/2" ROUND-OVER 233/9" %" COVE 14" ROMAN OGEE #S x 11/2" Fh WOODSCREW DETAIL 1/4" ROMAN 1/a"-THICK" CARDBOARD. RABBET BIT J V&"-THICK MIRROR TURNBUCKLE w/SCREW ' 'A MASONITE HANGER w/SCREW NOTE: SQUARE UP CORNERS WITH CHISEL |


