19 - Clamp Storage System, страница 17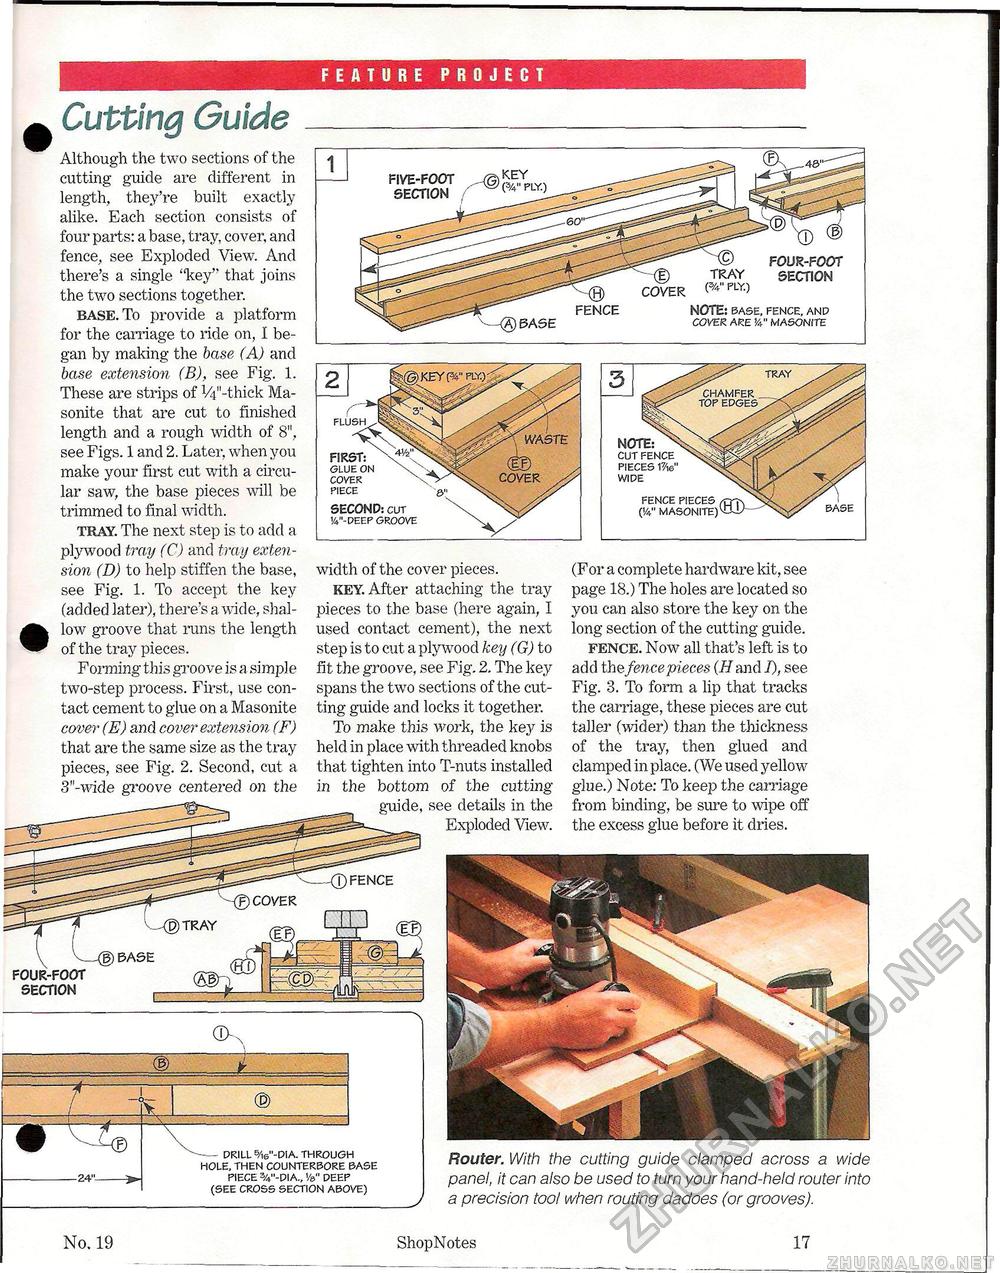
FEATURE PROJECT FIVE-FOOT SECTION FOUR-FOOT tray SECTION COVER P™) NOTE: BASE, FENCE, AND COVER ARE 54" MASONfTE glue on SECOND: cut 14"-DEEP GROOVE cover piece NOTE: CUT FENCE PIECES me" WIDE FENCE PIECES (!4" MASONITE) BASE --DRILL 5/is"-DIA. THROUGH HOLE, THEN COUNTERBORE BASE PIECE 3/4"-DIA„ Ve" DEEP (SEE CROSS SECTION ABOVE) Router. With the cutting guide clamped across a wide panel, it can also be used to turn your hand-held router into a precision tool when routing dadoes (or grooves). ^ Cutting Guide Although the two sections of the cutting guide are different in length, they're built exactly alike. Each section consists of four parts: a base, tray, cover, and fence, see Exploded View. And there's a single '"key" that joins the two sections together. base. To provide a platform for the carriage to ride on, 1 began by making the base (A) and bam extension (B), see Fig. 1. These are strips of W-thick Ma-sonite that are cut to finished length and a rough width of 8", see Figs. 1 and 2. Later, when you make your first cut with a circular saw, the base pieces will be trimmed to final width. tray. The next step is to add a plywood tray (C) and tray extension (D) to help stiffen the base, see Fig. 1. To accept the key (added later), there's a wide, shal- • low groove that runs the length of the tray pieces. Forming this groove is a simple two-step process. First, use contact cement to glue on a Masonite cover (E) and cover extension (F) that are the same size as the tray pieces, see Fig. 2. Second, cut a 3 "-wide groove centered on the width of the cover pieces. key. After attaching the tray pieces to the base (here again, I used contact cement), the next step is to cut a plywood key (G) to fit the groove, see Fig. 2. The key spans the two sections of the cutting guide and locks it together. To make this work, the key is held in place with threaded knobs that tighten into T-nuts installed in the bottom of the cutting guide, see details in the Exploded View. (For a complete hardware kit, see page 18.) The holes are located so you can also store the key on the long section of the cutting guide. fence. Now all that's left is to acid the fence pieces (H and i), see Fig. 3. To form a lip that tracks the carriage, these pieces are cut taller (wider) than the thickness of the tray, then glued and clamped in place. (We used yellow glue.) Note: To keep the carriage from binding, be sure to wipe off the excess glue before it dries. No. 19 |


