19 - Clamp Storage System, страница 23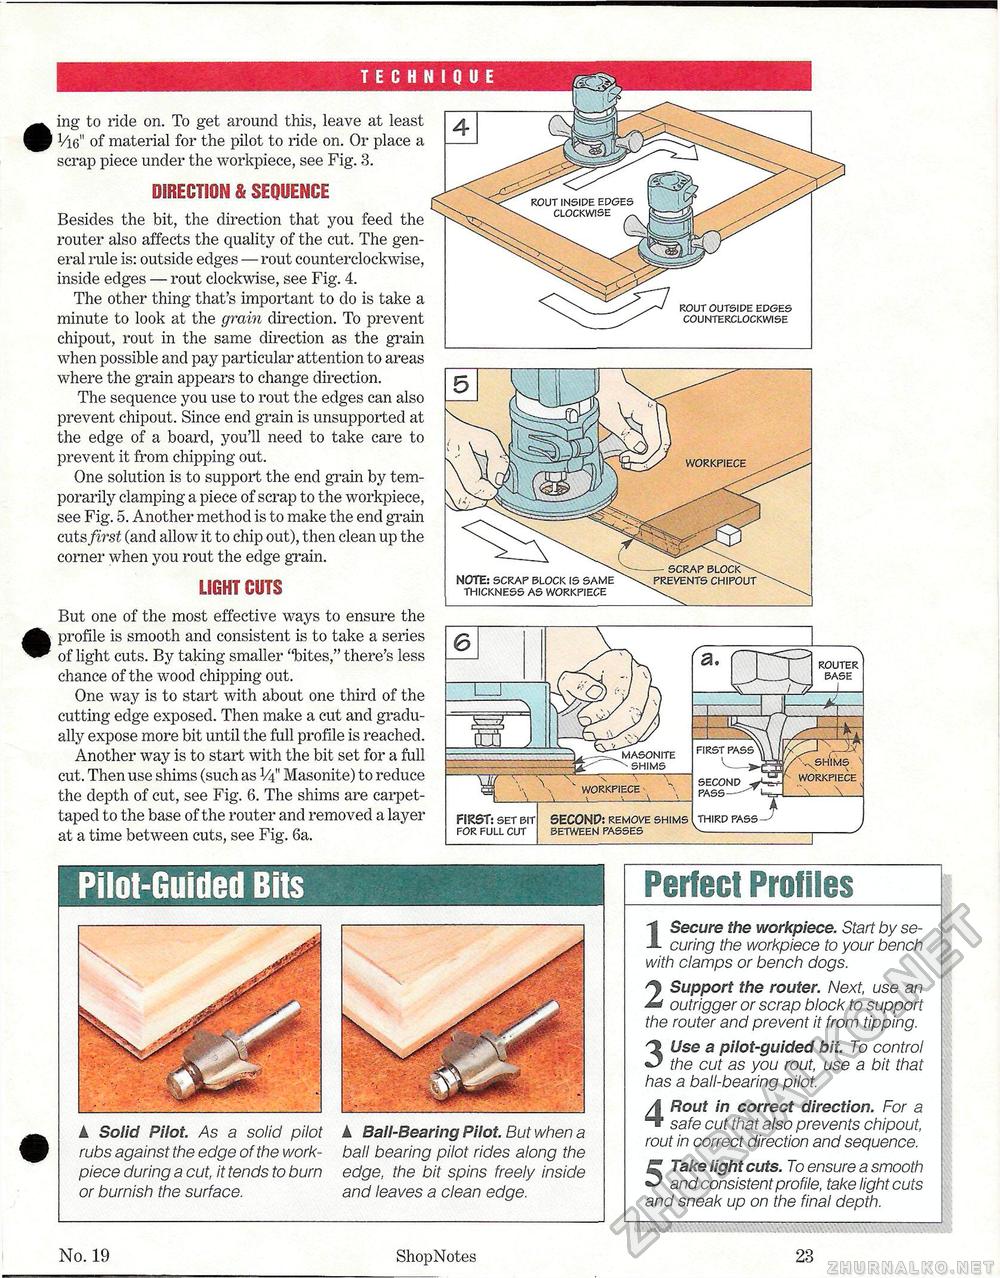
Pilot-Guided Bits k Solid Pilot. As a solid pilot rubs against the edge of the work-piece during a cut, it tends to burn or burnish the surface. A Bail-Bearing Pilot. But when a ball bearing pilot rides along the edge, the bit spins freely inside and leaves a clean edge. Perfect Profiles 1 Secure the workpiece. Start by securing the workpiece to your bench with clamps or bench dogs. 2 Support the router. Next, use an outrigger or scrap block to support the router and prevent it from tipping. 3 Use a pilot-guided bit. To control the cut as you rout, use a bit that has a ball-bearing pilot. 4 Rout in correct direction. For a safe cut that also prevents chipout, rout in correct direction and sequence. 5 Take light cuts. To ensure a smooth and consistent profile, take light cuts and sneak up on the final depth. ing to ride on. To get around this, leave at least Vie" of material for the pilot to ride on. Or place a scrap piece under the workpiece, see Fig. 3. DIRECTION & SEQUENCE Besides the bit, the direction that you feed the router also affects the quality of the cut. The general rule is: outside edges — rout counterclockwise, inside edges — rout clockwise, see Fig. 4. The other thing that's important to do is take a minute to look at the grain direction. To prevent chipout, rout in the same direction as the grain when possible and pay particular attention to areas where the grain appears to change direction. The sequence you use to rout the edges can also prevent chipout. Since end grain is unsupported at the edge of a board, you'll need to take care to prevent it from chipping out. One solution is to support the end grain by temporarily clamping a piece of scrap to the workpiece, see Fig. 5. Another method is to make the end grain cuts first (and allow it to chip out), then clean up the corner when you rout the edge grain. LIGHT OUTS But one of the most effective ways to ensure the profile is smooth and consistent is to take a series of light cuts. By taking smaller "bites," there's less chance of the wood chipping out. One way is to start with about one third of the cutting edge exposed. Then make a cut and gradually expose more bit until the full profile is reached. Another way is to start with the bit set for a full cut. Then use shims (such as V4" Masonite) to reduce the depth of cut, see Fig. 6. The shims are carpet-taped to the base of the router and removed a layer at a time between cuts, see Fig. 6a. rout insipe edges clockwise _ rout outside edges counterclockwise workpiece — scrap block\ prevents chipout NOTE: scrap block is same thickness as workpiece router base masonite ^ shims vshims workpiece workpiece thirp pass — y SECONP: remove shims between passes FIRST: set bit for full cut No. 19 ShopNotes 23 |


