25 - Special Table Saw Issue, страница 13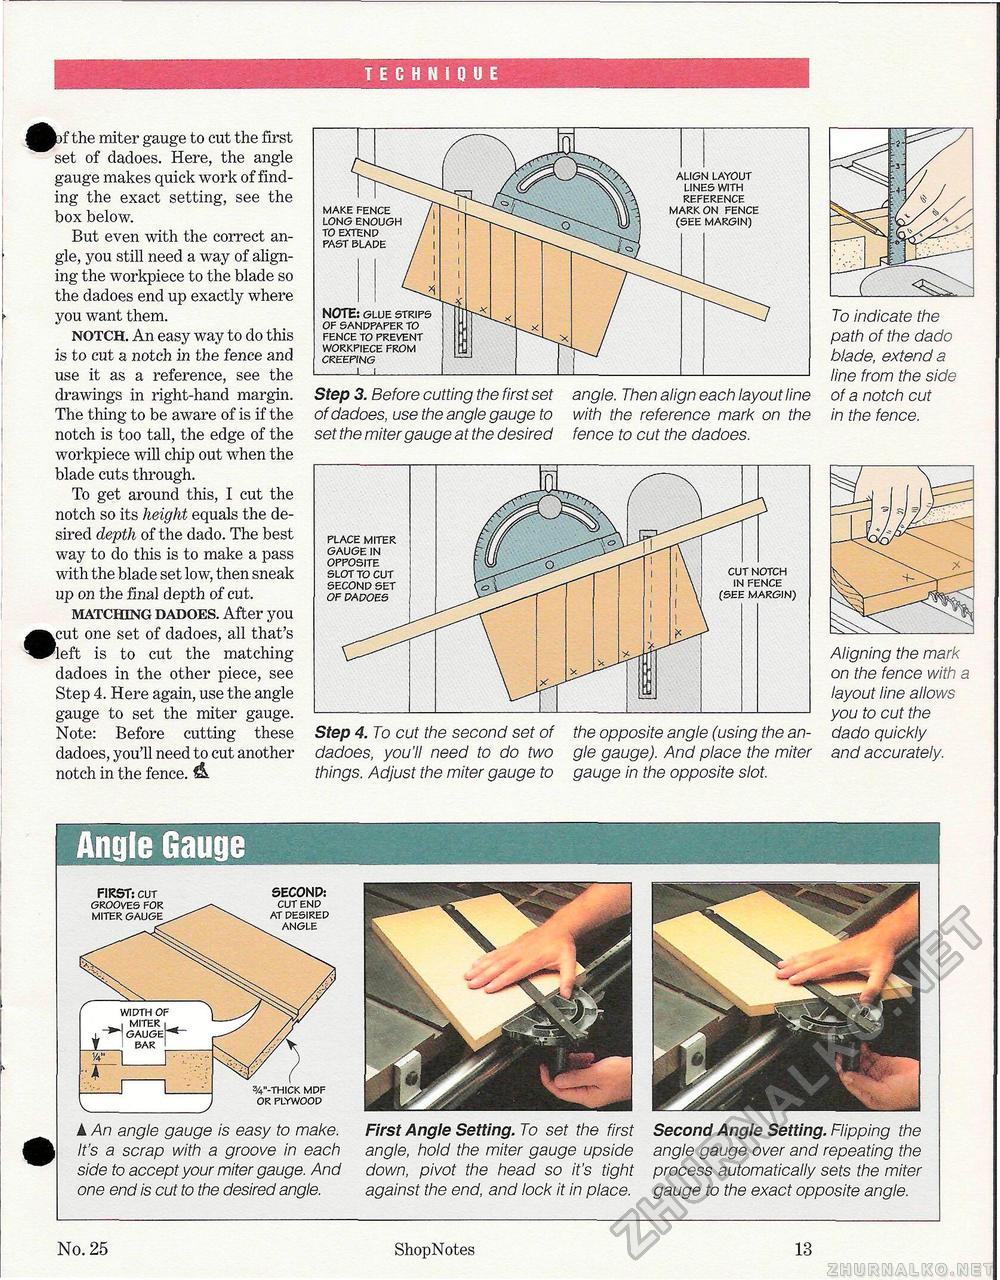
TECHNIQUE ^^jf the miter gauge to cut the first set of dadoes. Here, the angle gauge makes quick work of finding the exact setting, see the box below. But even with the correct angle, you still need a way of aligning the workpieee to the blade so the dadoes end up exactly where you want them. notch. An easy way to do this is to cut a notch in the fence and use it as a reference, see the drawings in right-hand margin. The thing to be aware of is if the notch is too tall, the edge of the workpieee will chip out when the blade cuts through. To get around this, I cut the notch so its height equals the desired depth of the dado. The best way to do this is to make a pass with the blade set low, then sneak up on the final depth of cut. matching dadoes. After you •cut one set of dadoes, all that's left is to cut the matching dadoes in the other piece, see Step 4. Here again, use the angle gauge to set the miter gauge. Note: Before cutting these dadoes, you'll need to cut another notch in the fence, lb Step 3. Before cutting the first set of dadoes, use the angle gauge to set the miter gauge at the desired angle. Then align each layout line with the reference mark on the fence to cut the dadoes. To indicate the path of the dado blade, extend a line from the side of a notch cut in the fence. Step 4. To cut the second set of dadoes, you'll need to do two things. Adjust the miter gauge to the opposite angle (using the angle gauge). And place the miter gauge in the opposite slot. Aligning the mark on the fence with a layout line allows you to cut the dado quickly and accurately. NOTE: glue strips of sandpaper to fence to prevent workpiece from creeping _I_I_ make fence long enough to extend past blade align layout lines with reference mark on fence (see margin) place miter gauge in opposite slot to cut second set OF DADOES cut notch in fence (see margin) FIRST: cut grooves for miter gauge SECOND: cut end at desired angle width of , miter - \_ bar '_ 3/4"-THICK MDF OR PLYWOOD A An angle gauge is easy to make. It's a scrap with a groove in each side to accept your miter gauge. And one end is cut to the desired angle. First Angle Setting. To set the first angle, hold the miter gauge upside down, pivot the head so it's tight against the end, and lock it in place. Second Angle Setting. Flipping the angle gauge over and repeating the process automatically sets the miter gauge to the exact opposite angle. No. 25 ShopNotes 13 |


