36 - Miter Trimmer, страница 25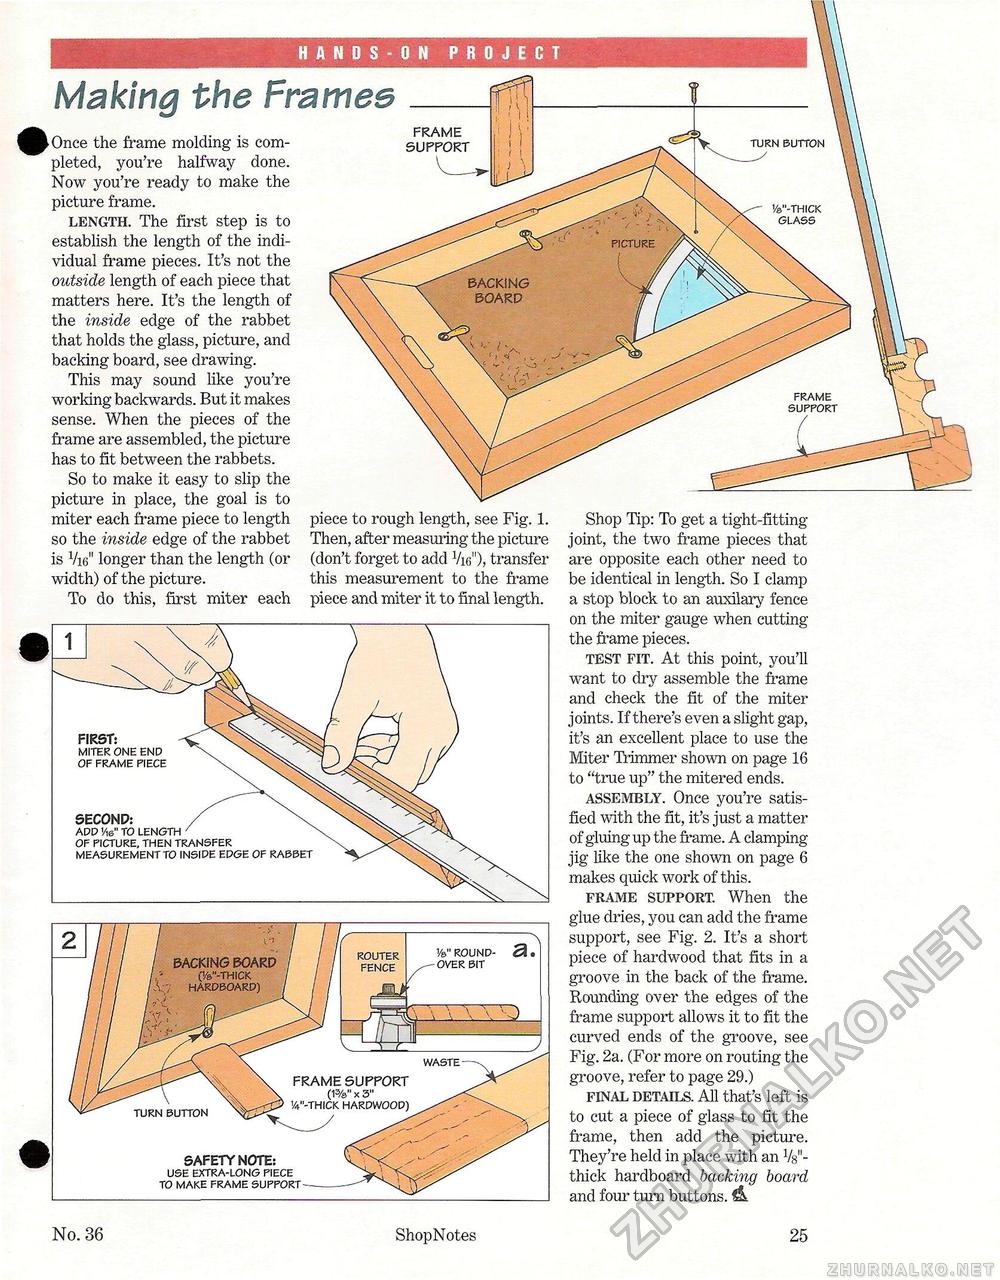
PICTURE BACKING BOARD HANDS-ON PROJECT Making the Frames KDnce the frame molding is completed, you're halfway done. Now you're ready to make the picture frame. length. The first step is to establish the length of the individual frame pieces. It's not the outside length of each piece that matters here. It's the length of the inside edge of the rabbet that holds the glass, picture, and backing board, see drawing. This may sound like you're working backwards. But it makes sense. When the pieces of the frame are assembled, the picture has to fit between the rabbets. So to make it easy to slip the picture in place, the goal is to miter each frame piece to length so the inside edge of the rabbet is Vie" longer than the length (or width) of the picture. To do this, first miter each FRAME SUPPORT turn button y </a"-THICK GLASS FRAME SUPPORT piece to rough length, see Fig. 1. Then, after measuring the picture (don't forget to add Vie"), transfer this measurement to the frame piece and miter it to final length. FIRST? MITER ONE END OF FRAME PIECE SECOND: ADD Vie" TO LENGTH OF PICTURE, THEN TRANSFER MEASUREMENT TO INSIDE EDGE OF RABBET Shop Tip: To get a tight-fitting joint, the two frame pieces that are opposite each other need to be identical in length. So I clamp a stop block to an auxilary fence on the miter gauge when cutting the frame pieces. test fit. At this point, you'll want to dry assemble the frame and check the fit of the miter joints. If there's even a slight gap, it's an excellent place to use the Miter Trimmer shown on page 16 to "true up" the mitered ends. assembly. Once you're satisfied with the fit, it's just a matter of gluing up the frame. A clamping jig like the one shown on page 6 makes quick work of this. frame support. When the FRAME SUPPORT (1%" x 3" !4"-THICK HARDWOOD) WASTE SAFETY NOTE: USE EXTRA-LONG PIECE TO MAKE FRAME SUPPORT Va" ROUND- 3 o OVER BIT glue dries, you can add the frame support, see Fig. 2. It's a short piece of hardwood that fits in a groove in the back of the frame. Rounding over the edges of the frame support allows it to fit the curved ends of the groove, see Fig. 2a. (For more on routing the groove, refer to page 29.) final details. All that's left is to cut a piece of glass to fit the frame, then add the picture. They're held in place with an Vs"-thick hardboard backing board and four turn buttons. iL No. 36 ShopNotes 25 |


