38 - Ring Boxes, страница 15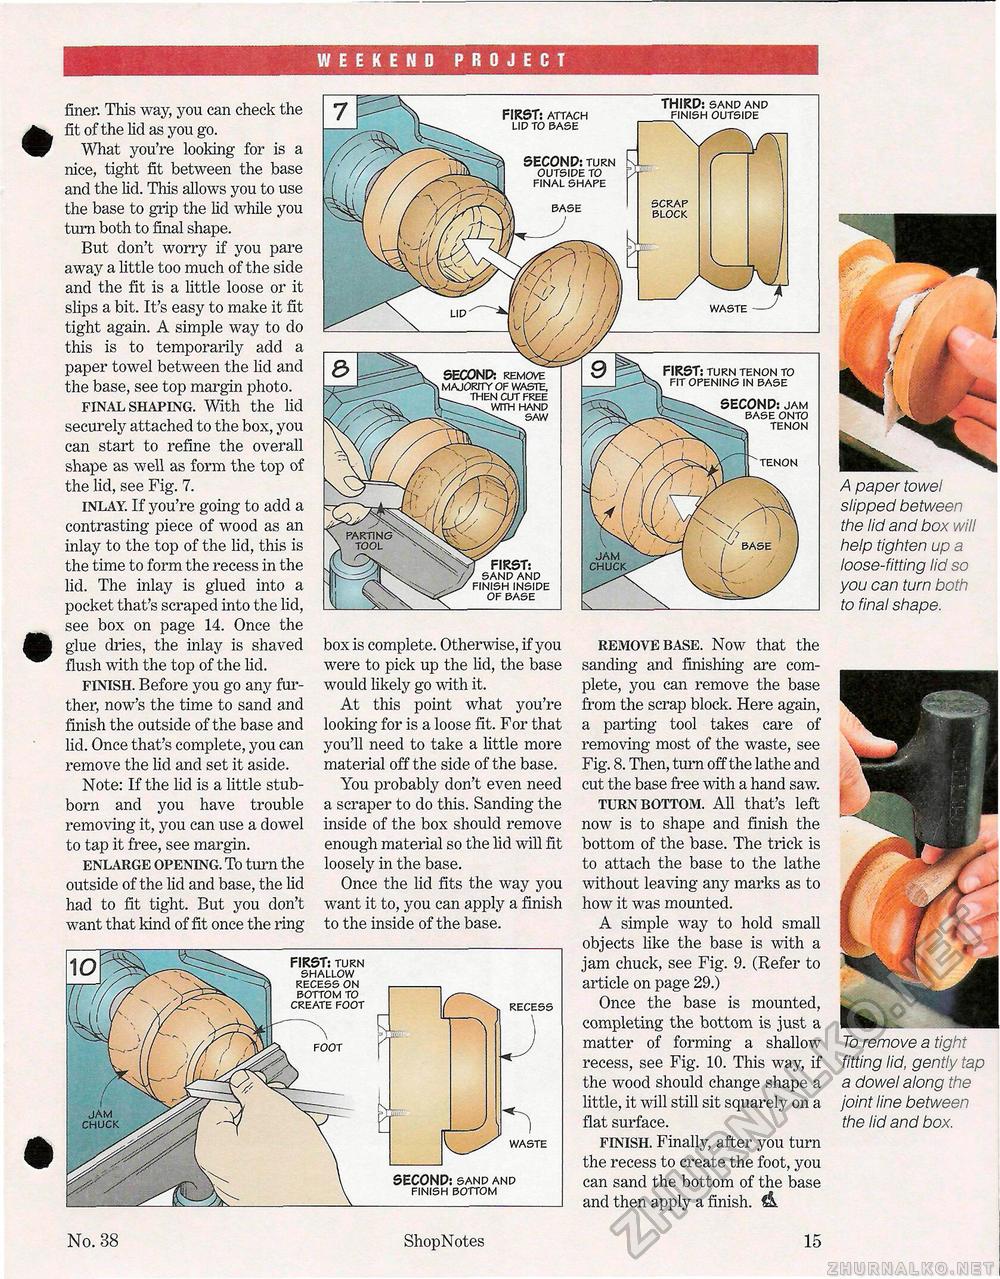
WEEKEND PROJECT finer. This way, you can check the fit of the lid as you go. What you're looking for is a nice, tight fit between the base and the lid. This allows you to use the base to grip the lid while you turn both to final shape. But don't worry if you pare away a little too much of the side and the fit is a little loose or it slips a bit. It's easy to make it fit tight again. A simple way to do this is to temporarily add a paper towel between the lid and the base, see top margin photo. final shaping. With the lid securely attached to the box, you can start to refine the overall shape as well as form the top of the lid, see Fig. 7. inlay. If you're going to add a contrasting piece of wood as an inlay to the top of the lid, this is the time to form the recess in the lid. The inlay is glued into a pocket that's scraped into the lid, see box on page 14. Once the glue dries, the inlay is shaved flush with the top of the lid. finish. Before you go any further, now's the time to sand and finish the outside of the base and lid. Once that's complete, you can remove the lid and set it aside. Note: If the lid is a little stubborn and you have trouble removing it, you can use a dowel to tap it free, see margin. enlarge opening. To turn the outside of the lid and base, the lid had to fit tight. But you don't want that kind of fit once the ring box is complete. Otherwise, if you were to pick up the lid, the base would likely go with it. At this point what you're looking for is a loose fit. For that you'll need to take a little more material off the side of the base. You probably don't even need a scraper to do this. Sanding the inside of the box should remove enough material so the lid will fit loosely in the base. Once the lid fits the way you want it to, you can apply a finish to the inside of the base. A paper towel slipped between the lid and box will help tighten up a loose- fitting lid so you can turn both to final shape. remove base. Now that the sanding and finishing are complete, you can remove the base from the scrap block. Here again, a parting tool takes care of removing most of the waste, see Fig. 8. Then, turn off the lathe and cut the base free with a hand saw. turn bottom. All that's left now is to shape and finish the bottom of the base. The trick is to attach the base to the lathe without leaving any marks as to how it was mounted. A simple way to hold small objects like the base is with a jam chuck, see Fig. 9. (Refer to article on page 29.) Once the base is mounted, completing the bottom is just a matter of forming a shallow recess, see Fig. 10. This way, if the wood should change shape a little, it will still sit squarely on a flat surface. finish. Finally, after you turn the recess to create the foot, you can sand the bottom of the base and then apply a finish. & To remove a tight fitting lid, gently tap a dowel along the joint line between the lid and box. FIRST: sand and finish inside of base jam chuck SECOND: remove majority of waste, then cut free with hand saw FIRST: turn tenon to fit opening in base SECOND: jam base onto tenon tenon SECOND: turn outside to final shape base scrap block THIRD: sand and finish outside waste FIRST: attach lid to base SECOND: sand and finish bottom jam chuck waste FIRST: turn shallow recess on bottom to create foot foot recess No. 38 ShopNotes 15 |


